In this tutorial, you will learn how to use the REAPER Audio statistics and volume plug-in called JS: Schwa: audio_statistic and JS: Utility/Volume. Retrieving and monitoring volume statistics data is very important for audio mixing and mastering for implementing proper gain staging. Let’s illustrate using two common implementations so that you will know how to use this plug-ins in your mix. This assumes you have fully installed REAPER in your computer as well as the needed plug-ins.
Adding or Reducing the Loudness of the Audio Waveform
This is perhaps the easiest and the most common implementation. There are instances when you like to reduce the volume of the music because it’s too loud or increase the volume because it’s too weak. You can do this easily in REAPER using this plug-ins. Before editing your audio, make sure you know the best practices of audio editing when you are adjusting your waveform to ensure the best quality. Below are the steps:
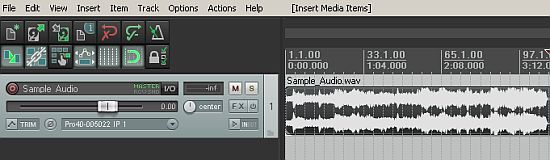
STEP1.) Launch REAPER and go to Insert — > Media file. You will need to load the audio you are going to edit. Find it on your hard drive. For best results, make sure the audio format should be a WAV file (16-bit or 24-bits audio).
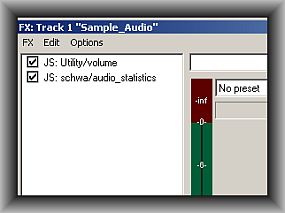
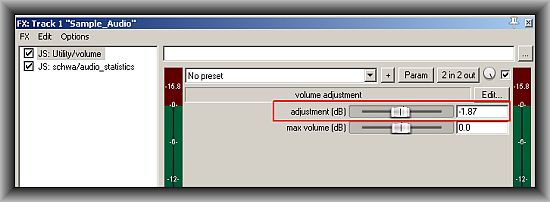
STEP2.) Click “FX” button of the track. In “Filter list” type: Volume. Click the JS: Utility/Volume plug-in to select and press OK. Next click “Add” then type “audio_statistic” to search the plug-in. Select the JS: Schwa: audio_statistic plug-in and click OK. This is how the FX is loaded (volume plug-in first then the audio statistics plug-in):
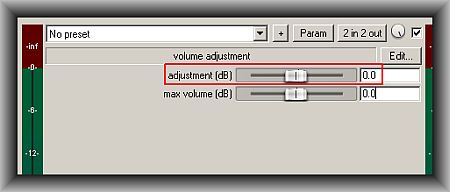
STEP3.) Make sure that the volume adjustment is initially set to “0” dB. This is important because you are not still adjusting the volume as of this moment.
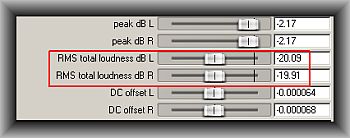
STEP4.) Play the audio from start to finish. The audio statistics plug-in will measure the current volume in RMS dB. Read this post if you don’t understand what does RMS means.
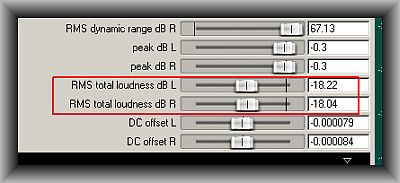
For example in the above data; the current loudness/volume is -18.22dB for LEFT channel and -18.04dB for the RIGHT channel. There are two data because the source audio is in stereo. Take the average of these, so it will be: (-18.22dB + -18.04dB)/2 = -18.13dB.
STEP5.) Decide on the new loudness level that wish you target. Supposing you would like reduce the loudness of the source audio to -20dB RMS. Then the required volume adjustment will be:
Adjustment (in dB) = Target loudness – Original loudness = -20dB – (-18.13dB) = -1.87dB
Go to Volume plug-in and enter -1.87dB as the adjustment value. This will reduce the overall volume of the audio by -1.87dB to aim -20dB RMS. Just leave the maximum volume to 0dB. However maximum volume setting is important particularly for increasing the volume so that it won’t exceed 0dB which results to clipping or distortion.
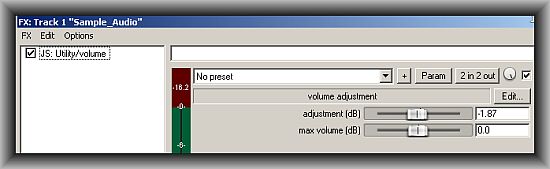
STEP6.) You can confirm that the volume adjustment setting is correct by playing the audio again. This time the RMS volume total should now be -20dB.
It shows that the new loudness level is around -20dB RMS which is correct.
STEP7.) Now you have the correct volume, you can then export/render the audio in the same format. First remove the audio statistics plug-in so that only the volume plug-in is left. These will speed-up the rendering process which you will be doing later.
STEP8.) Go to File — > Render. You need to assign a file name. Ensure that the sample rate, output format and bit depth should be the same as the source file.
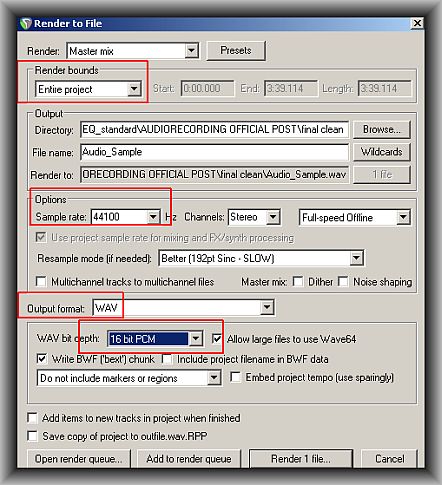
For example, in the above rendering settings; the output format is 16-bit/44.1KHz WAV. The source audio is using the same format. Finally click “Render 1 file”, and the file will be rendered. Now you have the adjusted file in WAV format, you can then convert that to MP3 using LAME encoder.


6 Responses
My version of Reaper doesn’t contain the JS utility volume or the JS schwa audio vst’s. Where can they be downloaded?
I don’t understand. Why do all this when you can just adjust the output levels of the FX or even just adjust the fader (so long as no clipping is occurring)?
Thanks Everett for bookmarking the site. I’m glad you finally made some progress to your mixes by implementing the tips illustrated in the blog.
Finally, I’m not pulling my hair over “soft and muddy” mixes! Thank you SO much for posting this and other Reaper mixing/mastering information on the site. It’s really helped a beginner like me to have fun and get a decent sounding final product. The difference between my mixes is night and day. I have you book marked as my mixing/mastering go-to site…
You are welcome. Thanks for dropping by.
Good article, and thanks for the tips. It is always good to learn something new…