I would like to share these tips to beginners or those struggling to master their own projects. This can help you find out which fundamental/dominant frequencies are used by different instruments using Notch filtering technique. Since a mastering engineer does not know what frequencies are adjusted/boosted or assigned by the audio mixing engineer; the mastering engineer could still determine what frequencies are to be adjusted during the audio mastering stage.
There are however a lot of techniques in spotting the instrument “sweet spot”. One method is performing musical instrument frequency analysis; a graphical plot that show where in the frequency spectrum does a specific instrument dominates. However, one drawback is that the audio wave you are working is already a summation of different musical instrument signals and the results are not conclusive.
Thus, what seems to be reliable based on my experience is notch filtering. To define, a notch filter is simply an operating mode of parametric equalizer to radically cut/stop a band of signals at an extremely narrow bandwidth range. My favorite setting for a notch filtering (high precision adjustment) is a cut of -48dB with a Q of 100.
The purpose is to detect where the instrument signals “significantly” attenuated or faded. I can do this by sweeping through the frequency range and when this point is found; this is the instruments most dominant frequency (also called “sweet spot” or fundamental).
Different musical instruments have different dominant frequencies which are assigned by the audio mixing engineer. For example, vocals and the presence of the music tends to occupy at a very wide range of 500Hz to 5000Hz, cymbals at 8000Hz to 15 KHz, kick drums at 50Hz to 200Hz, bass guitar at 30Hz to 200Hz.
But take note these are very wide frequency ranges. If it’s very wide, the mastering engineer cannot effectively cut or boost problematic frequencies if they occur in the mastering. In another way, the mastering engineer could also not emphasize important frequencies that the instrument should be boosted to improve its presence in the track. A good example is the kick drum and bass.
Some songs have bass guitar mixed at a lower frequency than the kick. But other tracks may have kick drums occupying at the subwoofer frequencies. Using notch filtering, the mastering engineer can isolate these two effectively. The mastering engineer will simply do notch filtering adjustment then sweep through this frequency range. Let’s have a demonstration:
Example #1: Find what specific frequency the kick drum needs to be adjusted in the provided audio sample.
Trial 1: Sweep to 200Hz
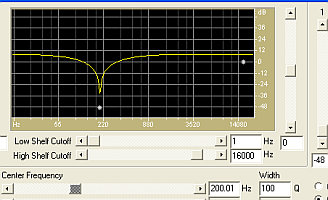
Audio result (observed the kick drum spikes):
Trial 2: Sweep to 90Hz
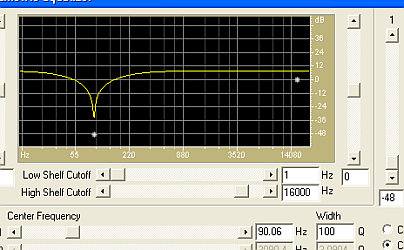
Audio result:
Trial 3: Sweep to 50Hz
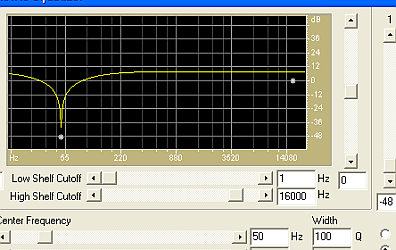
Audio Result:


No responses yet