Observations: Which do you think is the kick drum “sweet spot” or dominant frequency? For the 200Hz, you can still hear the kick drum spikes as well as the 50Hz. The correct frequency to be adjusted is 90Hz. It is because at 90Hz, there is a substantial loss of kick drum sound. This implies that 90Hz is the location of the kick drum center frequency. During mastering session, if there are any EQ related adjustments on kick drum (example using a multi-band compressor or any EQ tweaks); you can simply adjust at 90Hz then apply the desired cut and boost in dB. This will have the most profound effect on kick drum sound.
Example #2: Find what frequency do you need to adjust “presence” elements (vocals, etc,) if it’s somewhat buried in the mix and your mix sounds a bit muddy.
Trial 1: Sweep at 3000Hz
(Since these types of frequencies are wide-band type of signal, you can decrease the Q from 100 to 25 to spot it effectively)
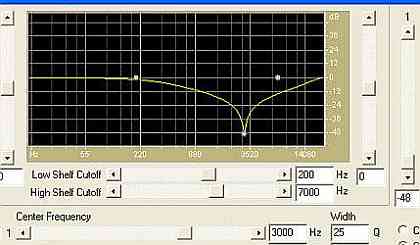
3000Hz notch filter sweep
Audio result:
Trial 2: Sweep at 1500Hz
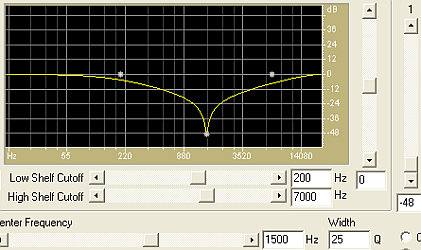
1500Hz notch filter sweep
Audio result:
Trial 3: Sweep at 800Hz
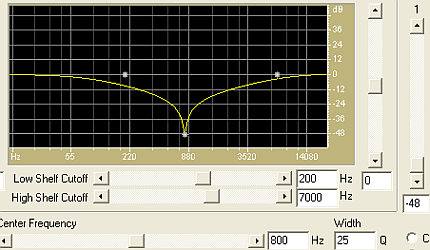
800Hz sweep
Audio results:
Observation: My choice is at 3 KHz since the vocal sounds so weak at this point (try listening with low volume) and there is a substantial loss of audio clarity and musical presence. Therefore, in any presence adjustment during mastering for this specific track, you can apply a wide band boost center at 3 KHz, for example: 3 KHz, Q=0.8 +1.5 to +3dB, this will have the most profound effect on improving clarity and presence.
Content last updated on August 15, 2012