Vocals are the most important instrument in any audio mixing work. In fact if the vocals are not properly mixed, you can observe a difference between good and poor audio production work.
Mixing vocals is therefore a big priority in the audio mixing session. In this article, I will share my personal techniques when it comes to mixing vocals. I will illustrate those essential principles I have in mind to come up with greatly produced vocals.
Bear in mind that this is not a one-setting-fits-all approach and should only serve as a starting point or guide in mixing vocals. It is because different vocals and genre takes different approach in mixing.
Start with the tips illustrated in this tutorial, and then tweak further to get the best vocal sound out of your mix.
Reminders for doing the vocal adjustment:
To test if the vocals are now mixed correctly with the rest of the instruments ; set the overall mix volume at low to moderate (not loud). Try to assess whether you can hear the lyrics properly. If you can hear the lyrics at low to moderate volume, chances are the EQ, vocal track levels, panning and compression are done right.
Now switch your overall mix volume levels to moderate to slightly loud for a short time. If you find out that the vocals are too strong or dominant, slowly apply some reverb until it sits right in the mix. Listen again at lower volumes to make sure you can still hear the vocal lyrics and not drowned with the reverb. This is way I adjust or mix the vocals for best results.

First Principle: A greatly recorded vocals will make it very easy to professionally produced recorded vocals.
Explanation: Garbage in–> Garbage Out. If the recording is bad, it will definitely sound bad in the mix no matter what effects or surgical procedure you do for the vocals. It is why mixing is very different from recording when it comes to technical aspects of music production. When you say high quality recording it says, “It captures the best performance without any noise, interference or clipping”
How do to this? I do this by testing the vocal level first before recording. The objective is to record the vocals at a maximum level without clipping or distortion– specifically around -40dB to -6dB (maximum peak or the loudest part of the vocals) at your audio interface hardware level meters NOT on your DAW level meters. Some audio interface do provide a recording level meters in the form LED display. They even includes dB units on them for easy reference, use them to get the best recording signal possible for your vocals.
This allows maximum signal to noise ratio and best dynamic range possible for your vocals. Once you have set the levels, you can now proceed to recording. September 27, 2011 UPDATE: You can find details on tracking vocals correctly on this post.
It is highly important that recording should be completely raw and without ANY EFFECTS including reverb. Some engineers add reverb only feed to the vocalist headphones to ensure that she feels it LIKE A PRODUCED SOUND, so that she can sing with confidence.
A real recorded vocal from a professional studio is DRY. Without any effects I mean. It is highly important that if the recording is done digitally, it should be recorded above CD quality, this means going above the normal 16 bit 44.1 KHz standard. Popular sound cards such as M-Audio Audiophile 2496 PCI Digital Audio Card can get 24 bit 96KHz. But PCI soundcards are old school technology for home recording; you should now be using either a USB or Firewire audio interface and record at least 24-bits/48KHz for your vocals. You can refer to this post for the recommended audio interface if you are using Windows. Aim for the one that has an input level meters on the hardware so that you can see whether the levels are clipped or not.
Second Principle: Clean up the audio first before using it in the mix
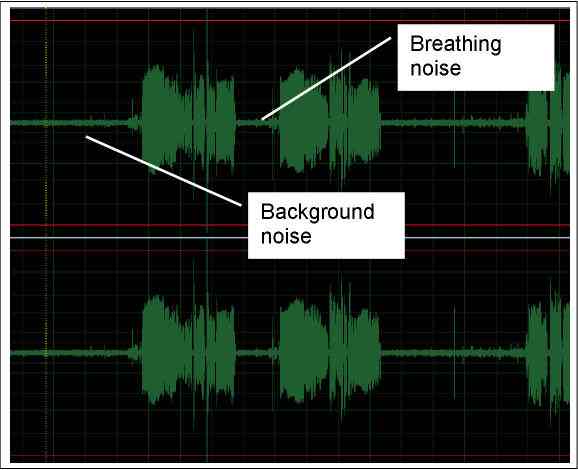
Now the recording is done, open it up using your favorite audio editor (I am using Reaper Digital audio workstation). Then zoom it out and remove any background noise and unusual breathing related noise. Noise normally occurs in the beginning and in the end. Breathing noise (should sound minor) occurs during the pause of the stanzas, or in the way to the chorus of the song.
You can refer to my past tutorial on removing noise for details. After noise removal, since there is a loss of volume, you can normalize the wave to bring up the signal to a reasonable level.
IMPORTANT WARNING: In this step; you are editing the vocals destructively, if your DAW comes with non-destructive editing features such as volume envelopes then use it first. Only do destructive editing if its beyond the capability of multi-track/DAW editing features. And do not forget to back up your vocals when you perform destructive editing.
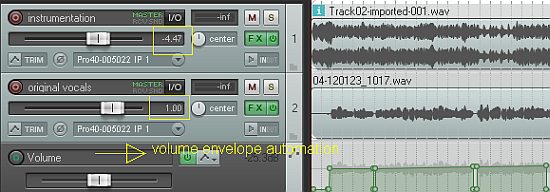
Personally I would “discourage” you from editing your vocal track destructively (using edit view or any audio editing software). If you are using a DAW software like Reaper, you can easily implement volume envelopes to silence the beginning or long pause in your vocal tracks, such as shown in the screenshot below:
You can read this tutorial for more details on this technique.
Third Principle: EQ first before Compress
Believe it or not, a vocal does not need serious effects like other instruments. The simpler your effects used, the better will be the produced vocals. It is highly important to EQ first using this setting:
Cut 200 Hz (high pass filter)= -6dB
Boost 3000Hz Q = 1 = 3dB
Boost 15000Hz Q = 1 = 3dB
Take note that if you take the summation of cut and boost, it is literally equal to zero. So if you cut 6dB and I boost 6dB, it does not change the volume. The objective is to preserve the volume by not doing drastic EQ changes.
However, concentrating your EQ work on vocals alone does not make your overall mix sound good. You need to pay attention to other instruments in your mix in such a way they do not compete with the vocal frequency range. You need to drill a hole in other instruments frequency range occupied by the vocals. This would make the vocals to sit properly in the mix.
In this case, I would “strongly recommend” that you read this guide on complete EQ settings to start when doing audio mixing. It contains all starting EQ tips for the most common musical instruments used in the mix. By working on that, you can obtain a very clear vocal in your mix while not compromising the sound quality of your other instruments.
For compression, I’ve shared some techniques here pertaining to vocal compression tips. Personally I like the Sony Wave hammer plug-in in Adobe audio, presets to voice. It produces some of my finest mixed vocals.
Also, I am using Waves C4 compressor and pop vocal preset. It simplifies all compression settings you need to do for your vocals.
Fourth principle: Be very conservative with reverb
Frankly, the mix vocals I used has a very low amounts of reverb. This could be due to the fact that I am mixing for rock, country and pop which audible reverb is not very popular unlike in other genre.
But not only that, having low amounts of reverb makes the vocals stood up and sounds very strong (in your face). You can easily captivate the listener with strong vocals with low amounts of reverb. I use Sony ExpressFX Reverb, set to Plate reverbs. Plate reverbs is highly recommended for vocals and only set it:
Room size: 30
Liveliness: 10~15
%Original (dry mixing) = 85%~90%
%Reverb = 15%~10%
Also I use reverb plug-ins from Waves and Focusrite, they do sound great and I would recommend setting the wet percentage at 30% to 40% at a start. But this plug-ins are not free, also if you buy some Focusrite audio interface, you can get a free Focusrite plug-in suite that includes the reverb plug-in.
One great way of learning how to apply reverberation effects is to listen to an actual sample. You can read this tutorial adding vocal reverb. It contains some important illustration and audio samples about how vocals could change with different reverb settings.
Then once you apply some setting; listen very carefully to the mix and avoid over-doing the implementation of reverb. Sometimes a small reverb is enough, in some applications moderate reverb is also necessary. One of the golden rules of implementing reverb on vocal mixing are as follows:
a.) Very slow ballads (slow tempo songs) – moderate reverb.
b.) Fast tempo songs (punk rock, alternative music, country music, etc.) – low reverb or even no reverb. Feel free to experiment what sounds appropriate for the mix.
c.) Moderate tempo – moderate amounts of reverb.
Do not be obsessed with reverb settings, use your ears to judge the setting. It is also important that you consider the blending of vocals and its reverberation with the rest of the instruments in the mix. You cannot implement the same reverb settings on all tracks otherwise it would sound squashed and muddy.
In this case, you should learn how to apply reverb to a mix properly. You can read a tutorial about this topic here. And then you will learn that different instruments need different reverb settings. It is being influenced by the following factors:
a.) The track location in the stereo field
b.) Tempo of the song,
c.) Genre
d.) Natural frequency of the instruments.
Content last updated on October 22, 2012


44 Responses
clogged it
Agreed. Panning exactly the same mono recording from LEFT and RIGHT does not contribute something better to the stereo ambiance of the music. It needs to have some contrast to make a difference. It is why double recording and overdubs are important in modern music production.
I that feel panning strings either hard left or right may not supply the necessary surround to stereo, mostly if u r listenin with headphone. It will be a one directional sound , favouring one side.
Hi Jason, I’m glad to know you find it helpful. Yeah me too; before it is hard to learn recording and mixing without some initial sets of rules/settings. I do it in the hard way before. I spend months experimenting what sounds great at least to my ears. The tips in this blog and this tutorial is definitely a product of experimentation. I shared it to others in the hope that they can save time and they have something to start with. Happy New Year!
LOL I meant ears not eyes.
Ive never heard someone say u MUST boost/cut at __hz or khz or that u must EQ before compress (or even the other way around). A lot of recording is subjective and, depending on the vocalist and the sound your going for, things can be done in a million diff ways.
However, its nice to see someone give some TIPS on a sound that THEY like. A lot of tutorials will tell tell u what I just said….”experiment!”, “do what sounds right”, “there are no rules so use your eyes” lol. So its nice to see some SPECIFIC advise and I’ll def bookmark this page and try out those settings 🙂
OK thanks. Just beep me back if you know!!!:)
I never mixed vocals in rap so I cannot write a tutorial for this. But the details and principles are shown in this post. EQ and compression for rap vocals is similar to those used in other genre. But I will look into this,probably i will try mixing some rap vocals to see how things work.
mmmm..
can I have a favor?
can you write the steps in mixing vocals in rap?
plsss
No. You will simply boost around 3dB gain with Q=1. This is not a shelf adjustment.
regarding the Boost 15000Hz Q = 1 = 3dB, is that with a shelf?
Hi,
Thank you for liking my blog, you can refer to these following tutorials for the answer:
https://www.audiorecording.me/pre-fader-vs-post-fader-aux-sendsreturn-and-insert-fx-how-to-use-it.html
https://www.audiorecording.me/how-to-use-reverb-unit-with-mixing-console-using-aux-sends-and-returns.html
https://www.audiorecording.me/how-to-connect-compressor-eq-in-mixer-inserts-and-reverb-in-aux-sends.html
Hi Emerson,
Love your blog so much, want to know if its necessary using the send fx channel in adding reverb or delay, and whats the work of the send effects channel?
Actually what if the voice is baritone or alto, bass? Applying a 400Hz high pass filter might attenuate a portion (although not everything) of these low frequency vocals significantly. Then the result is that the vocals sound so thin. Then this setting is not for everyone.
Hi
Love these blogs and tips, I was wondering if anyone knows how to run a 400Hz High Pass filter on Adobe Audition for Mac…
According to production guru Dave Foxx, pretty much all the music is going on below 400hz therefore a high pass filter on the voice would make it sit better in promos etc
Hope you can help!
Yeah probably but you cannot assume those are the best settings. You should use your ear to adjust and experiment. I know it takes time but that’s the only way to really correct audio problems. For your second point, if you cut it does the nasality of the voices gone? If yes, then problem solved, if not sweep the EQ around and find the best cutting spot.
Best on my experience, somewhere around 800Hz and 3000Hz are the frequencies to check. Always use your ears to judge the correctness of an EQ setting.
Great blog.
Rather newbie question: I am using Logic Pro. I am only planning to use the software instruments – and I noticed that these have EQ and compression already set (and some more settings). So when I record my audio, I apply EQ and compression (and some reverb) to my audio track only, and avoid altering instrument settings – because I assume these are the best settings for the instruments. Is this ok?
Second point: I have a nasal voice, so I cut frequencies at 1500 and 3500 with a Q of 1, -9 dB. Is this OK?
I’ll try to post some recordings, but my compositions will sound a bit different because these are not in english, and the scales are not standard western music scales.
Again, great blog. Keep it going. Best wishes.
OK, Ill try this again, cause my comment got rejected last time :P…I think that I’m recording well with one mic, but I want the opinion of a professional. Please look at least one of my songs… and give me some tips, cause I still don’t feel like I’m where I need to be
thank you!
link to page: soundcloud.com/jamtaktics
Yes, if it sounds good then its right. Lead vocals are often pan in the center while the backup vocals are either left or right. You may want to make closer to the center like 20% to 30%.
Hi Emerson,I mix vocals by leaving the lead voice at the centre and pan the backup voices 40% right and left.Is this Right?
Hi Ron,
Of course, its not a one size fits all EQ , any audio mixer will know. Its because the moment they set at 200Hz cutoff then the vocal does not sound good. It is a sign that the setting itself is not optimal. So it make sense to sweep the filter freq to find the optimum spot. I used that 200Hz cutoff for a specific vocalist, it will be different for other singers. It is because some singers might have high or less bass content in their vocals. Thank you so much for taking the time to comment.
Good basic settings, but a one size fits all EQ, particularly a recommendation to cut vocals below 200hz is not at all good. I’d rather advise a person to sweep that filter freq from 200Hz to the minus side until excessive bass is rolled off. A 200hz fixed cut for all voices, all genres is a recipe for disaster. There are times when you can roll off below 80-100 and acually give a gentle boost at 200 with a high Q (narrow bandwidth). All depends on voices and genres.
Hi Mon,
You can read this tutorial: https://www.audiorecording.me/recording-vocals-at-home-in-mono-or-stereo-how-to-record-vocals-properly.html. I hope it clarifies everything. Thanks.
Hi Mon,
I will write a tutorial about this..Thanks for your feedback.
Hello Emerson,
I can’t find anywhere else to post this question.
It’s about recording vocals. Most other forums I’ve read says that MONO should be for vocal recording.
DO you record vocals in mono?
Thanks again for the help.
Mon
Hi Falgunan,
I have added a new section on how to use this website, it includes guides on how to start recording from start to finish and that includes mixing. I am on the process of creating the mastering guide but you can start using it. This is the URL: https://www.audiorecording.me/getting-started-course-outline-in-tracking-and-mixing.html
Thanks. Cheers.
Have you ever used multi-band compressor for tunning live vocal? If yes, how do you do it?
thanks
enjoyed your blog a lot! im a newbie in recording like a pro but im already using adobe audition for months LOL! im thankful I tried searching for guides like yours! but I hope you do also have guides on where and how should I start recording upto finish! thx and hoping for your reply!
Hi Diego,
Your tips are definitely helpful and I agree with it. There are times when I take out breathing (or minimize) if its too excessive and distracting to listen.. Yeah about recording vocals hot and I never record at -3dB to 0dB range. Instead I adjust volumes to make sure it peaks around -10dB to -8dB for the loudest vocal peak of the tracks which is fine and a lot of headroom. Thanks for visiting my blog.
I like the tips though I felt differently on a few things.
1. I would never record vocals as hot as possible before clipping. That would be shooting yourself in the foot. If you plan on mixing these vocals and compressing them you completely destroyed your headroom. I feel vocals should be recorded right in the middle. Not too hot and not too low due to ground noise.
2. I would ever take out breathing in vocals. It makes the vocals sound real. Without the breathing it leaves the vocals sounding artificial. The editing that should be done should be extra noise in the begining and end of every take with a fade in and out.
3. I agree with the idea of not too much reverb but i feel your wet mix in reverb should be at 100% and adjust the levels from your fx sends. This is because of phasing.
thanks for this blog
Hi Essentialz,
Wow, I just can hardly believe you have basically complete the recording using a laptop, mic and little preamp. I did hear your songs in Youtube and the following are my constructive comments that can further improve the quality of your recording:
a. Fat bass drum- you need to cut down the fat bass frequencies at 400 Hz, Q=2.0 , cut it with -6dB to -9dB. This will make the bass sounds so fat. You do not need to compress your fat bass drum. So you need to balance the fat bass drum not to be too dominant in your mix.
b. Vocals – your vocals sounds too hot. You can either lower the vocals volume just a bit in order to balance with the rest of the instruments.
c. The EQ of your vocals is already OK.
Keep up the good work!
Hey I’m gonna leave a link to my YouTube, http://www.youtube.com/officialessentialz . Ive been recording for a while with just my laptop, mic with pop filter and little preamp that i picked up. If any could listen and has some tips please help me out, i would really appreciate it.
Bigsean,
What a cool beat man! http://www.youtube.com/watch?v=YcsLcnlY0rc , keep up the good work.
Hi BigSean,
No question about purchasing condenser microphones for recording excellent vocals. It is the standard way of recording vocals for professional recording studios, those big studios used by the recording labels.
But, is there a big difference? The answer is NO, based on my experience, with proper miking, EQ, compression and mixing techniques, listeners does not care whether the vocals has been recorded with condenser or not. You can record great vocals using dynamic microphones and with proper techniques applied (discused in this blog), there is no big difference provided you know how to work with it during recording and mixing sessions.
By the way; this is my YouTube page i would love to hear some feedback about my music in general thank u: http://www.youtube.com/kind1277
hey emerson i really really enjoy and learn from this god bless u man god bless u i have one question plz …is there a big difference between the dynamic and condencer? cuz im having a dynamic mic and i wanna make excellent vocals is it possible?
Hi Daniel The Translator,
Sorry it takes me a long time to reply, I’ve been very busy for the past weeks, anyway I have listen to “Egipto” and “Chinesa” here: palcoprincipal.sapo.pt/dharma , is that the songs you mean? All I can say is that they are fairly good rock recordings, though it seems that the drums lost some punch. But the vocals are considered OK for a rock recording (partially buried in the mix). However the songs can be improve.
Hi Bill,
A high pass filter is a filter that allows to pass all frequencies above a certain cutoff while attenuates frequencies below it. If you have a high pass filter set at 100 Hz, it will attenuate below 100 Hz while passes above that frequency value.
Low is around 50Hz to 150 Hz ,mid-low is around 150 Hz to 400 Hz , mid is around 500Hz to 4000 Hz. Mid-High is around 4000 Hz to 9000Hz, High is around 10000Hz to 16,000Hz.
Could you please explain EQ..
What is a high pass filter and what frequency goes with it as well as lows,low mids, mids.
Im very confused.
Thanx
Hi Emerson. Thanks for everything. You can listen to our two songs at: palcoprincipal.com/dharma It’s the two first songs on the playlist. Keep in mind that the drums were recorded with four vocals mics. Tell me what you think. Best regards.
Hi Translator,
No probs,once your recording is done, upload it to your music page, it could be any like MySpace, come back to this blog and send me a message. I will check that out.
Thanks for reading my blog.
Cheers.
Hey. How are you? Great blog man. I mean, I've been like searching for this since ever lol. Awesome work man. Thanks for this, really. My band has just finished its first recording, and I'm in charge of producing it, but, well, it's my first time. I'm using Adobe Audition and Reaper, and a ton of Plug-Ins. If I have any doubts, can I send a comment and ask you? Wouldn't you mind? I promise to send the songs when they're done 🙂 Hugz from Portugal.
Hi Keith, thanks for following the blog post! Anyway I do agree with different EQ needed depending on the vocalist.
However, this is looks like a case to case mixing scenario.
Intelligibility of human voice is very critical at 3KHz range which I prefer to have boosted to get some presence in vocals for clarity of the lyrics..
Again a case to case mixing scenario and you provided me a good example such as nazal sounding vocalist.
I enjoy the blogs! I’m a little confused as to how you could recommend a “one size fits all” approach to EQing a vocal? Of all the instruments, it’s the most complex. Different EQ is needed depending on the vocalist. I’m sure you know this and you’re trying to give people some pointers, but these settings are not universal. In fact, if you have a nazal sounding vocalist, you may have to cut 3khz to smooth it out, not add 3db at 3k. hmm.
Just my thoughts. Keep ’em comin’!