Noise is unwanted in recordings; in fact they do exist and should be removed. Noise in recordings can surely ruin the quality of the mix and decrease the professionalism of your work.
This post covers the noise removal procedure using Adobe Audition 1.5 using Edit View (if you are doing multi-track, double-clicking those tracks in detail brings you to the edit view of the waveform per track). If you are using another audio editing software, then the process should be fairly similar. For details about the noise removal process in your own software, refer to the manual and read this post for some tips.
The actual process
Step 1: Identify the portions of the recording where noise is the only signal.Looking below, I have planned to have at least 1 to 3 idle seconds before I start recording , the purpose is to have portions only for the noise. You can see below that the noise is being highlighted in the beginning portions.
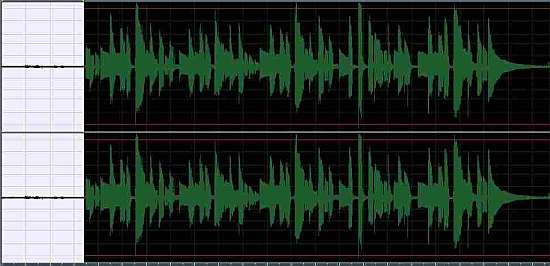
You can hear the mp3 equivalent of this “noise + recorded guitar track”:
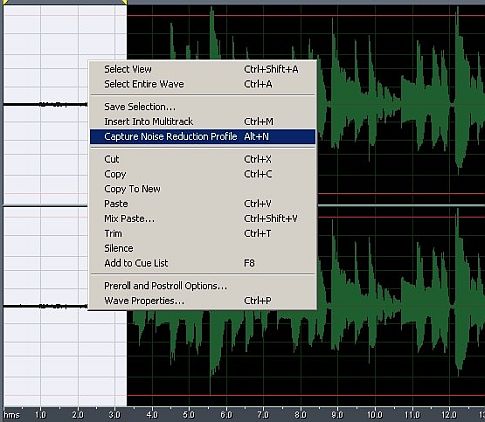
Step 2: Capture this “noise only” section using a noise profile data in Adobe audition. This can be done by clicking “Capture noise reduction profile”.
Step 3:Go to Noise Reduction feature in Adobe Audition 1.5, you should see a very similar window as shown below. You can use my noise reduction settings, it works fine. Take note that in the graph, the green dotted below the yellow lines are the noise signals. It is very important to have a profile that consist of “noise only” signals, to avoid degradation of the true music signal that is being recorded.
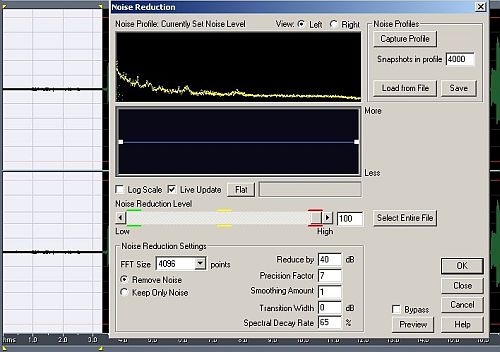
Step 4: In the Noise reduction menu, click “Select Entire File”, then click OK. This will apply all the settings and processing on the entire wave signals, including the true musical signals that is being recorded. After this noise reduction processing, you can now see that the noise on the beginning portions has been removed.

Listen the guitar track without noise, as you can hear, it sounds clean and pure, no hissing and humming.
Golden Rules of Removing Noise in Recordings
1.) If its poorly recorded because of noise. It is much better to re-recorded it without noise. There are lots of reasons why the recording is noisy which can be as follows (for details of the following reasons, read the related tutorials at the end of this article):
a.) Not using balanced connection and cables.
b.) Using consumer equipment and not professional music production gears. This does not mean that you should buy high-end gears to solve this problem. For example, there is a big difference in noise reduction and clarity if you are recording using PCI/onboard soundcards comparing to the audio interface designed for professional music production like these gears.
c.) Mismatch in the impedance somewhere in the signal chain.
d.) The recording environment is already noisy. To resolve this issue, consider sound proofing your existing live room.
e.) Some hardware issues with your computer or recording equipment that causes noise. This can be a grounding problem that can cause some hum in your speakers or can be captured during recording.
2.) Nose reduction feature offered by many recording software (such as included by Adobe Audition) can only be useful to a certain extent. Overdoing noise reduction takes a lot of original content to the audio, thus the recording don’t sound good anymore despite being noise free.


2 Responses
Great! Thanks for that. Anyway I get used to Adobe Audition NR system. I have been using that for 4 years already same with Sony plugin. They sound good to me.
Excellent step by step!
I did a screen capture video using Audacity, that will help expand on this as well:
http://someaudioguy.blogspot.com/2007/11/beginner-audacity-tutorial-with-video.html
Do you like the NR in Audition?
I haven’t tried it yet, and am kind of partial to Sony’s plugin.