Professional Audio Mixing is basically two steps: EQ and Compression. Different instruments require different compression scenario. To those that do not know what is compression, it is all about controlling the peaks of recorded signal.
The easiest way to understand how compression can be useful to a mix is vocals. Vocalist even professionals have tendency to sing very loud in some portions of the song. Now without compression, this vocal track could be very annoying. Compression sets balance by automatically compressing signals when it reaches a certain level.
Some Basic Introduction about Audio Compression
It is important that by applying the suggested settings in this tutorial; you know how a compressor works. As well as its parameters like the threshold, compression ratio, attack time and release time.
If you would like to know more about this audio compression related terminologies, you can refer to the following very useful tutorials:
a.) Beginner tutorial on Audio Compression– illustrates the most basic function of a compressor in handling input audio signals.
b.) Understanding attack and release – illustrates the technical details behind these important parameters.
c.) Dynamics compression implementation -an example tutorial on the use of compressor basics on Adobe Audition 1.5. Concepts on this tutorial can be applied to any DAW software.
My major rules in compression is simple, compression takes away signals and sound quality. It is a fact, that if overdo it will drastically reduce the power of the sound. Now let me give you my tips on compressing common instruments in audio tracks.
Compressing vocals in the mix
I use the presets of Sony Wave hammer-Voice settings. This plugin is available in Sony Creative Sound Forge 10. If you have this installed in your computer, since this a Direct X plug-in, it can also be added to Adobe Audition or other DAW that accepts Direct X plug-in.
The characteristics of these compression settings are this:
Attack time- 5 ms
Release time- 50ms
Threshold- -10dB
Compression ratio – 5:1
Take note that attack time is very short, it is because vocals is highly transient in nature, the notes of the vocal is very short, so to capture effective compression in vocals, one must set to short attack time. The release time is a bit slow. It is because when a vocalist sings loud portions of the song, it will tend to last a longer time as well. It is an odd song to have a very short loud portion of the vocals. Threshold of the compressor is the level of the signal at which compression starts. For vocals, I need it to set to -10dB because more than -10 dB in vocals is already very dominant in mix. The compression ratio is 5:1; this means a five times reduction in the signal when it reaches -10dB or above. Now that’s a bit compression to lower the volume of the loud peaks.
Of course, if you do not have a wave Hammer compressor then you can use any compressor (even free compressor, make sure though it sounds good) in your DAW mixing software. Then start with the settings provided previously (threshold, compression ratio, etc).
The above setting is not a one-fit-all solution for all vocal mixing. You still need to use your ears to do some adjustments. The common scenario is to have a threshold set too high or too low for the vocals you are currently mixing. So start adjusting the threshold first before the other settings such as compression ratio, attack and release time.
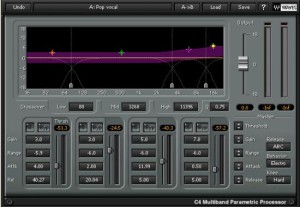
Currently today, I am mixing vocals using Waves C4 plugin. It is currently a very reliable plugin and takes away a lot of guesswork in the adjustment of threshold, ratio, etc.
My favorite setting is using the C4 Pop vocal preset as shown in the screenshot below:





33 Responses
I’m not sure..but it works with Adobe Audition 1.5 which has much less user-base than Pro tools. Just try it to see if works. Good luck.
Are these Sony plug-ins compatible with Pro Tools?
Thanks for the setting tips, I’m learning how to use the compressors in logic, so far your vocal and guitar settings are balancing things much better. going to try out the drums next. Cheers!
5 to 1 I don’t go over 2to 1 very often I have cubase so if it is that bad I pen edit like you said comp take away sound or bounce to another track and chase it with the slider.
Yeah probably, I have some ideas on how to mix accordion with compression and EQ. I will write a post on this. Thanks for the idea.
Hi..I really like your tips. I wonder if you know how to compress and EQ an accordion? Thanks.
Hi Andy, thanks for the feedback. I did encounter a problem before using sony wavehammer when I reinstall my OS, I lost my Sony plugins and installers. What I did is to use the Sony wavehammer compression settings (attack, ratio, etc) in other compressor plugins such as the Focusrite plugin suite and it works.
I think this tip can be helpful to those that cannot have Sony Wavehammer in their DAW during mixing.
thanks for the info. I think it works only audition-cool-edit-pro-2 like versions… I was asking about audition cs5.5. anyways I also use cool edit pro 2, so no problem using sony wavehammer.
Thanks! and thanks for this article it has really helped!
Yeah that will do. The key is to understand the principles that produces that certain compressed sound and then work further to get the sound you want. Audio mixing is all about experimentation and what sounds good to your ears. Good luck.
I don’t have a audio interface at this time. Hoping to get some work soon and was thinking of getting a zoom R16. I actually just got Reaper a weekago. I’ll have to mess around with the comps that come with it. Thanks!
Hi Steve,
Do you already have an audio interface? It is because I was thinking I could test some free plug-ins that comes along with some audio interface. These plug-ins could sound great but with few tweaks.
For the meantime, you can try using any free compressor (like those that comes from Reaper Digital audio workstation) but use the wave hammer settings provided in the tutorial. Of course not of all those settings could be present in free plug-ins but at least the essential settings of a compressor are covered like threshold, compression ratio, release time, attack time.
Cheers.
Emerson
I tried the vocal technique and it was perfect for the vocals. But I have a problem. Sound forge is way to pricey for me and that seems to be the only way to get wave hammer. Do you have any alternatives to get that sound? free vsts would be great but not completely necessary. Thanks so much!
Please read this tutorial: https://www.audiorecording.me/how-to-manage-remove-directx-plugin-in-adobe-auditioncool-edit-pro.html
Thanks!
I just want to ask:
since you mention as below,
“Compressing vocals in the mix —–I use the presets of Sony Wave hammer-Voice settings. This plugin is available in Sony Creative Sound Forge 10. If you have this installed in your computer, since this a Direct X plug-in, it can also be added to Adobe Audition or other DAW that accepts Direct X plug-in.”
How did you import the wave hammer to use in adobe?
Please show me step by step thank you.
You can start here: https://www.audiorecording.me/how-compressor-attack-and-release-works-a-beginner-tutorial.html
Actually, the threshold is independent of the compressor attack and release time. But all attack, release and threshold is strongly dependent on the audio material being mixed. You do not need to calculate either. You simply need to use your ears. If you cannot use your ears to judge audio compression. You will have a hard time to become a successful mixing or recording engineer.
Hello Emerson, is there any relation between compressor’s attack time and release time to the threshold of the compressor? If so how do i know how to set the attack time corresponding to the release time, or release time to the attack time? I need ur help in calculating betwn the two. I am using waves c1 comp. Thnks in advance.
Would the compressing vocals in the mix settings be the same for a compressor in the vocal chain while tracking?
Emerson,
Thank you very much for sending me that tip on piano compression. I know that experience will be the best teacher but I’m starting to see the big picture now about compression!
Hi Herman,
I just wrote a guide regarding the compression settings for piano here: https://www.audiorecording.me/how-to-mix-piano-keyboard-panning-eq-and-compression-techniques.html
I hope it answers your inquiry, thanks.
Cheers.
What would be some compression settings for piano. I notice that you didn’t mention. I’m reading a lot not much compression is given to the piano anyway…
hi,
it is very nice tips. can you help me with one of my problems. i have just bought korg d3200 and my recording just goes well except the final mixing is abit silent. can you pls tell me what should i do with that? can i make it louder on my mixer or do i need to master my fineshed songs with another mastering software?
thanks in advance
Hi Hulinning,
I will write a separate article on the use of Expand/gate setting for the compressor. You can subscribe to the blog feeds to get the latest update. Thanks.
Hi,
In compressor, there are also Expand/Gate settings.
What settings do you recommend for these?
Thanks
Hi DjM@NjOl,
Yeah sure, I will write a tutorial on this. Please subscribe to the feeds to keep you updated. Thanks.
Cheers.
Great Tutorial. Thanks tonss. Could you post a tutorial for EQ with sound forge 10.
Thanks Again.
Hi Partha,
I will write a different posts in how to mix, compress and EQ sitar. It will be available in this website soon as a tutorial. Do not forget to subscribe to my feeds, just enter your email address above. Thanks.
Update: You can read the tutorial here: https://www.audiorecording.me/mixing-conga-eq-panning-compression-and-reverb.html
whats d eq for sitar?
good post! It’s always good to have a refresher on compression!
Great! Always remember to EQ first before you compress for best results. Cheers and thanks for your comment.
Thanks a lot for all the tips!
I’m gonna try out those wave hammer settings as soon as possible for my acoustic+vocal music project and see how it works out.
Thanks a lot!
Thanks for liking my blog,no probs Zaki, if you like to have some partnership in blogs with me, then please contact me in email (contact info on the homepage).Cheers.
I really like your blog, do u mind swapping links ?