Most of the EQ suggestions in this blog are very specific such as:
Boost +6dB 100Hz for Kick Drums Q=1.4
However in real world EQ adjustment, different musical instruments are not exactly unique in sound although they are still kick drums, bass guitar, vocals, snare, etc. Their purpose in the mix is NOT the same from one track to another, so specific EQ recommendation will only serve as a starting guide and not as a fixed rule for all tracks in your audio mixing projects.
A good example is the vocals. In this mixing vocal tutorial. I recommend the follow EQ settings:
Cut 200 Hz (high pass filter)= -6dB
Boost 3000Hz Q = 1 = 3dB
Boost 15000Hz Q = 1 = 3dB
However a lot of people are believing that this is a one-size-fit-all settings which is actually not. It is because supposing you are mixing a vocal tracks of a singer with alto or bass voices. Then the above EQ suggestions will not work for that singer, since a boost at 3Khz is only be appropriate with high pitched vocal tracks.
This is where the skill to find the “sweet spot” of any musical instruments is extremely very important to an audio mixing engineer. To define “sweet spot”, this is the specific range of frequencies that strongly defines the “good” sound out of the musical instrument. For example, it make sense that the sweet spot of a bass guitar is somewhat in the bass frequency range. 30Hz to 200Hz. However the entire bass frequency range is NOT the bass guitar sweet spot. It is because this depends on your project or the sound you are working.
For example, the sweet spot of a jazz bass guitar solo could be around 100Hz to 200Hz while the disco bass is around 40Hz to 70Hz. Take note that “correctly” identifying the sweet spot of any instruments in your mix is one of the secrets to audio mixing success. It will help your mix to sound clean, nice, defined and punchy.
OK, below are the steps on how you will find the sweet spot of any instruments you are working when doing an audio mix (whether it is vocals, guitars, piano, etc.):
1.) Load up the parametric EQ. You should be able to sweep through the different EQ ranges while playing the music. Some old audio mixing software like Adobe Audition 1.5 won’t allow you to do this in real time, instead you stop the music first – assign center frequency and Q values – then play the song. This is a time-consuming process, although it works but it will be a bit “harder” to find the sweet spot.
The best and easiest type of parametric EQ to find the sweet spot is the one that allows you to adjust using “knobs” instead of assigning numerical values. Some software like FL Studio allow this feature. So in this case, while the music is playing, you can rotate knobs which will also sweep the frequency from either high to low or vice versa.
There should be two knobs, one for EQ (center frequency sweeping adjustment) and one for Q (width or bandwidth adjustment).
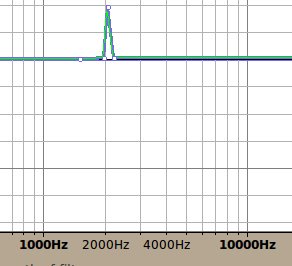
2.) First, assign a boost of around +6dB (at any frequency, but preferably around 2000Hz) and narrow down the bandwidth to near minimum (very narrow) such as shown below:
3.) Then play the music (or confirm the sweet spot by “soloing” the instrument), refer to the following guide:
To find the sweet spot of:
a.) Vocals – sweep around 4000Hz down to 600Hz and find the frequency at which the vocals seems to be very clear and defined. Stop and then take note that frequency.
b.) Bass guitar – sweep down from 2000Hz to sub-bass frequency range around 30Hz to 200Hz and find the frequency where the most important sections of the bass are defined and clear.
c.) Guitars – it depends, if it’s a rhythm guitar you can sweep around 400hz to 2000 Hz. Or lead guitar from 800Hz to 5000hz.
d.) Cymbals/Hi-hats – from 8000Hz to 15,000Hz.
4.) Now that you find the sweet spot, start to widen the Q or bandwidth until the track sounds best according to your ears. For most adjustment; this is equivalent to Q of around 1.0 to 3.0. FL Studio is however using 0 to 1.0 so you can approximate using the affecting frequencies and using the techniques discussed in this parametric equalization theory tutorial. Regarding the gain/amount of boost, you can decrease it from +6dB to a level where it sounds optimum, such as +1dB to +3dB.
5.) Now since you have boosted the sweet spot to make the instruments sound defined and clear, it will also results to “mud” since there are other instrument frequencies that are affected in that range. Start cutting down the affected frequency range of other instruments. For example if you have the following “sweet spot” parametric equalizer settings:
Vocals: 1000Hz Q=1.0 +3dB
Bass: 50Hz Q=1.4 +6dB
Kick drums = 100Hz Q=1.4 (Kick and bass should have different sweet spot to prevent mud)- +6dB
Then the other affected/opposing instrument frequencies are cut:
Guitars, snares, etc – Cut -6dB at 1000Hz Q=1.0 to increase clarity and definition of vocal sweet spot.
Bass guitar – Cut -6dB at 100Hz Q=1.4 to prevent mud with kick drum sweet spot.
Kick drums – Cut -6dB at 50Hz Q=1.4 to prevent conflict with bass guitar sweet spot.
By following the steps above, you can greatly improve the quality of your mix. As a summary , always remember to: sweep the parametric EQ to find sweet spot -optimize the sweet spot (boost and Q adjustment)– cut affected/opposing frequencies for clarity and definition.
Content last updated on August 15, 2012


4 Responses
Thanks for reading.
Great tips.
Probably not, if you want to make your mix sound warm you should start at the recording process. Make sure you capture each instrument by detail without any effects as dry recordings often sound warm.
If you add effects such as reverb during the recording or during your mix, it takes away some warmth on the sound. Try to use some analog gears like an analog mixer to process and route your sound from analog to digital.
After all recordings are done right, its now the time to think about sculpting it using EQ (finding the sweet spot, etc) in the mix such as illustrated in this tutorial. This will further improve the clarity of your mix.
Finally using an analog summing process is also a good technique to further add warm to your completed mixes.
Thanx for the tips I’m going to try them I also wanted to ask how do I make a mix sound warm, maybe I was thinking maybe a maximizer??