I have successfully produced drum tracks without a drummer. And the good thing is that the tracks are still playable live with a real drummer. With this type of set-up I get these following benefits :
a. Save money on drums.
b. Save time on tracking drums.
c. Save space on the studio.
Unlike other drum sequencing, I think this produces the best sound. Try to hear one of my produced tracks using this type of drum sequencing method:
(” Sure” by Jeanine Maningo)
It is now hard to distinguish the difference in sound between a real drummer and this type of approach. Also, it will be 100% in timing because of the sequencing is software driven.

Above are the basic but complete parts of a real drum kit. The important parts are:
1. Kick drum
2. Floor toom
3. Snare
4. Left and Right Mid tom.
5. Open/pedal hi hats.
6. Right (Crash cymbal)
7. Left (Ride cymbal)
All of this are possible to produce,thanks to the use of Hotstepper Drum Sequencer. This is a freeware courtesy of Christian Knufinke.
Please try to download Hotstepper, so you can try the demonstrations below. To open the archive, you need RAR software. You can download it on that link that I provide.

Above is the view of a default hotstepper program. To open hotstepper, open the archive and click hotstepper.exe to run the program. You can then see the default drum parts setting:
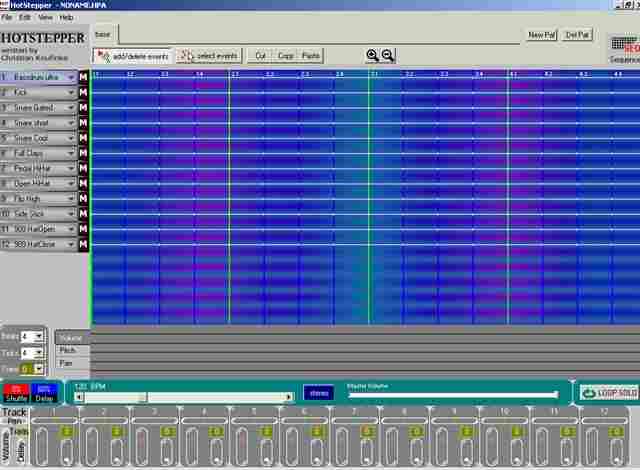
Hotstepper can play audio in a programmed sequence using its audio file library of real recorded drum tracks. You can record you own drum sample and name it using the following…
Update September 23, 2011: You can read this tutorial on adding new drum sounds to your Hotstepper library.
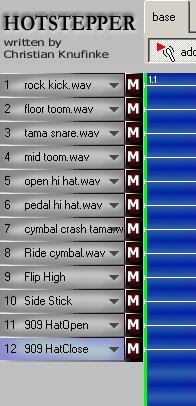
Take note these are real drum sounds beat with real hands not the midi sounds that will produce the common “demo” sound. The respective audio file names in the hotstepper library corresponding the real drum kit parts are:
a. Kick drum- “rock kick.wav”
b. Floor toom- “floor toom.wav”
c. Snare – “tama snare.wav”
d. Left and Right Mid tom.”Mid toom.wav”
e. Open hi hat- “Open hi hat.wav”
f. pedal hi hats. – “Pedal hi hat.wav”
g. Right (Crash cymbal)- “Cymbal crash tama”
h. Left (Ride cymbal)- “Ride cymbal.wav”
Then change the following default settings to real drum sound mode(the default is midi):
Change default:
1. “Bass drum ultra” at No.1 to “rock kick.wav”, you can change by selecting the arrow down besides the mute “m” symbol.(see screenshot below)
2. “Kick” at No.2 to “floor toom.wav”
3. “Snare gated” at No.3 to “tama snare.wav”
4. “Snare short” to “mid toom.wav”
5. “Snare cool” to “Open hi hat.wav”
6. “Full Claps” to ” Pedal hi hat.wav”
7. “Pedal hi hat” to “Cymbal crash tama”
8. “Open Hi hat” to “Ride Cymbal.wav”
After changing the default to its proper real drum sound. The sequencer menu should look like this:
Today in 2011/2012, there is a lot of great drumming software that you can use to produce a much better sounding drums than Hot stepper. I would recommend checking out Superior Drummer by Toontrack.
Although this is not free, but for a relatively low price you can get the most important features shown below:
1.) Ability to integrate in your existing DAW easily such as Reaper digital audio workstation software.
2.) 24-bit drum samples (HotStepper does not have 24-bit support only 16-bits so the quality is not good) for near analog recording sound quality.
3.) Tons of brilliant drum tone presets by professional drummers and producers in the recording industry.
Convert HPA (Hotstepper Drum Sequencer File) to 32-bit float/96KHz WAV
From a reader of this blog: “Hi! I would also like to know how you convert a hpa file to wav file. Look all over Google, but I couldn’t find a single thing about it.”
– The conversion process can be lengthy depending on the complexity of your drum loops. In this tutorial, you will learn how to convert your HPA file (Hotstepper drum sequencer) into a 32-bit float/96KHz WAV which can be used by your multi-track recording projects. Since the purpose of Hotstepper is to compose and arrange drum sequence loops, it still needs to be converted into a high resolution WAV file for it to be added to your project.
FIRST STEP: Create your drum loops and export each drum parts
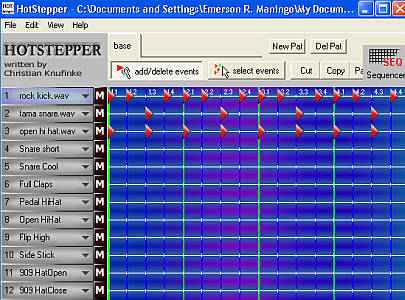
1.) Launch Hotstepper, create and compose your favorite drum loops. If you are having difficulty in creating drum loops, you can download common drum patterns at the next page of this tutorial (scroll down below and click page 2). Supposing you will download pattern 8 on that page, extract first the hpa file from the zip archive. Then in Hotstepper, go to File – Open and click “No” for “Do you want to save before continuing?” then browse to the location of pattern8.hpa. This is how patter 8 drum loops would look like:
If you see an error when opening the hpa pattern files on any of those downloads; it is most likely that you do not have the correct drum parts saved in your Hotstepper library. You need to specify correct filename as used by the downloaded pattern example (e.g. rock kick.wav, tama snare.wav, etc).You can get these real drum sounds in any professional drum recording studio or in your own acoustic drums. Once you have finalized the sounds and added it to the Hotstepper library, you can reuse it many times in your projects without needing to go to the recording studio anymore. You can also assemble unlimited amount of drum loops/sequences using the same real drum sound samples you added in the library.
2.) To get started in converting this hpa pattern file to WAV; you need to export EACH drum parts (snare, kick, cymbals, etc) as a separate wav file. One big mistake after completing/creating the drum loop is to directly go to “File” – “Write Pattern Wav” and export the entire drum tracks into a single wav file. This is not correct because you will still be applying effects to each of the drum tracks during mixing. Since this is only a single file (already containing all the drum parts); you cannot implement your desired effects for each drum parts and you cannot isolate them in the mix for further processing (panning, etc). Looking at the previous screenshot; you are only using three drum tracks and that is “rock kick.wav”, “tama snare.wav” and “open hi hat.wav”. This means that at the end, there will only be 3 separate wav files for your drums. Let’s start by exporting “rock kick.wav”. To export the kick drum part, you need to remove the red triangles of all active drum parts (snare and hi hats) except the kick drum. You can do this in Hotstepper by right clicking over the entire red triangles on snare and hi hat parts so that only rock kick.wav red triangles should remain. This is how it looks like after doing this adjustment:

As you can see, only rock kick.wav has the red triangles and the rest (snare and hi hats) has been removed. Now it’s the right time to go to “File” – “Write pattern wav” and click “Select File and Write”. Name the wav file as “kick.wav”. Go to “File” – then “Quit”. When you see the message “Do you want to save before continuing?” Be sure to click NO (Very important so that your loop that is saved will not be overwritten). Save it to a newly created folder. Name the folder as “drums” so that it will contain all isolated drum track WAV files. Now take a listen to the newly created kick.wav; you should only hear the kick drum part in the wav file and no snare/hi hats. This implies you have completely isolated the kick drum part from the HPA file.
3.) Launch Hotstepper and open pattern8.hpa again. Let’s export tama snare.wav (the snare drum part); click the red triangles of kick drum and open hi hat parts because you only need the snare track to be active, see screenshot:

Now the snare parts are isolated; export it as WAV file (using the same saving procedures mentioned previously) and named it as “snare.wav”. Close the Hotstepper and never forgetting to click “NO” when “Do you want to save before continuing?” shows up.
3.) Finally re-launch Hotstepper, open pattern8.hpa and isolated hi hat parts in Hotstepper by removing the red triangles of kick and snare drum parts. This is the screenshot:

SECOND STEP: Sample rate conversion to 32-bit float/96KHz
You now have 3 wav files for your drums (kick, snare and hi-hat). However Hotstepper will only export it as 16-bit/44.1KHz which is not optimal for mixing. You need to convert it to 32-bit float/96KHz (or to whatever bit depth and sample rate you used in your mix).
1.) Download this bit depth and sample rate converter. R8brain is also free.
2.) Launch Voxengo r8brain. In the “Input WAV file” browse to kick.wav then click Open. Change the “Resample to r8:” from 44100 to 96000 (change those two 44100 to 96000)
3.) In the “Output bit depth” change 16 bits to “32 bit float”. In the quality, select “Very High”.
4.) Click “Batch” button.
5.) In the “Input Directory”, it should be the directory to your “drums” folder, for example:
C:Documents and SettingsEmerson R. ManingoDesktopdrums
6.) Finally click “r8brain batch” button.
7.) Go to your “drums” folder. You will see newly created files for example “hihat.wav.orig”, etc. These are your OLD drum wav files in 16-bit/44.1KHz format. The newly converted wav files are still using the old filename but with new bit depth/sample rate.
THIRD STEP: Import all drum tracks to your multi-track project
1.) Open your multi-track software.
2.) Add each one of these tracks to separate channel in your multi-track. This is how it looks like after adding all of them (using Adobe Audition):

As you have observed, the tracks are clearly isolated to each other so you can apply dedicated effects to each one of the drum parts. Finally you have completed converting your HPA (Hotstepper) file into a high resolution wav file. It is now been added to your multi-track recording project.


9 Responses
@Rebecca, please look at the above tutorial section (converting HPA to 32-bit float/96KHz wav).
Hi Rebecca, thanks for dropping by. I will write a tutorial on this. To get the latest updates, you can subscribe to this blog so you will get immediately notified when a new tutorial gets published.
Hi ! I would also like to know how you convert a hpa file to wav file.. Look all over google, but I coludn’t find a single thing about it…
Hi Robert,
You could spend one hour in the studio recording real drum sounds, in this case, you will go to the studio to record crash, ride cymbals, etc. But you do not need to worry since, you will only do this ONCE. After you have recorded it in the studio, you can then incorporate it using the sequencer. You can reuse the recorded wav in your own projects using the sequencer without any limit. However, if you fill a certain project needs a different sound, then you have go to the studio again and record the sound your want. But this will not usually happen , unless you are mixing and producing a lot of genres.
hey, i was just wondering where i could get some of those sample .wav files like the crash and ride cymbals. considering i don’t have a drum kit to record them off of
Hi Anonymous,
Great comment! I will make a tutorial for this one, please come back to this blog, I will write this one within this month.
Cheers.
I created a Hotstepper drum sequence utilizing the available sounds provided by Hotstepper. I can’t figure out how to convert those sounds from .hpa files to wav files. Can you help me?
Thanks for reading my blog mate! I am glad you now found a solution to create drum tracks without any hassle.
Cheers,
Emerson
nice s/ware u got there mate! thx. i can now produce my own song w/out a drummer and of course suits my taste!
brilliant!