For those that are not using real drums in their home recording studio project, you might want to experiment further to improve the quality of your drum sound. The sound that comes out from most drum sequenced software is not realistic and not natural sounding.
Assuming you do not need to buy another much more powerful drum sequencing software solutions or buying a real/acoustic drum kit, the quickest way you can improve the sound of your drums is using samples.
These samples are actual recording of the beat which can be taken from any percussion instrument. If you have that bass drum in your home or a solo snare kit then you can use it. By doing that “actual recording” you add some realism to your existing drum groove.
Another way you can sample drums is to duplicate an existing drum sound in your loop and add a bit of delay and different EQ settings on the duplicated tracks. This can broaden the drum sound.
Let’s have an actual example so that you can understand this technique.
Drum Sequence without the samples (original)
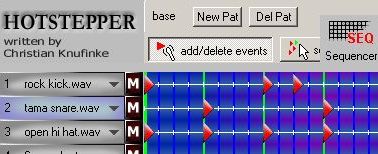
Supposing you use a relatively inexpensive drum sequencing software such as Hotstepper to generate the drum arrangement. Like any other drum sequencing software, it needs to be programmed. Then assuming you have the following drum sequence below:
And this is how it sounds like:
Supposing you want a more fat bass sound in the kick as well as a punchier snare sound, this is possible using samples.
TIP: Adding Real Drum Sounds to HotStepper Sound Library
HotStepper is a drum arranger, composer and sequencer that is free to use. This software runs very well in Windows environment. To try this software; download it at this URL. The download package is a .zip file. Right click on this zip file and then click “Extract here”. This is standalone software which means you do not this to be installed in your Windows operating system. After unzipping, go inside hotstepper folder. The executable file of this software is HotStepper.exe. There are other files that are inside this folder and do not delete or edit them. To launch this sequencer, double click HotStepper.exe. You should then see the default sequencer window such as shown below:

To use it, it is really easy. All you need is to click on the blue regions and it will leave a red triangle on the marked region. To play what you have composed, click “Loop Solo”. If you commit a mistake simply right click over the red triangle and it will be removed.
What is good with hotstepper is the ability to create both simple and advanced drum loops. But it will take time to master the hotstepper drum looping skills. I suggest you will practice it on a daily basis and incorporate the created loops in your recording project.
Now here is one of the main problems, you might notice that HotStepper includes a default set of drum sounds in its sound library. These sounds are not taken from actual acoustic drum sounds. One big advantage is that you can enhance its sound library with the new set of drum sounds. With real drum sounds in the sound library, you won’t anymore need a complete drum set or a drummer to produce the drum tracks in your project. All you need to do is to compose your favorite drum loops using this software, export it as wav to your DAW then it’s done.
To add new sets of drum sounds in the library, follow these steps:
1.) Record actual drum sounds from each component using a microphone. Save it as snare.wav, cymbals.wav; etc for the rest of the drum parts. You can record at 24-bit/96Khz mono for best resolution. Make sure it was the best recording possible and ensure that it don’t clip. Back up these audio files, so that you will not need to record again in this case you made a mistake in formatting the sound file (in step#2).
You need to format each sound clip from each drum parts so that it will fit with the HotStepper sound library. The acceptable format is: 44100Hz, 16-bit mono and each drum sound sample should be less than 10 seconds.
2.) To start formatting, open each of the drum sound clips with your recording software and then trim down the sound clip to the following recommended audio length:
a.) Snare – 0.965 second
Length is measured from the start to end of the sound clip. Make sure the audio recording immediately start at 0 second. See screenshot below:

b.) Crash cymbal – 5.107 seconds
c.) Tom – 0.608 second
d.) Kick – 0.915 second
e.) Side stick – 0.850 seconds
f.) Ride cymbal– 1.709 seconds
g.) Pedal hi hat- 0.136 seconds
h.) Open hi hat- 2.092 seconds
i.) Mid-tom– 2.589 seconds
j.) Floor tom– 2.793 seconds


No responses yet