Before you read this tutorial, make sure you fully understand dynamic range compression first as being applied in music production.
This tutorial will demystify one of the confusing features in audio compression: attack and release times. To illustrate this carefully, it needs to be defined first:
Attack time – the time it takes for the compressor to complete the gain reduction (or bring down the level) based on the compression ratio.
For example, if the compression ratio is set to 1:2 and the threshold is set at -20dB, this means that if the input level is -10dB (needs compression because it is above threshold), the output will be -20dB. If the attack time is set to 30ms; this means that when the input is -10dB = it takes 30ms for the compressor to reduce its gain to become -20dB (output of the compressor).
Release time – the time it takes for the compressor to bring up the level to be the same as the input level once it realizes that the input level does not anymore need compression (because it is now below threshold level).
A good example is that the input level now changes from -10dB back again to -40dB (below the -20dB threshold). The compressor realizes that this does not anymore need compression, so it “releases” the signal and apply some gain to bring back to its original level (uncompressed level) which is -40dB.
A picture is worth a thousand of words. I know that beginners find those definitions still confusing and too technical. So for the best explanation and illustration; I will use diagrams. Refer below:
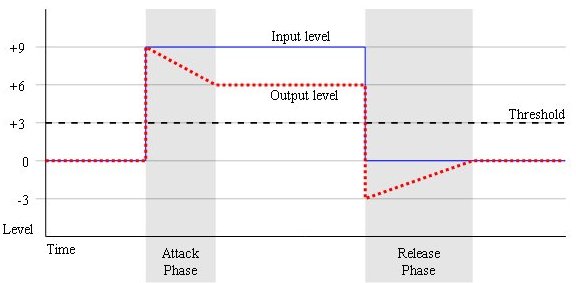
Credits: Iain Fergusson
OK based on the above diagram, it is obvious the following are given:
Threshold= +3dB
Given input level= +9dB
Resulting output level= +6dB
Computing the compression ratio:
Compression ratio= Sample Input level/Sample output level = +9dB/+6dB= 3/2 or 1.5:1
Since the threshold is +3dB; the compressor won’t do anything to the input level as long as it is below +3dB (no compression, input level=output level). However based on the diagram above, the input level changes from 0dB to +9dB; this activates the compressor since +9dB is above the +3dB threshold.
But the compressor cannot compress or reduce the input level “abruptly”; instead it has a transition phase from +9dB to +6dB targeted output level (based on the compression ratio set). This transition phase is called the “attack phase” as indicated in the diagram above. How long this attack phase depends on the compressor “attack time”. You will see the “linear” transition from +9dB until it reaches the +6dB output level.
As long as the input level is +9dB, the output level is +6dB (one way to think of a “compressor” is an automatic volume regulator). However the input level went down from +9dB back to 0dB; the compressor realizes that starting from +3dB all the way down to 0dB does not anymore need compression, so it “releases” the input level.
The compressor also cannot “abruptly” releases the input level immediately back to 0dB.Based on the diagram above; when the input level is 0dB, the compressor output level is still -3dB. But since 0dB does not need anymore need compression; the compressor “releases” then applies gain to be the same with the input level again. This transition phase is called “release phase”, how long this phase depends on the compressor “release time”.
If you are using the compressor effect in your audio recording, mixing and mastering; you can creatively set the following compressor parameters to get the sound you want: threshold, attack time, release time and the compression ratio. These are the basic elements of a compressor. Setting different values of attack time, release time and other parameters can have significant effect on the resulting sound.
How to set the best attack and release times for a compressor?
Every frequency/range needs a different attack and release times treatment. In a multiband compressor, it lets you assign different compressor settings (threshold, compression ratio, attack and release times) for every frequency band or range. For example if your multiband compressor has 3 bands (bass, mid and high frequency range), you can assign 3 compression settings for each of those bands. The only remaining problem is how you will be able to assign a reasonable attack and release times for each compression band. There are certain rules applied by professional audio recording community as to how to set the attack and release times. For example, they use the beats per minute method of the music. In this tutorial, lets attempt to derive a practical formula guide in computing a reasonable attack and release times based on the frequency being compressed. Supposing you are adjusting a bass frequency, for the sake of simple illustration let’s use a square wave.
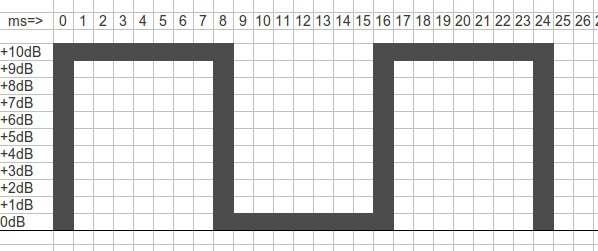
In the square wave above, you can say that the:
Period= 16ms
Frequency= 1/t = 1/16ms = 62.5 Hz
Maximum level (amplitude) = +10dB
*********
Update: October 1, 2012, Thank you Brun Leiser for the correction on compression ratio formula.
*********


One response
A very nice article, quite easy to comprehend! Thanks a lot!