Now you have a recording studio in your home, you might ask: “How do I record my rock band songs in a multi-track recording project?” Is it using one at a time recording or recording the band live? The answer is that you can do both. It depends on the following factors which I will be discussing in details:
1.) Capability of your recording equipment and room.
2.) Your aim as a producer (pertaining to the style of the song and attitude of the band).
3.) Availability of the musicians in the recording venue and time.
Capability of your Recording Equipment and Room
Before anything else, the most important consideration whether you can record a band live vs. one at a time recording is your equipment and studio room isolation limitations. Here is what will happen if you attempt to record the entire band live:
First, you need sufficient number of microphones and cables. There are least 4 microphones needed together which is a combination of condenser and dynamic microphones. Recording vocal needs one condenser microphone. Recording drums need at least two condenser microphones for left and right overheads and one dynamic/condenser for kick drums. This assumes you record drums with only 3 microphones. If your ambition is getting a full drum sound, you need more microphones. This setup assumes you are recording guitars and basses in DI mode and not using amp. If you would like to use an amp when recording guitars and bass; then you need more than 4 microphones. Recording bass and guitars using DI is also an added advantage in minimizing bleeding of sounds during recording (such as getting the guitar sound bleeds into the vocal microphone thus recording the unwanted guitar sound).
Second, you need an effective isolation of instruments sound in your room. The vocalist needs to be placed in an area with minimal bleeding of other instruments sound into the vocalist microphone. This can be a challenge because the vocal microphone is very sensitive to other sounds (since it is a condenser microphone). This implies that your vocalist will be placed in an isolation vocal booth free of leaking drum sounds and guitar amp sounds. For recording guitars and bass using DI, there will no issues with bleeding as there are no microphones involved. For recording drums, there can be issues of having the vocal sounds bleed into the drum microphones if the vocalist is not well isolated with the rest of the instruments.
Third, you need an audio interface that can accept around 8 pre-amp inputs. Why? You need one pre-amp input for your vocals, one pre-amp input for your guitars, one preamp input for your bass, and three preamp inputs for your drums (six inputs to be used). If you are using two microphones for your guitars with an amplifier (stereo recording or double tracking technique) then you need 7 pre-amp inputs. Audio interface with this capability requires very low latency recording so you should be using ASIO compatible DAW and not WDM. This is most likely a Firewire audio interface and can be an expensive audio interface (somewhere around $500).
Lastly, you need a DAW with multi-track recording capability in ASIO mode and a big hard drive space for saving high resolution digital recording (which is either a 24-bit/48KHz format or 24-bit/96KHz).
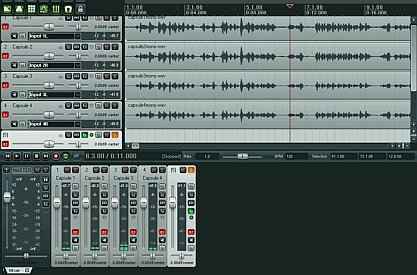
Image credits: Pro Sound Web
If your budget is limited, you can only track one at a time. To track one at a time, you should have at least DAW software with multitrack recording feature, an audio interface with at least 2 pre-amp inputs (if you need to record drums, look for audio interface with at least 4 pre-amp inputs). 2 condenser microphones and one dynamic microphone is enough for one at a time recording. You can use these microphones to track all instruments.
Your aim as a producer
Sometimes it is not only limited and decided by recording equipment’s alone; the decision to record the band live or one at a time depends on the recording producer objectives. For example, the recording producer finds out that the band would sound better if they are recorded live because of the energy when they jam together. There are also instances that the producer decides to record one at a time. An example is to emphasize difficult guitar solo or vocal sections. There are also instances where recording one at a time is necessary especially if the producer will be doing overdubs or layering of tracks (like a double guitar recording or double vocals recording).

Most rock band recordings are a combination of two techniques (recording live and one at time recording). At first, the band is recorded live primarily to record drums then the producer will track the rest of the instruments one at a time in an overdub sessions.
Availability of the musicians in the recording venue and time
The last consideration whether to record the band live or one at a time is the availability of musicians. As you might have expected; it is almost impossible to group the entire session players together in a single venue in a tight recording schedule. This is because the hired session players might be living in different faraway places.
Thus, the only solution is to record them one at a time. At first, the drummer and primary musical instruments (guitarist or bass players) are recorded live. Then the producer will book separate schedule for the rest of the musicians which can be done in different recording studios at different time. Doing this way, the entire multitrack recording project can be completed even though some musicians are not available for recording at the same place or time.
Two Methods to Control Sound Bleeding when Recording a Band
This is a beginner tutorial on controlling bleeding in multi-track recording by implementing proper isolation techniques. As a background, bleeding is a serious issue in recording where undesired audio are captured during recording.
To better understand bleeding and how it can seriously affects your multi-track recording project, say for example you are recording a band. You decide to place the band in a single room and then you place a microphone on the vocalist, one microphone on the guitar amp and one microphone on the bass amp. The drum also needs at least 4 microphones. All in all there are around 7 microphones in a single room.
If your objective is multi-track recording, you will be assigning each of these tracks in your DAW (recording) software. Since you are recording using 7 microphones, you need to create or insert 7 tracks in your DAW. If you are using Reaper, then you will simply insert 7 tracks to capture or record the band live as they perform; for example:

Can you guess what will happen next? Yes, there will be extreme bleeding. As they start playing; the drum sound will go into the vocalist microphone, or the guitar amplifier sound will go into the drum microphones, vice versa. In all microphones; there will be serious bleeding of sound.
Effects of Bleeding during Mixing and How to Control It
Supposing you are done recording the band and then you start mixing your multi-track project. This is where serious problem will start to occur. First, the track is not an accurate representative of the instrument recorded because it substantially contains recorded audio of other instruments. Second, since the track is not an accurate recording, applying EQ, compression and other effects can be less effective or even futile with extreme bleeding. Finally, your mix sounds dull and confusing since tracks does not seem isolated properly in the mix.
This is why bleeding needs to be controlled during the tracking or recording process. How? Different record producers and engineers have different approach in controlling bleeding during recording. Let’s discuss the two common methods.
First Method: Record Drums first with a click track
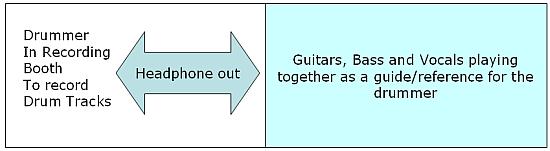
In this method, you need two rooms; the drums are isolated and first recorded. Since timing is very difficult for the rest of the band members; the record producer will decide on the BPM (beats per minute); then formulate a click track primarily for the drummer (for details about click track, read the next page of this tutorial). The drummer will be placed alone in a single room with microphones aiming at the drum kit. The guitarist, bassist and the vocalist can be placed in another room with audio output feed to the drummer headphones and vice versa.
So the first aim of the producer is to record the drums clean. The rest of the band members will just play live as a reference for the drummer. After recording the drums are cleanly recorded (without serious bleeding), the rest of the instruments can be recorded one at a time. The vocals will be recorded last. And take note that recording them one at a time prevents bleeding since they are not playing together in a single room.
Second method: Record Guitars, Bass and Drums Together in Isolation
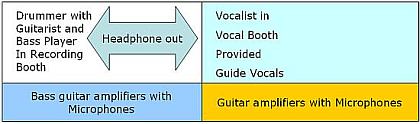
In this method, you need 4 rooms. The drummer is not alone in the room but with the guitarist and the bass player. However:
1.) The guitar amplifiers are placed in a different/isolated room with microphones on it. A headphone output would be provided to the guitarist, bassist and drummer. The output audio contains the rough mix of all live instruments.
2.) The bass guitar amplifiers are also placed in a different room with its microphone.
3.) The vocalist would be placed in a vocal booth but the vocal is not yet recorded and will be used as a guide vocal for the rest of the instruments to be recorded.
When the recording starts, the record producer and the engineer would be able to record guitars, bass and drums together while still getting very clean recording without any bleeding.

Image credits: Yitzchak Halevi Band
This method is primarily important for those bands that are reluctant to play one at time. The record producer should decide if bands would be best if recorded together or one at a time. In most cases, particularly those bands in the rock, alternative and grunge genre, they are recorded together because they seem to play with more energy with that setup. As usual, the vocals or any overdubs (guitars or vocals) can be recorded last.
Using Click track for band recording timing
In this section, you will know how to set click track in Reaper DAW for your multi-track recording projects. You will also know how to set the project BPM out of a raw demo from the band or artist song.
Timing and synchronization are important issues that the record producer and engineer should deal to produce a successful record. As a background, when the band is playing live without any aid of timing and synchronization device, there are instances where the actual tempo or BPM of the song would slow or speed up throughout the song. Although this is acceptable in live performance, it sounds awkward to listen in professional recordings particularly if the timing/synchronization is severely out of hand. But take note that it’s perfectly acceptable to deviate only just a little from the original tempo or project BPM because this adds “feel” and “natural” live sound of the band record. Being too obsessed with perfect synchronization can make the recording sound too mechanical and unnatural.
Timing issues in the recording projects can best be resolved by the use of a click track. This operates similar to a metronome and the speed of the ticks depends on the project BPM. Therefore before you can set the click track in the multitrack recording project, the record producer should decide on the project BPM (beats per minute).
How to Set the Final Project BPM for multitrack recording
Click track is the basis of timing for recording an artist/band particularly drums and rhythm instruments such as guitars. It needs to be set based on the song BPM. The song BPM can be decided based on the following steps:
Step1.) The producer needs to listen to the band song raw demo recordings. It can be in the wav file and mp3 version. The producer needs to decide if the tempo is right. If not; the band needs to do another demo recording targeting the desired tempo which would be used by the producer as inputs enhancing the song structure/instrumentation.
The band can record the demo while playing live together; it can be done with a single condenser microphone placed in the small room where the band is playing. Or it can be done by live band recording using an multi-channel audio interface for better clarity. The raw demo can simply consist of an acoustic guitar and vocals. It’s the tempo/BPM of the song that is important.
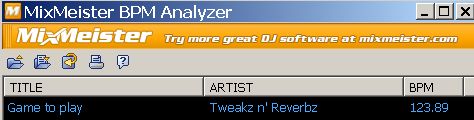
Step2.) Once the song tempo has finally been decided based on the rough demo recording; the producer will then attempt to measure the song BPM by using BPM analysis software such as Mix Meister.
Step3.) To measure the BPM accurately, place the mp3 file of the demo song recording inside a folder in your desktop. Name the folder like “demo song”.
Step4.) Launch Mix Meister program and click “Import Music Files”.
Step5.) Browse to the demo song folder and select it then click OK.
Step6.) Mix Meister will then analyze the BPM accurately such as shown below:
Set Reaper DAW Click Track using the Final Song BPM
If you are now going to start recording the tracks for the song; then the first thing that you should do is to set the click track as the timing basis for the artist and musicians.
Follow the steps below:
1.) Launch Reaper DAW.
2.) Go to Track – Insert New Track.
3.) Go to “Insert” – “Click Source”.
4.) The default settings for Reaper click track is 120BPM with 4/4 time signature and the length is around 10 seconds. You are going to change these values to your project final BPM.
Supposing the song is 124BPM, 4/4 time signature and the length is 3 minutes. Go to the BPM section in the Reaper DAW workspace somewhere placed in the middle to below. Change the details there, for example:

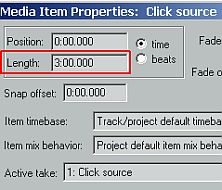
5.) To change the length of the click track to 3 minutes, right click on the click track waveform and click “Item Properties”. Then change the length from 10 seconds to 3 minutes; see screenshot below:
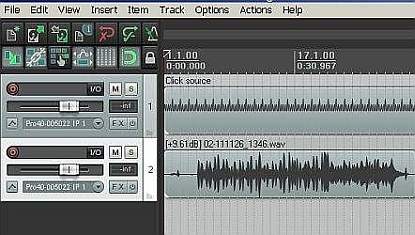
This is how the final project in Reaper would look like (with click track as the 1st track):
This is a sample of an acoustic rhythm guitar recording made with Reaper using a click track in the background; notice the timing of the rhythm with respect to the click source:
Content last updated on October 14, 2012


No responses yet