And click “Connector Retasking”. In the options “Which device did you plug in?”, select “Mic In”. Then click OK.
b.) Close the Realtek HD Audio Manager.
2.) You need to enable microphone as the default recording device. Go to Start – Control Panel – Sound – click “Recording” tab. If Microphone is not set as default device, right click on it and click “Set Default device”. Disable any device under recording except microphone, e.g. the “Stereo Mix”. Click OK.
3.) Launch Audacity or any recording software you are using. Configure Audacity to use the netbook microphone as the input recording device. You can configure this as follows:
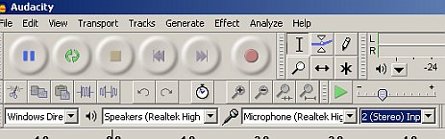
In this example, the speakers are driven by the Realtek HD audio drivers while the input device is the microphone. Also you configure the recording to stereo.
Test for Audio Clipping
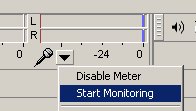
1.) Enable Audacity to monitor the input signal before recording. Mouse over the microphone icon near the level meters and click “Start monitoring”.
2.) Try to strum the guitars. The level meter should move with respect to the volume input. If you strum hard, the level meter should move near the peak. You should not record clip signals (those above 0dB). You can refer to this tutorial for recording clipping prevention techniques.
Start and Complete the Tracking Session
1.) You can configure the recording bit depth and sample rate of the recorded tracks. This is very important. If you would like to record at 24-bit/96Khz, then in Audacity go to Edit – Preferences – Quality and set the “Default Sample rate” to 96000Hz then the “Default Sample format” to 24-bit. Finally click OK.
2.) Hit the record button (red button) to start the tracking session.
3.) Hit the stop button to stop the tracking session.
4.) Review your performance for any mistakes and re-record if necessary.
5.) Do not forget to save your session files. Below are some examples of guitar recording I’ve made following the steps outlined on this tutorial:
Blues guitar:
Guitar strumming:
Take note that the recording quality is clear and acceptable. With the use of a multi-track software, you can even create a complete music production project out of this guide.
Content last updated on August 14, 2012


2 Responses
I have not tried this but I think this is highly possible. This is my idea:
1.) Purchase a USB audio interface. Most netbooks do have USB ports so an external audio interface can be used.
2.) Install the USB audio interface drivers to your netbook.
3.) Connect as follows:
a.) Connect the audio interface to USB port.
b.) Connect your monitors or headphones to audio interface headphone output.
c.) Connect the musical instruments or microphone to preamp inputs audio interface.
4.) Configure your software to record from the device.
5.) Try to do some test record, you should be able to monitor the output while recording.
Of course one downside with this method is that it requires you to purchase an external USB audio interface. But this is only way I can think that would work.
In this case, you would not anymore need a mixer because the audio interface would handle all routing functions. I suggest to read the audio interface manual for details to make sure it is compatible with your netbook or software. Good luck
hello, just wondering. I have a net book that has a mic/headphone as one socket. If I was to use a 4/5 channel mixer, how would I hear what is coming out of the netbook as i record? As the output for headphones is being used for the input for the mixer? i know i can plug headphones into the mixer, but how would i hear my netbook? if i use a 3.5mm splitter, plug mixer in one and headphones in the other, would this still work? Hope to hear back. Thank you! Great tutorial as well.