Supposing you are assigned by your teacher to sing a particular piece of song. You search for minus one and then found out it is available in Youtube.
Since you will be practicing your minus-one on a daily basis, you plan to create a personal audio copy of the minus-one ideally in MP3 file format so that you can practice anywhere even without an Internet connection.
This tutorial will illustrate how you can use your netbook (ASUS EeePC netbook for example in Windows 7 Starter Service Pack 1) to record minus-one music from Youtube. The end result will be a mp3 file of the minus-one music.
Disclaimer: Bear in mind that in this illustration, you should not share copyrighted music to other persons or distribute the music anywhere, on the web or any file sharing mechanisms. Doing so will be illegal and against the copyright law. Remember that the aim of this tutorial is for personal and educational use only.
Below are the complete steps:
1.) Make sure you are connected to the Internet first. Download free copy of Audacity. This is an open source recording software that will run in Windows 7.
2.) Install Audacity to your Windows 7 Netbook.
3.) Go to the Youtube URL of the minus one.
4.) Stream it until it will be completed. Do not close this tab in the browser so that you won’t need to reload it again.
5.) Go to Start – Control Panel – Realtek HD Audio Manager.
6.) Under “ANALOG”, right click on it and click “Connector Retasking”. Make sure that “Headphone” is checked under “Which device did you plug in?” See screenshot below:

7.) Now go to Start – Control Panel – Sound. Go to “Recording” tab. In most cases, you should find at least “Microphone” there. If only you cannot find “Stereo Mix” right click anywhere below the microphone. Check “Show Disabled Devices” and “Show Disconnected Devices”. This is how it looks like after enabling this:
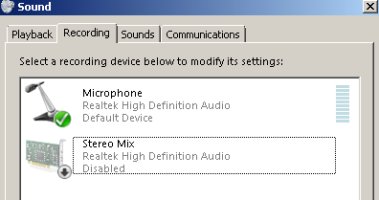
OK you have observed that only microphone is enabled and “stereo mix” has been disabled.
8.) Right click on “Microphone” in “Sound” and click “Disable”.
9.) Now right click on “Stereo Mix” and click “Enable”.
10.) Right click on “Stereo Mix” and click “Properties”. Make sure you have the following configurations:
a.) Go to “Listen” tab. Make sure “Listen to this device” is unchecked.
b.) Click “Levels”. Make sure there are enough volumes set for stereo mix and it is set to 50 to 60.
c.) Click “Enhancements” and make sure “Disable all sound effects” is checked.
d.) Click “Advanced” and make sure “2 channel, 16 bit, 48000Khz(DVD Quality)” is checked. And under “Exclusive Mode” the following are checked:
d.1) Allow applications to take exclusive control of this device.
d.2) Give exclusive mode applications priority.
11.) Launch Audacity. Set the following devices in the Audacity configuration (“enclosed in red box”):
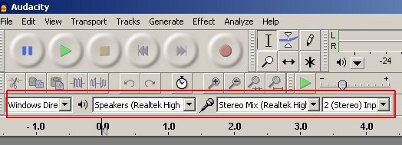
Make sure the audio host is set to Windows Direct Sound then the Speakers to “Realtek High definition”. The input set to “Stereo Mix(Realtek High Definition)”.
12.) Click the drop down beside the microphone icon in Audacity:
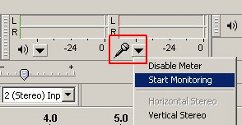
And then click “Start monitoring”.
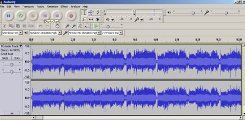
13.) Play the minus one in Youtube, you should see the volume level meters moving. It should have enough captured volume like what is shown in the screenshot below:
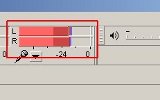
If the volume leve meters are barely moving, the recording levels will be very weak so increase either the volume of the music in Youtube or the stereo mix volume level.
14.) If everything is now OK, re-position the minus one video back to its start in Youtube. Do not yet play it. Close all programs in Windows 7 except your browser and Audacity.
15.) Hit the record button (red button) in Audacity and then immediately hit the play button Youtube. The audio wave will then be captured by the recording software. Do not
yet close or stop anything while the minus one is still playing.
16.) When it is done, hit the stop button in Audacity. Select the long silence before the start of audio, see screenshot below:
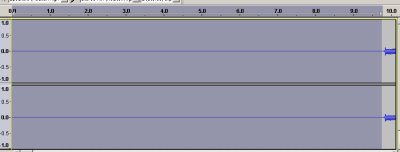
Go to Edit and then click “Delete”. It will remove the long silence which is not needed. Now do the same after the end of the minus-one, remove also the long silence.
17.) Click anywhere on the wave and press Control- A to select the entire wave. Go to Effect – Normalize. Set to 0.0dB and all options checked. Finally click “OK”. This will maximize the volume of your minus one without distortion. This is how it looks like after normalizing:
18.) Click File – Save Project and then click “Don’t show this warning”. Assign a project name. Close Audacity.
19.) Go to this URL and download lame for Windows 7. Install that to your computer.
20.) Open your Audacity minus one project. Its time to create an MP3 version of this audio. Go to File – Export. Under “Save as type”, select MP3 files. Click “Options”. Set the quality to 320kbps and using “constant” bit rate mode. Set the channel mode to “Joint Stereo”. Click OK. Assign a filename to your MP3 file. Finally click “Save”. You can skip the metadata and just click OK.
21.) Try playing the minus one version with Windows media player. It should be perfectly clear and well-recorded. You can then use this MP3 file in your practice.
Content last updated on August 14, 2012


No responses yet