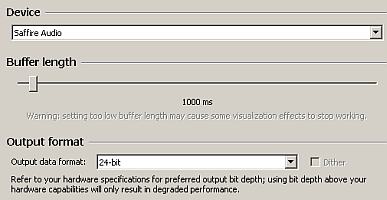
Burning Music to Audio CD: 10 Do’s and Don’ts

by: EMERSON MANINGO on April 20, 2012 in Audio Mastering Tutorial

If you want the best quality out of your audio CD music project, then you need to know these important do’s and don’ts of burning music into a CD. This is typically helpful for self-produced musicians that are producing their own music at home. And you would like to create a CD that would be distributed for sale in gigs and independent store outlets.

Importance of audio mastering

DON’T burn created music into a CD that does not undergo an audio mastering process. Take note that this is only applicable if you are the one creating the sound recording and mixing of the song.

DO prepare your music to have that broadcast quality sound, format and optimum loudness before finally burning it into a CD. This is only possible through an audio mastering process.

Audio mastering is a process of conditioning your finished mix/recording so that it will have attain the optimum loudness, sonic characteristics and format appropriate for distribution and broadcasting.

The recommendation is to have your mix professionally mastered before you will be burning it into a CD. You can find a lot of quality mastering engineers in this Gearslutz forum: http://www.gearslutz.com/board/where/ . You can also read this tutorial on characterizing a professionally mastered CD.

Importance of using high quality audio resolution

DON’T burn mp3 format into an audio CD if you want the best quality results.

DO use only the original 16-bit/44.1KHz stereo WAV format as a source when creating an audio CD.

MP3 can be used to create an audio CD. But if you want the best audio quality, you should only burn the 16-bit/44.1KHz stereo WAV version of the song and not the MP3 version.

The primary reason is that MP3 is a lossy format; it is already compressed and won’t sound as good as the lossless WAV file. Bear in mind that you also don’t get the sound quality benefit if you are converting MP3 to WAV first before burning into a CD. It is because your audio source is already in lossy format. There is no way to make it sound like the original wav file except to rip the song from the original artist album CD.

Importance of ripping high quality wav file as a source file to another CD project

DON’T ripped audio CD tracks as MP3 (or to other lossy audio file formats), if you want to use this audio file as one of the tracks in creating another audio CD.
Read the rest of this entry »

How to Make or Create a Radio Friendly Mix/Master -Broadcast Ready

by: EMERSON MANINGO on March 9, 2012 in  Audio Mastering Tutorial

This a complete tutorial on how to make your mix or music ready for radio broadcasting or any types of broadcasting such as in television, etc.

The fact that broadcasting follows an entirely different audio specification than the usual CD audio master you bought in stores or the MP3 masters you downloaded from iTunes, etc. If you submit music which is not radio or broadcast ready; it is either denied for broadcasting simply because it is not following specifications or it sounds very awful on air. Why? It is because broadcasting systems have their own compressors and limiters

One truth that you should know is that radio and television systems already include their own compressors and limiters. This equipment’s are designed to make their broadcast output as loud as possible while controlling the accidental spike on loudness that goes out on air.

However very loud type of music which has a very small dynamic range can sound awful in radio because broadcasting compressors/limiters further compressed or limit them! This results to pumping, squashed and distorted music on air.

The Solution: Allow more “Dynamic Range” on your Music

The straightforward solution would be submitting music that has a very wide or big dynamic range. The question is how much and how to measure dynamic range?

It has been found out by a study here:
http://productionadvice.co.uk/loudness-means-nothing-on-the-radio/

Using a standard radio broadcasting compressor (Orban Optimod Broadcast Processor) that music needs to have dynamic range of around 8dB to maintain the desired punch and clarity on air. Smaller than that (< 8dB or less), the music would now start to sound squashed and bad (distorted also).

So how would you measure the dynamic range of current masters that you are planning to submit to the radio or any broadcasting medium? Follow the steps below:
Read the rest of this entry »

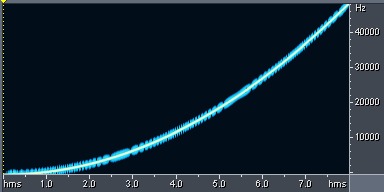
Dithering and Sample rate conversion before MP3 encoding? Complete Study

by: EMERSON MANINGO on March 6, 2012 in  Audio Mastering Tutorial

In this post, an experiment will be conducted on the effects of MP3 quality in relation to dithering and sample rate conversion which are done in the mastering process. The tools used are the following:

a.) Reaper digital audio workstation with LAME encoder functionality for converting to MP3 and doing test dithering.
b.) Voxengo R8brain free – for doing sample rate conversion and test dithering.
c.) Adobe Audition 1.5 – for doing spectral analysis of the converted result.
d.) The 24-bit/96KHz WAV sweep test tone signal by:

http://src.infinitewave.ca/TestSignals.zip

Objective and Methodology of the Study

This study will aim to investigate the results on the following combinations (using free/open source tools):

Test Flow#1: The quality of the MP3 as result of direct conversion

24-bit/96KHz sweep tone signal == > Reaper LAME MP3 encoder == > Assess spectral quality results of MP3

Test Flow#2: Sample rate conversion and dithering is being done first before MP3 conversion

24-bit/96KHz sweep tone signal == > Sample rate conversion using Voxengo R8brain to 44.1KHz == > Dithering and noise shaping using Reaper built-in dither functionality == > 16-bit/44.1KHz wav input to Reaper LAME MP3 encoder == > Assess results

Test Flow#3: Sample rate conversion and dithering to be done entirely by R8brain

24-bit/96KHz sweep test tone signal == > Sample rate and dithering by Voxengo R8brain == > 16-bit/44.1KHz WAV input to Reaper LAME MP3 encoder== > Analyze results

Test Flow#4: SRC (Sample rate conversion) is done first but no dithering has been externally applied. Then the 24-bit wav is inputted directly to the LAME encoder.

24-bit/96KHz sweep test tone signal == > SRC by R8brain == > 24-bit/44.1KHz WAV input to Reaper LAME MP3 encoder== > Analyze results

Spectral result of the original source audio

Using Adobe Audition 1.5 Spectral graph analysis, the original/unaltered 24-bit/96KHz WAV sweep tone plot is shown below:

Original test tone spectral result

The x-axis is the time in seconds while the y-axis is frequencies. The curve blue line is trending upward (because it’s as sweep tone) indicates the change of frequency content with respect to time. So we can say approximately by looking at the plot that at 4 seconds; the signal frequency of the content is at 10,000Hz. The black background/region indicates the absence of signal frequency content.

Since the sample rate is 96 KHz, it can accommodate signals up to 48 KHz as the maximum depicted in the plot. According to Nyquist theory on the post on 44.1 KHz vs. 48 KHz audio recording sample rate.

Maximum frequency content = Sample rate/2
Read the rest of this entry »