Using Volume Automation Feature in Reaper
To use volume automation, follow the steps below:
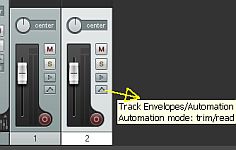
1.) Click on the waveform to be applied with volume automation. The corresponding channel mixer strip will be highlighted in white, click the symbol “^”. See screenshot below:
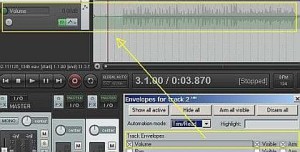
2.) Under “Track Envelopes” check “Volume”. After checking, it will automatically add the volume envelope on the multi-track as indicated by the screenshot below:
3.) The green horizontal line stands for 0dB which implies no cut or boost in the volume. See screenshot:
4.) To adjust volume in any part of the waveform using volume envelopes, simply press SHIFT hold in your keyboard and press LEFT click hold on your mouse to drag the green line below (so you are cutting volumes) to the desired cut in volume.
If you are boosting volume, you still hold SHIFT and hold LEFT click in your mouse then move the green line above the 0dB. Sometimes if the entire envelope would move as opposed to only the desired section, you still need to add a point first in the green line. This is simply accomplished by pressing SHIFT and LEFT CLICK once on the green line. This will add a point that serves as the boundary of the volume envelope adjustment.
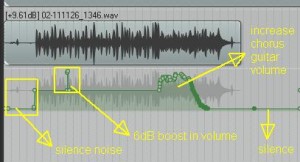
5.) Experiment and have fun with it. The above procedure is basic in getting to know how to adjust the volume envelopes. You can even draw free-form lines for cutting; boosting and even for fading out. For example below is the final volume envelope implementation that solves that above volume issues:
In the above example, the recording/mixing engineer can quickly implement changes in volume to the recorded wave without the need to edit the waveform. For example silence is implemented by dragging the green line all the way to the bottom of the envelope. And boosting can be accomplished by drawing a free form line above 0dB. Below is the completed track applied with volume automation. The first 7 seconds are silence removed by volume automation:
Aside from volume automation, you can also do panning automation that pertains to the location of the sound in the stereo field. Reaper also has an option to apply volume automation before any effects applied. So in the automation controls, you can select “Volume- Pre FX”.
Content last updated on August 5, 2012


