This is a beginner tutorial on how to prevent digital clipping when doing tracking or recording session. A very important skill in creating quality recordings in a music production.
Introduction to Digital Clipping
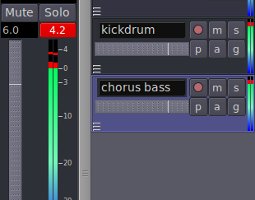
Digital clipping should be prevented at all cost because it can distort your audio and degrade the quality of your recordings. If you do not know what is “digital clipping”, it is simply defined as those input signals (either coming from your audio interface/musical instruments) hitting above 0dB as detected by your recording software. For example this screenshot:
Example screenshot of digital audio clipping in software
It hits above 0dB and the level meter shows that a specific portion of the input signal hits +4.2dB. If you are using a digital audio workstation software, it will result to red color on the volume level meters. There are lots of level meters in a digital audio workstation which you should be aware. These are:
a.) Level meters for each track (volume level of the channel) also known as bus or channel level meters. If your project has several tracks, there will also be a number of these level meters.
b.) Level meter for master channel (which is the summation volume of all tracks or channels). There is only one master channel level meter.
When you are tracking or recording a specific instrument, you should watch the level meters carefully for each channel and the master channel. Be careful because sometimes the master channel level meters does not indicate clipping but it is already clipped in its specific channel level meters. See example screenshot below:
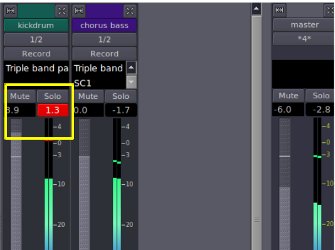
clipping on one channel but the master channel is not clipped