
Step2.) Generate the WAV file of your voice over. If you have a home studio with microphone, you can record it by speaking to the microphone, for example:
“Visit the music publisher website,
www.audiorecording.me ,
Thank you”
Or if you do not want to record your own voice and does not want to hire a voiceover talent, you can do it yourself by going to this website.
And then enter the text you would like to be converted to speech, for example see the following text and settings used below:
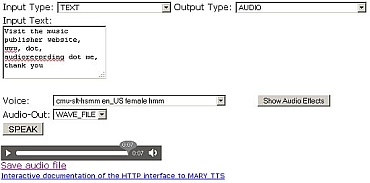
After you have finalized the automated voiceover, you can click “Save audio file” link and save it to your computer. You can use a lot of text to speech generated software and there are lots of great solutions out there.
If you are recording your voice over; you need to read this tutorial on how to record vocals properly. Recording voices over uses the same technique as recording vocals. You should pay attention to your recording levels, etc.
Step3.) You can use any audio editing software to mix the voiceover to your MP3 file to form the watermarked audio. Supposing you will be using Audacity (free software); you need to add two new tracks (one for the voiceover and the other for the MP3).
You can also do this with Reaper much efficiently. Read this Reaper DAW tutorial for details.
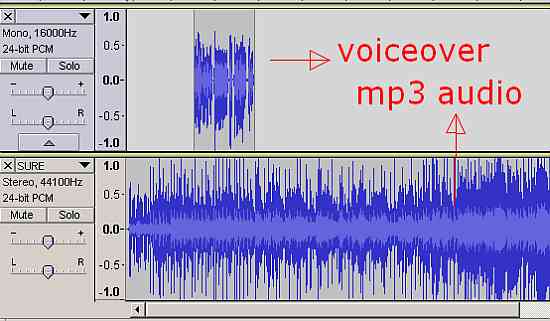
Then import the MP3 and the voice over. By default, the voice over would be 16KHz sample rate and 24-bit PCM when imported in Audacity. Your MP3 should be in standard 16-bit/44.1KHz. The Audacity project rate should also be in 44.1 KHz to match with the MP3 sample rate.
Use the “time shift tool” to move the voice over to the desired location. For example, see screenshot below:
Step4.) After you have finalized the blending of your MP3 and the voiceover, save the project first and assign a file name. After that, go to “Tracks” then click “Mix and Render” in Audacity.
Step5.) After mixing, the resulting single stereo waveform is now the watermarked mp3. You can then use this file as a preview or any other marketing purposes where watermarking is needed.
To Export as MP3 in Audacity, go to File – Export then assign a filename to the watermarked MP3. You can optionally assign ID3 tags (recommended) as well as the MP3 bit rate (128KBPS recommended for most streaming purposes, although you can also use 320kBPS). For a better quality results, you can try flow below:
Record voiceovers in 24-bits//44.1KHz — > Important voice over and 24-bits/44.1KHz WAV file of your song — > Mixdown/render to 24-bits/44.1KHz stereo WAV –> Sample rate and bit depth conversion to 16-bits/44.1KHz — > Convert to 320Kbps MP3
Refer to the following tutorials below for details:
1.) Reaper high quality mixdown
2.) How to use dithering & sample rate conversion. Simply set resample to 44.1KHz and output bit depth to 16-bits. The result is 16-bits/44.KHz WAV file.
3.) Finally you can convert WAV to MP3. Read this Reaper DAW tutorial for the steps on how you can add an MP3 encoder.
Listen to the sample watermarked MP3 below created by the following the above steps.
Content last updated on July 14, 2012


No responses yet