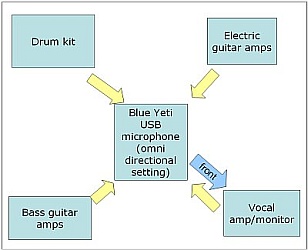
So that means that the microphone will be placed in the center of the room with the entire amps/monitors/sound source directly facing it. Since the microphone is now in the omni directional recording mode, it should be able to capture the levels equally in all directions. And then the font of the microphone (indicated by blue arrow) will be facing towards the vocal cabinet since vocals is often the weakest signal in a live band recording session. You need it to be as clear as possible and not to be drowned with the rest of the loud instruments. It is also recommended to use a microphone on stage boom stand to hold the microphone and to easily place it within the room. This will let you adjust the microphone conveniently either in horizontal or vertical direction.
3.) Finally before you start recording anything to your laptop, once you have realized the setup above. Try to go to the center of the room where the microphone will be placed. Let the band play a specific song you wish to be recorded. Now try to assess subjectively if the quality of the sound you get in the center is great and balanced. If not, try to experiment by tweaking my suggested configuration or adjusting the amps, etc. My advice is that what sounds great to your ear will also translate to better recorded signals. Do not start the recording process unless you captured/optimized the quality of the sound played by the band inside the small room.
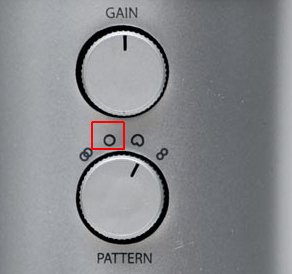
4.) Lastly, try to do a test recording. If what you will hear from your laptop are weak signals, try to tweak the gain of the microphone (shown in the screenshot previously). But since the band is already very loud, this is highly unlikely. Warning: If the band is too loud, you will notice that it will result to distortions when recorded. It won’t sound nice. The tip is to decrease the microphone gain settings so that it won’t overload. Make sure you do not open any software while recording. Make sure only Sound Forge is running. Lastly, you can always read the microphone manual as it contains a lot of tips and advices on how to properly use your microphone for best recording results.
Content last updated on July 5, 2012


5 Responses
Have you checked that the waveform is clipping?It is not enough to set the mic inputs levels down in the recording software. You should also apply some attenuation pads and decrease the gain of your audio interface preamp input. Have your tried using the Blue Yeti attenuation pad switch (if there is?)
Can you describe in detail about your recording setup (such as connecting your microphones to computer/audio interface)? It can reveal a lot of clues about this problem. But I suspect that the microphone has been picking up the loud band, its a condenser microphone with very sensitive inputs, you should be using its attenuation pad switch.
I tried to record a loud band with the Yeti into GarageBand. the Gain was turned all the way down but the recording was still distorted. mic input levels were also down in GarageBand. Any clues as to what the issue may be?
Would you be able to assist me with a problem I am having. I purchased a yeti mic and am having trouble trying to figure out how to run it through garageband. Would you be able to give me a step by step process as I am very new to this.
Thanks very much!
Hi Samik,
I think a DAW (digital audio workstation) should be designed “independent” of a microphone. I believe Nuendo 4 will work with any microphones. If you have valid license of your Nuendo 4, I recommend contacting their customer support and report your issue.
Which is the best software you think is best for recording through Blue Yeti, because Nuendo 4 is not supporting it as I tried at my home PC.(Intel i7, 16GB Ram)