This is a beginner tutorial on how to do a multi-track recording session. Let us first define multi-track recording:
Multi-track recording is a process of recording two or more musical instruments into their respective two or more channels or tracks into a recording device. The recording can be done simultaneously (multi-channel recording) or one at a time.
Recording multi-track is very efficient. It is because it can save a lot of energy in the recording process. Supposing you are the producer that is recording a band with 4 tracks (one vocal, one guitar, one bass, and one percussion); then after the recording; you found out that the guitar solo needs to be change. Without multi-track recording technology, the entire band would need to perform again for the recording. This is very tedious isn’t it?
With multi-track, only the guitarist would need to perform again and the rest of the band would rest. On how to perform multi-track is the subject of this tutorial. This tutorial emphasizes multi-track recording using digital technology. This would let you use your existing PC as a multi-track recording studio.
Hardware and Software Requirements of Multi-track
Hardware:
-A Complete DAW (digital audio recording) system. In digital domain, the recording studio (which is your PC) is your DAW system. If you are a beginner or don’t have one, you can read this guide.
The heart and soul of your DAW system hardware is the external audio interface. If you are a beginner and on a tight budget, you can read some recommendations here pertaining to audio interface. Look for one that allows you to record more than 2 tracks with a preamp on each input. For example; looking into the recommendations on that post; you would most likely select Tascam US-800.
Software:
The most recommended is Reaper.
It is a complete multi-track recording solution.
Recording One at a time vs. Simultaneous Tracking
When you are having a multi-track session, the recording can be done in two ways:
a.) One at a time– you will be recording musician performance one at a time.
b.) Simultaneous tracking– a group of musicians (such as a rock band) would be recorded together/simultaneously.
The following are the recommendations:
1.) Since recording a drum kit requires different microphones (e.g. one microphone on snare drum, one on kick drum, etc.) then it should be recorded “simultaneously”.
2.) Rock bands whose energy from synergy is important needs also to be tracked simultaneously. Read the details on this tutorial about recording a rock band in the studio.
3.) Re-tracking/re-recording/re-take/overdubbing of vocals, bass guitar or guitars in general can be done one at a time.
Recording Simultaneously-The General Concept
Let’s start with a slightly more complex procedure of multi-track recording – simultaneous recording sessions.
1.) You first need to assign which instruments should occupy each input in your audio interface.
2.) You then decide how many tracks you would need to create in your multi-track recording software. As a rule, number of tracks is equal to the number of microphones used. Or it is equal to the number of musical instrument inputs to be recorded together. For example, 6 guitars require 6 tracks to be created.
3.) For overall purpose of clarity, make sure you label your tracks in your software so that you won’t get lost.
Below is a signal flow of a simultaneous multi-track recording (e.g. you are recording drums):
It uses 4 microphones to record the entire drum kit. Each of the four microphones is connected respectively to 4 preamp inputs of the audio interface. In the DAW software (Reaper in this case); four tracks are created because of the four microphones. Track 1 is assigned to snare; track 2 is assigned to kick, etc. This is how it looks like in Reaper:
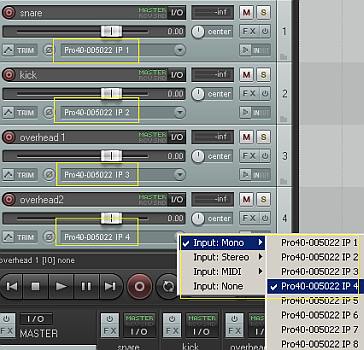
Enclosed in yellow are your audio interface inputs (Input 1 for the snare, Input 2 for the kick, etc.). You also need to observe proper gain staging as illustrated in this tutorial before hitting the record button. Once everything has been set (recording levels, bit depth, sample rate, etc.), hit the record button.
Since this is a simultaneous multi-track recording session, there will be four waveforms appearing together and visible on your DAW from Track 1 to Track 4 (if you are recording four tracks).
Detailed Multi-track recording example using REAPER
First, let’s illustrate on how to perform multi-track recording in Reaper with the details. Below are the steps:
1.) Go to Insert — > Multiple Tracks. This will let you add several empty tracks for recording at once.

The number of tracks to be inserted depends on how many instruments you wish to record at the same time. If you are only recording one instrument, then add only one track. Otherwise if you are tracking or recording more than one instrument (such as a live band) then insert a suitable number of tracks for recording.
2.) Identify the audio interface inputs associated with the inserted new track:
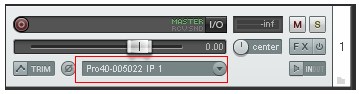
In the above screenshot, it shows that track#1 is ready to accept inputs from the first analog input of your audio interface (example using a Saffire Pro 40 audio interface). If you inserted more than one track in the session, make sure the inputs are set to another analog input of your audio interface and not Input 1 since it is already used by Track #1. Some guide on multichannel (simultaneous) recording below:
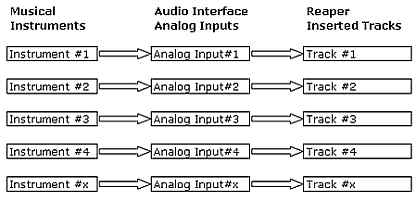
As you can see in the above guide, every musical instrument has its corresponding audio interface analog inputs. And every analog input of the audio interface has its corresponding REAPER tracks added for recording.
3.) Check if you are recording mono. Mono (one channel) is the suggested recording mode for most projects. It is because this corresponds to one instrument to be recorded per track. Refer to some basic guide below:
a.) Recording one singer with one microphone is mono in nature. It is because there is only one audio source.
b.) Recording one guitar is also mono since there is only one musical instrument.
To confirm that you are recording in mono, click the audio interface inputs in your REAPER track. You should see “Input: Mono” checked. See screenshot below:
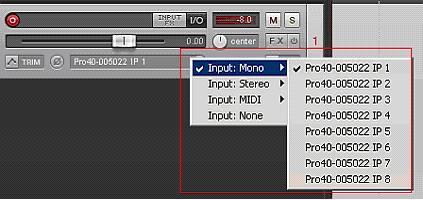
As you can see, REAPER track #1 is set to record in mono and will receive input from the audio interface analog input #1. For other REAPER tracks for recording, make sure to set them to mono and configure proper analog inputs that they are going to use. This is another example guide illustrating when to record in stereo or mono like in vocals.
4.) Connect your musical instrument to your audio interface. This can be a microphone, guitar, etc. Observe the following golden rules of connecting instruments for recording:
a.) Connect microphones to microphone preamp input for your audio interface.
b.) Use balanced inputs and outputs (refer to your hardware specifications for details). (read more details here)
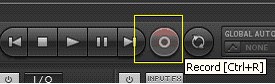
5.) Aim the track for recording by clicking the record button (see inside the red box):

If you mouse over the button after clicking on it; you should see the message “Record Armed” and this implies that the track is now ready to accept recording from your audio interface input 1.
6.) Play the loudest section to be recorded with your musical instrument and stop. Take note of the captured recording levels received by REAPER. You should make sure that the loudest part of the recording is less than -6dB. This will minimize the occurrence of distortion and clipping. See screenshot below:

For example in the above screenshot, the maximum peak levels captured is around -8dB which is OK. If it hits beyond -6dB; lower the preamp gain settings in your audio interface. Repeat the test until the maximum peak recording levels should fall below -6dB. On the average, you should aim at the recording level of -18dB for most of the time.
7.) Ensure that you are recording at 24-bits. To do this, review your project settings shown at the top right menu. You should see 24-bits. For example see below:

The main objective of doing step 6 and 7 is for correct gain staging.
8.) Assign a track name. For example, see below:

Note: If you added multiple tracks at once in Step1. It will automatically name your tracks based on numbers. For example, if you want to record multiple guitar tracks, it will be named automatically as guitar1, guitar2, etc. when you assign a common name “guitars”. In the above example; the track name assigned is “acoustic guitar recording”.
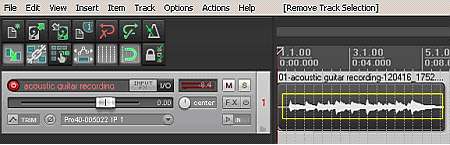
9.) When everything is set and ready, hit the record button:
The captured waveforms would then appear on the track under recording (inside the yellow box).
10.) When the recording is done or you would like to stop the recording, hit the stop button. You will then see the options below:
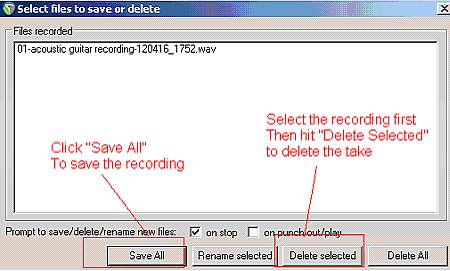
To save the recorded track, hit “Save all” and it will be saved in this path by default: C:Documents and SettingsYour Windows UsernameMy DocumentsREAPER Media. To remove the recorded track because it’s not a perfect take or you would like to repeat the take, select the track first (highlighting it) then hit “Delete selected”.
11.) You can then listen to the recorded take by hitting the playback button in REAPER.
12.) At the end of the recording session, do not forget to save the project by going to File – Save Project.
Recording One at a Time
This is easy. The only difference is that you would only be plugging one instrument at a time to your audio interface and you would only be creating/recording one track in your DAW/Recording software.
Some important reminder:
1.) Always watch the level meters on other channels, turn the gain to minimum or mute if you are not using them.
2.) Observe proper gain staging always when recording or tracking.
Summary: Multi-track recording process or steps
Below are the fundamental steps to do multi-track recording sessions:
1. Start recording the drums. Make it right the first time. Be sure to complete all the drum recordings before proceeding to the next step. Drums provide the basis of rhythm foundation for the rest of the tracks. You should be spending an ample amount of time in tracking drums. A drum recording mistake detected in the succeeding process would now be very difficult to correct. It is because if timing/BPM would be changed, everything would be re-recorded to keep in time with the drum beats.
Drummers need some reference and some ways to isolate the drum sound from the rest of the band. It is highly important to control sound bleeding otherwise you would be capturing the sound from other instruments.
Recording drums requires simultaneous recording method in multi-track setting.
2. Start recording the guitars. Guitar recording needs creativity and time. On the tips to prevent sound bleeding, there are suggestions included on how to isolate the guitar sound from the rest of the band.
Guitars are usually recorded one at a time, carefully assigning tracks on your DAW software and making sure it is properly labelled to avoid confusion (e.g. leadguitar1, leadguitar2, rhythmguitar1, etc.)
You can refer to the following tutorials below for recording guitars:
a.) How to record overdrive or distortion guitars using an amp.
b.) This is another tutorial illustrating how to record guitar using DI or amplifier cabinet method with clean techniques.
3. Record the bass. Bass guitar recordings can be done in DI or amp. For details, you can refer to this user guide.
4. Pre-Panning stage- this is the stage after recording all tracks except the vocals. Panning is about assigning the tracks location in the stereo field. Since this is pre-panning, these are not yet the final panning settings that would be used in the mixing stage. This is only temporarily used for recording the vocals (so that the vocalist would have a clearer idea of the background/instrumental music, making it more lively and natural sounding). You do not need to apply other effects like EQ and compression, leave that to the audio mixing engineer. To get started, you can read the following tutorials:
a.) A tutorial on panning drum instruments.
b.) This article illustrates some techniques on how to create realistic panning in your mixes.
5. Vocal recording stage: This is the last stage of the multi-track recording process. This is where the lead and background vocals would be recorded over the pre-panned background instrumental. For more details on this topic click here.
7. Reset all panning settings and all temporary effects. All recordings to be sent for audio mixing should be as original as possible as the recording itself (no alteration to be made on the sound recording by your DAW).
8. You can now start the audio mixing process.
Content last updated on October 8, 2012


No responses yet