
This post will list the most common recording mistakes in professional home-based music production. This is useful to a beginner home-based studio producer/engineer/musician looking forward to create commercial-quality recordings.
MISTAKE #1: Using onboard sound card when recording music to your computer
Onboard soundcard has lot of limitations that could prevent you from creating high quality recordings. It is because they have very low signal to noise ratio it means that the noise created will be substantial over the recordings. The second primary reason is that onboard card will not allow you to record at highest sampling rate/bit depth as possible which is crucial for professional sound recordings. Most onboard cards only support 16-bit/44.1Khz or 48Khz which is not optimum or recommended. The last reason is that they have limited connectivity; onboard card is designed not for professional music productions but for other less audio-intensive apps like gaming and chatting. So if you need to record two instruments simultaneously, you just can’t. Much worse if you are tracking/recording drums 🙂 Instead; invest in high quality audio interfaces such as Tascam US1641 USB 2.0 Audio and MIDI interface.
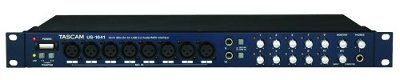
In this case, you really do not need a soundcard or an outboard audio mixer. All you need is an audio interface and connect it to your computer using USB 2.0 technology. They accept several inputs and is ideal for recording several instruments at once which includes drums. This audio interface cost around $300 dollars, so if you are on the very tight budget and plans to use a soundcard. You can start with M-audio Audiophile 2496 which allows recording at 24-bit/96Khz format and only cost $95.
MISTAKE #2: Using Computer/Laptop multimedia speakers for monitoring audio.
These speakers are not designed for professional audio monitoring. They do not have flat frequency response. As a result, you won’t be able to monitor the details and assess the quality of your recordings objectively. Common multimedia speakers such as Creative, Altec, etc are designed for gaming applications and not suited for serious music production. One of my most favorite entry level professional studio monitor is Yamaha HS80M Studio Reference Monitor:

Reference monitors allows you to assess the quality of your recordings accurately because they have a flatter frequency response compared to speakers designed for other applications. These are “powered” studio monitors under $500 and they have exceptionally flat frequency response.
MISTAKE #3: Not doing pre-production or recording production plan
If you are aiming to produce the best sounding album as possible, crucial planning is needed. You need to examine what musical instruments or instrumentation is needed to be added to the song to make it sound great. Test things in advance before recording the tracks. In this case, do some pre-production runs, let the band perform and experiment with different arrangements to decide what is good or not.
Then you make a plan and write it on a paper. Sequence your multitrack project in advance, so you will decide how many guitar tracks you need to record. How many vocal takes, back up vocal is needed. Or whether you need to hire violinist to fit the song, etc. Once you have completed that solid plan, then start the recording sesssion.
MISTAKE #4: Recording and Mixing in UN-treated room acoustics
Your room that you are recording or mixing has a HUGE impact on the results of your music production. In this case, you need to treat your room properly so that it won’t unncesssary bounce sound waves that could bias your mixing/recording decisions. You can read this tutorial on mixing studio setup acoustic design. This is more in-depth and complete tutorial on home studio acoustics that basically covers everything you need to learn.
MISTAKE #5: Recording everything in stereo
Some tracks will only be highly necessary to be recorded in stereo (such as a solo instrument). In a multitrack project, everything should be recorded in 24bit/96Khz mono since these tracks will be mixed and then summed up into a two-channel (left and right) signal known as stereo mixdown. The file sizes are also less compared to a stereo signal.
To illustrate some application, you can read this post on recording vocals in mono compared to stereo.
MISTAKE #6: Do not have a “trained” ear
If you are working in a studio both as an engineer or a producer, it is a requirement that you have “trained” ear. Your ear is the most powerful studio equipment. This means you can spot out of tune recordings easily, perceive minor changes in volume level, changes in tempo, pitch, noise, etc. There is no overnight success formula to have this asset. Instead you need to trained your ear on a continual basis so that you can sort out what sounds good and what sounds bad. In this case, you need to undergo ear training development exercises for recording/mixing engineers. Do not forget to monitor at reasonable level because consistent loud volume can damage your ears in the long run.


6 Responses
Thanks Andrew for adding the clarification, that’s actually what I supposed to mean.
Hi there, You may not have spotted that you’ve put:
“MISTAKE #5: Recording everything in stereo
Some tracks will only be highly necessary to be recorded in stereo (such as a solo instrument).”
You actually mean
“MISTAKE #5: Recording everything in stereo
Most tracks will not need to be recorded in stereo (such as a solo instrument) except for a few instruments that would benefit from stereo microphone techniques (such as a grand piano or an orchestra) which could make sense to record in stereo”
You have also put:
“A common newbie mistake is to record at 16bit/44.1Khz. This is not optimal…
…24bit/96Khz for best results”
This is not a useful generalisation to make, and not a “newbie error”. In fact, if it is ever going to end up CD then recording at 44.1kHz does make perfect sense, as you don’t need to sample rate convert. If you REALLY want to record at a high sample rate then go for 88.2kHz to make the sample rate conversion much simpler. If your audio is going to end up on video – then 48kHz or 96kHz would be the appropriate equivalent.
Recording at 24bit IS a very good idea – because it gives you a bigger dynamic range and gives you a lower noise floor when dithering etc etc.
Don’t forget – to record at 96k/24bit you need more than three times the amount of harddrive space, not to mention the data read/write rate.
Otherwise, an interesting article with some very good info!
thanks!
It’s not actually a bad idea if the recording is clean. If it works for you and you are happy with it, stick with that setup first. I have used unbalanced setup before and it works for me for very small projects such as yours.
I suggest you better stick with your recorder in the early stages of your recording career, investing another recorder can be expensive. And if you are not still earning from your projects, your business won’t be profitable.
Like what I’ve done before, I used my old setup for around 3 years until I made sufficient returns from my investment to buy a better gears with more inputs, better performance and better sound. What is essential is you know the methodology in recording which will stay the same regardless of what gears you will be using. It is what make this blog very different from other recording sites on the Internet, I emphasized on the techniques and skills on the process to get a better sound than simply relying on the quality of gears as a factor of great recordings.
As you may have already experience, you made some improvements by following the simple methodology without switching/changing your gears. And this is important because you acquire some new skills to further improve the sound of your projects. Good luck and thanks for reading my articles. Cheers! 🙂
Hello again:
Thank you for your quick response. I followed your recommendation with REAPER and to my surprise, it showed the raw recording from the piano was already at 24-bits. Here is the copy: Bits/sample: 24 (int) So, this means my digital recorder already has 24-bit DA/AD converter. I’m very happy to see that.
In more detail, this is how I am recording from the piano. I am using a TASCAM DR-1 recorder. I use the AUX OUT from the piano, which has two RCA type connectors. I plug two short (about 4 feet) RCA cables to AUX OUT which then is connected to a 3.5mm mini jack adapter. This is because the recorder LINE-IN is only a 3.5mm connector. Then, this is plugged into the recorder.
I know the RCA cables are unbalanced but I hear no distortion or noise in the recording. To my ear, it sounds very clean. I have also read that using the 3.5mm adapter for the RCA cables is a bad idea. Is that true? These are the only audio-out connections the piano has though, apart from midi in-out-through connectors. Anyway, I thought this would give me the best sound while avoiding a microphone, which I do not own. I will consider your recommendation to buy a mic though but there will be problems with external ambient noises like cars, people, dogs and such.
I then transfer the music file, which was recorded at 24-bit WAV 48K sample, to the computer where I then use audio software to edit and enhance the sound. Then it is sampled to 44.1 and finally dithered to 16-bit. The file is then burned to a CD at 8X.
I have recently learned that the LINE-IN to the recorder is consumer grade specs. Here is what the specs say:
LINE IN input
Jack 3.5-mm phone (stereo)
Input impedance 23 kΩ
Nominal input level -10 dBV
Maximum input level +6 dBV
I am open to suggestions if you can recommend a better recorder. Otherwise, I sincerely thank you for your expert advice. I made changes in my recording methodology based on your articles and I am now hearing a tremendous improvement.
Thank you again.
eddie
Hi Eddie,
Thanks for taking the time to read my articles. I will answer your inquiry one by one:
1st inquiry:
Most professional converters used in music production is now using 24-bits that is a standard. I can imagine this is your recording process flow:
Piano — > Line in — > Digital recorder — > Original/unprocessed digital recording
The question though is that you are not sure whether its recording at 24-bits or not. Some digital recorders do provide this feature very easily but since you are not sure, I assume there is no way in knowing that unless it will be analyzed in other methods.
One of the easiest techniques in knowing this is to confirm the original/unprocessed .WAV or flac recording (depending on the file type being used) with a DAW software such as REAPER. I suppose this should be easy since the file is now in the digital format as .WAV,etc so no extra conversion is needed.
Supposing let’s use Reaper since its free and easily available. Install that software first in your PC, Mac or laptop. If the original recording of the piano is not yet in your PC or Mac, save it to a USB disk “unaltered”. Make sure there is no processing applied to file when saved to your USB disk such as dithering or sample rate conversion. Ensure that it is the original recording format being saved.
Once the file is in your computer with REAPER installed, load it up by following Step1 and Step2 of this tutorial: https://www.audiorecording.me/quick-audio-mastering-with-reaper.html
In Step2 you will know that it’s a 24-bit recording or not by looking the bits/sample field. Most old digital recorders is recording at 16-bits. But 24-bit recording has more headroom and yields better sound quality overall when mixed or mastered, so its important that the recording is using this format.
If the recording is in 24-bits, there is no reason to upgrade your equipment. Please let me know the results of this procedure/test.
2nd inquiry:
Careful with using line in. This is only appropriate if the output of the keyboard is already in line level. This means it is already strong and amplified output (no pre-amplification needed). If you do not know about line level and how it compares with the rest, you can read this tutorial: https://www.audiorecording.me/whats-the-difference-between-line-instrument-and-microphone-levels.html
In addition, it is important to record only using “balanced” connections to minimize noise and yield better sounding recordings. I recommend to record your piano if possible using balanced XLR mono or balanced TRS mono when supported by your recorder. Read this tutorial for details: https://www.audiorecording.me/balanced-and-unbalanced-audio-guide-in-home-recording.html
If your piano keyboard does not support balanced outputs (e.g. not having balanced XLR or TRS) then the best option is to use a high quality microphone with XLR output to record your piano sound and then plug this to your digital recorder preamp inputs. You should get a better sound using this method.
I want to thank you so much for these valuable articles. I learned a great deal. I do have a question though.
I am using a digital recorder to record piano music. I noticed an upgraded model of my recorder which states it has 24-bit DA/AD converters. I assume mine has 1-bit DA/AD converters since the specs make no mention of it. Would the additional 24-bit converters make a difference in sound quality recordings or maybe add more definition in what you hear? I’m tempted to buy it but if the end result is that same as what I already have then I see no reason to buy it.
I don’t know if this matters but I am using a digital piano and am only using LINE IN to the recorder to make the recordings – no microphones.
I thank you immeasurably for these articles and look forward to you response.
eddie