Multiband compressors and Spectral Analyzers
If you want to use a free multiband compressor in your mastering; you can use C3 plug-in. You can read some tutorial here on how to use C3 multi-band compressor. Although the software used is Audacity, you can also run this plug-in with Reaper.
Another great plug-in that you can use for spectral analysis (examination of audio spectrum by visual display) is Voxengo span.
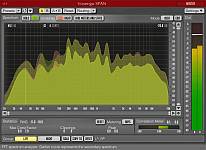
Voxengo span
Brick wall limiter/SRC and Dithering in Mastering
Perhaps one of the most important audio mastering plug-in is the brick wall limiter. Luckily there is one great limiter that you can in audio mastering and it is for free.
This plug-in is called W1. It works exactly like the L1 Waves plug-in only that it is free (a clone in functionality). Although the L1 Waves offers more than just the limiter function; W1 works only as a limiter and does not clone the ultramaximizer functionality according to this study.
So now you could not only make your master get that desired loudness but you can make it sound great too.
The last stages in the audio mastering process are dithering and sample rate conversion. The good thing is that you can only one tool for this which is Voxengo R8brain.
Lastly, bear in mind that your ears are still the most important piece of gear in mastering. Use it at all times and do not heavily rely on spectrum analyzers and other visual display to you what settings to make. It is important that you trust your ears.
Reverb- Gverb installation in Audacity
If you have installed Audacity in Ubuntu/ Linux operating system or even in Windows and Mac, you will notice that it does not include reverb effects. For example, if you go to Effects menu in Audacity, you will never see a Reverb effect or even in Effect – Plugin section.
This tutorial shows the installation procedures and basic settings of Gverb and Plate reverb plugin, an open source reverb plugin solution.
Step1.) The very first step is to install the required plugins in your computer. The gverb and reverb plugins are installed via “LADSPA”, otherwise known as Linux Audio Developer Simple Plugin API. If you are using Audacity in Windows or Mac, things are simple. You will only need to download the following installers and then proceed to install the plugin in your computer.
Windows LADSPA installer
Mac LADSPA installer:
Read this tutorial for details for the installation in Windows and Macintosh.
Assuming you are using Ubuntu for your Linux distribution, follow the rest of the steps:
a.) Go to System– Administration – Synaptic Package Manager. Ubuntu requires you to enter your Linux password before you can install anything in your computer.
b.) Under “Quick Search”, type ladspa
c.) Find the package named as swh-plugins, the description of this plugin is: “Steve Harris LADSPA plugins”. Click on it and then select “Mark for installation.
d.) Finally hit “Apply” to proceed with the installation.
e.) The package will then be downloaded and installed in your Linux computer. After installation the package will be marked with a green button as shown in the screenshot below:
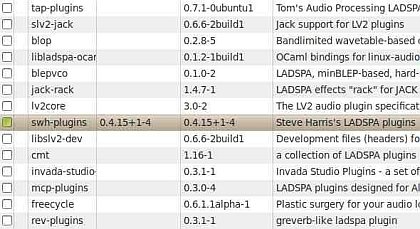
Ladspa plugin in Audacity
Step2.) Now you have installed the required plugins that includes the reverb effects in Audacity. Its time to confirm if those are successfully added to your Audacity installation. Launch Audacity then go to Effect menu. You will notice that not only reverb and gverb plugins are added, the package does include a lot of effects that you can use in your audio production using Audacity. See screenshot below:

gverb plugin audacity
Step3.) OK assuming you would like to apply reverb to a sample mixing session in the vocal tracks. According to this mixing vocal tutorial , the most recommended type of reverb for vocal applications are plate type of reverbs. Suggested settings using Plate reverb plugin are as follows:
Reverb time: 1- 2
Damping= 0.35 to 0.45
Dry/Wet mix= 0.30 to 0.5
Remember that these are conservative reverb settings typically applicable for achieving a stronger vocal presence. If you need a long tailed reverb, then simply increase those settings above according to your own choice.
You can read this great guide about Gverb tutorials. Personally I will only use Gverb for adding reverb on non-vocal instruments such as guitars and bass. As a rule of thumb, you should not apply too much reverb if your aim is to attain a high clarity mix. Too much reverb can your mix unpleasant to listen. Set the reverb time not more than 2 to 3 seconds in most cases , adjust other parameters according to the music and be conservative.
Content last updated on June 23, 2012