
Tip #2: Avoid distortion by leaving some headroom
Now that you know how to deal with the noise floor and getting great S/N ratio; the next step is to leave some headroom to avoid the possibility of distortion. In recording, this is around -18dBFS to -6dBFS maximum. See below:
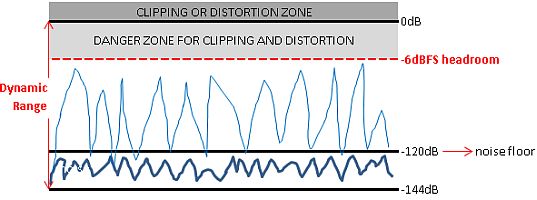
When you are recording, you should leave a maximum of -6dBFS headroom. This will decrease the chances of signal distortion and clipping; an essential element in gain staging. However setting at -6dBFS probably is too much, most of actual recordings would settle at around -42dBFS to -18dBFS with -18dBFS as the most common peak zones.
In gain staging, you should maximize the recorded signal in such a way it is within those peak zones. The recommended is around -18dBFS to -6dBFS maximum or when you get a good green to slight orange (but never red) in your audio interface recording meters. This will give you the best signal to noise ratio particularly if you are recording at 24-bits.
Adjusting for good recording signal is a trial and error process with your audio interface preamp gain. For proper gain staging, start at 50% gain applied and check its response with respect to headroom. Never assume you get a good recorded signal at full gain adjustment of preamp because you will end up with no headroom and increase the possibility of distortion and clipping.
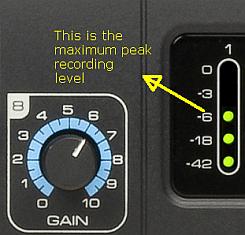
For example, below is a screenshot of a Saffire Pro 40 audio interface level meters with peak level at -6dB.
Tip#3: Limit -3dBFS in master fader level out in mixing and every channel
This tip only applies when you are finished with your recording and you are now about to mix the recorded tracks. You are now ready to mix and adjust your faders. Every channel or track in the mix has its assigned fader and level meters. And all of these are summed up in the master channel which also has its own level meters (known as the master level meters).
For proper gain staging, you should not clip either of these channels; leave around -3dBFS maximum. See screenshot below (for example if you are using Reaper DAW):
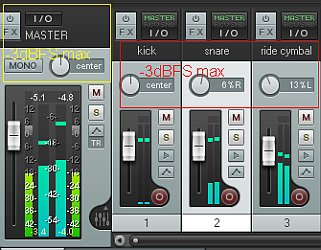
The yellow box is the master fader and its level meters, while the red box are the tracks fader and its corresponding level meters. To avoid distortion and get the best proper gain staging, observe a -3dBFS maximum in all channels. The following are some suggestions on how to adjust:
1.) If one track sounds very weak and buried in the mix, do not further increase its fader volume. Instead pull down the volume of the other tracks until that problematic weak track will now sit properly in the mix. This technique reduces the possibility of clipping for each channel and for the master fader output.
2.) If the master fader clips beyond 0dBFS. You can either reduce the fader on each channel by the same amount (e.g. if you reduce -1dBFS in channel 1, you reduce -1dBFS also in the other tracks). This will make the leveling assignment on each track unaltered while you effectively lower the master fader output volume to less than -3dBFS. However if you are sure nothing in each channel is clipping, you can safely reduce the master fader volume to less -3dBFS directly without adjusting the volume in each channel.
3.) To prevent ear damage while doing gain staging in the mix; monitor at moderate volume.
4.) During mix down, it is recommended that the peaks of the wave should be around -6dBFS to -3dBFS. This leaves a lot of headroom for mastering engineers to work with. For more details, you can read this tutorial on correct audio mixing levels and headroom in preparation for mastering.
Content last updated on June 20, 2012


No responses yet