This an important beginner guide in audio mixing. This is all about setting right levels and headroom for your audio mixing projects. If you ignore the importance of setting proper levels and setting headroom, the mixdown ends up squashed, poor in dynamics and not ready for mastering. For recording and tracking (not in mixing); you can read these tips on setting proper levels in your recording and preventing clipping. The following are the rules that you should always remember every time you are setting the proper levels in your audio mixing project. Let’s start.
Headroom Settings for Individual Tracks in the Mix
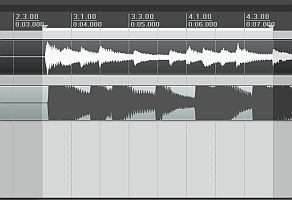
Rule#1: No audio clipping on individual tracks. Your individual tracks/channel or bus in mixing has its own volume level meters. Take a look at those in your DAW (Digital audio workstation) software. It should not clip. Clipping occurs when it hits above 0dB and it will become red in the level meters. See examples below:
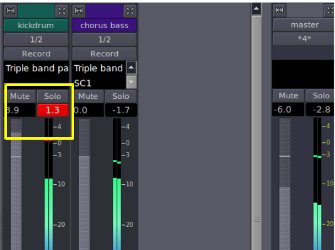
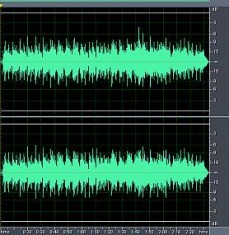
The kick drum channel is clipped at +1.3dB and the level meters indicate it as red. It exceeds the maximum allowable level of 0dB. As a rule; the peak level of individual tracks should not exceed -3dB to have some little headroom for the track. As a definition, peak level or amplitude is maximum volume level detected on the entire track. The audio track also has its own average level. There is where most of the track volume settles. You can estimate it from your audio waveform (however accurate measurement of peak amplitude and average level will be discussed later):

Why avoid clipping? This results to ugly/unwanted distortion of your individual tracks which can be obvious during and after mastering stage. For example, you are not aware that the vocal channel is clipped. When your track gets mastered, it will result to distorted vocals when played at loud volumes.
Rule#2: Conservative EQ boosting and Track fader adjustment. If you noticed some clipping after implementing effects that could boost the volume (such as EQ boosting); then try lowering the volume of the track using its fader. However it is best to apply a reasonable boost on EQ. It is not wise to apply +12dB or more boost on using EQ and use the track fader to lower down the volume to compensate increase in levels.
Instead, apply only a conservative amount of +3dB to +6dB boost on any frequency band but rely more on cutting audio frequency problems. You can read these EQ techniques for clarity. You will notice that simply by cutting problematic frequencies is much safer because it won’t increase the track levels/volume. Too much EQ boosting can result to unnatural sound which is undesirable. In some cases, if it requires too much EQ boosting during mixing, it is best to re-record the track and adjust desirable EQ settings before it will be recorded.
Headroom Settings for Master Channel
Rule#3: No clipping on master channel. Most DAW features a master channel level meters where this is the summing volume of all the tracks in your mixing projects. This should not be clipped also or else serious distortion problems can occur later (such as in mastering). Apply the following rules on headroom for the master channel:
1.) -3dB maximum peak volume.
2.) -30dB to -20dB average SPL
More about the above rules will be discussed later. If you noticed some clipping on your master bus, then adjust the master fader by lowering it down. But always remember Rule#1 and Rule#2. If you have some extreme EQ boosting and clipping on your individual tracks that also caused the master channel to clip; then it is always advisable to correct these individual problems first.
Rule#4: Implement correct headroom for mastering. If you are now very happy with your mix, you are now ready to mix down the project into a single waveform ready for mastering. It is always a good practice to double check your wave statistics before submitting to the mastering engineer. Double check your results vs. Rule #3. Let’s have an example:
1.) Supposing you have a stereo mixdown wave that looks like below:
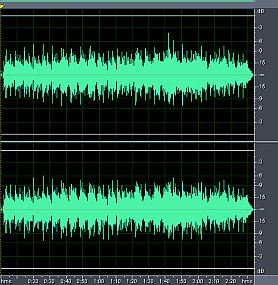
2.) It is not enough to just look at the wave and conclude it’s ready for mastering. You should check the waveform statistics and decide whether the headroom is correct. In Adobe Audition 1.5, you can check the waveform statistics of the mixdown wave by going to Analyze – Statistics. For example you see the results below:
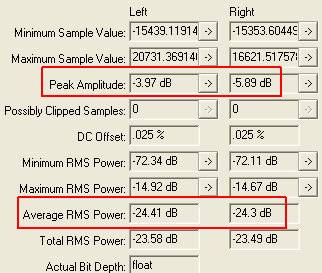
Interpretation of the results: The two most important results are the “peak amplitude” and “average RMS power”. Peak amplitude is the loudest peak captured while average RMS power is the average level. Based on the results, the peak amplitude for left and right channel is -3.97dB and -5.89dB which is within/below -3dB standard. The average RMS power for both left and right channel is -24.41dB and -24.3 dB which are also within -30dB to -20dB standard. Therefore the headroom settings are correct. What happens if my mixdown does not follow the correct headroom? You can still re-open the mixing project and adjust either the master faders or the track individual faders (also not forgetting rule#1 and rule#2) so that the mixdown will observe the proper headroom.
Checklist on Submitting the Mix to Audio Mastering Studio
Now you have the correct levels, refer to the following checklist below when submitting your work for audio mastering.
Check List #1: Is your mix final? Has it already been approved by the concerned artists and recording producers?
Purpose: Assuming all technical specifications and requirements are satisfied (as discussed in the previous section); you need to have the mix approved by the artists and the recording producer. You need to make sure that there is no other request for changes from them in the mix, it is because once the material will reach the mastering studio, there is no turning back. If you turn back, you need to do a separate mixdown again with the artist/producer requested changes that can take time and destroy your schedule.
Check List #2: You SHOULD mix down to highest audio resolution as possible.
Purpose: You need to create a very high quality mix, isn’t it? If you mixdown to low resolution such as 16 bit 44.1Khz (by applying dithering for example), you are destroying your mix.
Do not apply any dithering or sample rate conversion during mixdown. Leave that to the mastering engineer. The mixdown resolution (output of audio mixing) should be exactly the same as the source audio file resolution. For example, if the project is recorded at 24-bits/48KHz, then the mixdown should also be at 24-bits/48KHz. As stated, you should not be altering the bit depth and sample rate when mixing.
The required bit depth should be 24 bits (you should never mixdown to 16 bits, ever!). The sampling rate can be 44.1Khz, 88.2Khz or 96Khz. Using 192Khz is not recommended and neither it is beneficial in contributing to the sound quality. But again, 24 bit, 96Khz or 24 bit, 44.1Khz are the standards.
Check List #3: Never , ever apply too much compression on your mixdown in an attempt to make it LOUD and at the request of your clients.
Purpose: By compressing to make it loud in an attempt to praise clients or it is a client request, you are destroying your mix which is IMPOSSIBLE for mastering engineer to repair and restore its dynamics in natural way. If you really need to compress the mixdown for some reasons, make sure you read this mix buss compression tips.
Illustration: Steps to do a High Quality Audio Mixdown (Master Mix)
When doing an audio mix down which would be submitted to a mastering engineer; it is very important to provide the highest resolution possible.
Follow the steps below on how to do a mix down on Reaper:
1.) Launch Reaper, open the project, mix and apply effects on it as desired.
2.) When the mix sounds perfect and you decided to do a mix down; you need to select which section in your session you would like to be rendered. To do this, move your mouse cursor somewhere over the timeline and then hold left click to select regions. It would be highlighted as shown in the screenshot below (gray white):
3.) Once you have selected a region in your session, go to File – Render.
4.) Ensure that you have the following:
a.) Render: Master Mix
b.) Render Bounds – Time selection
c.) Assign a file name of the mix down (exclude the file extension) as well as the output directory. This is where you could find the file after mix down/render.
d.) Sample rate – (the same as the sample rate of your Reaper session); if you use 48 KHz as your sample rate during tracking/recording then use this sample rate during mix down.
e.) Channels – stereo / Full Speed offline
f.) Leave Resample mode at its default settings as well as multi-channel, dither and noise shaping.
g.) Set output format to WAV.
h.) WAV bit depth – 24 bits
i.) Check Write BWF and “Allow Large files to use Wave64”.
This is a sample screenshot:
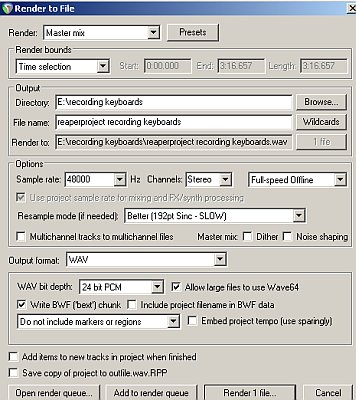
3.) Finally click “Render 1 file”, do not do anything as Reaper would render the mix. After completion, you can open the file saved in its specified output directory.
Content last updated on October 14, 2012


2 Responses
Hi Daniel,
Thanks for the feedback. I do not know if Ableton live 7 is capable with doing the analysis. I supposed it should, you need to refer to the manuals or contact their support if they have this feature.
Even though this is a tool, this is very easy to monitor. Simply watch your master level meters from start to end. Most master level meters would automatically detect the maximum peak amplitude so it should not be that hard for you to detect.
You do not need to do this for every channel but you only need to see the master channel (the summation of all your tracks) and see the maximum peak amplitude. However for proper gain structure, you also need to prevent clipping on every channels in your mix.
Mixing down is a matter of preference. I suggest mixing down in a high resolution DAW that supports 64-bit float summing. You can read this article for details: https://www.audiorecording.me/advantages-of-64-bit-daw-over-32-bit-float-digital-audio-workstation.html
I don’t know whether Ableton Live 7 supports 64-bit summing, try to check at the manuals or contact their support. But I know that Adobe Audition 1.5 definitely does not support 64-bit summing.
Hello
before i ask a question, i wanted to say that this page has been very useful; the difference between my tracks 2 months ago and today is complete. However i have a question regarding clipping.
Is it possible to do this analysis in ableton live 7 ? Or should i record every channel in a different .wav and analyze each one through adobe?
and is it better to mix it down all in adobe or mixitdown in ableton??
tyvm.