
Performing a Recording/Tracking Session in Audacity
After restarting Audacity you are now ready to do recording. The objective is to ensure you have correctly setup and configured Audacity to work with your audio interface.
Step1.) Make sure your audio interface is on and connected to your PC.
Step2.) Connect one musical instrument to your audio interface preamp inputs (e.g. acoustic guitar). Switch the gain to moderate (30% to 50% of maximum gain). If your audio interface includes instrument level detection, switch it on or use it.
Step3.) In Audacity, enable monitor input (see screenshot below).
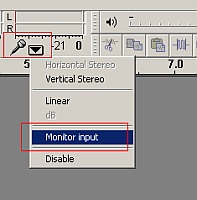
This will let Audacity detects any input signal from your audio interface. Now try to play your music instrument and see if the level meters moved. In some system, it can take some time for the input signal to be detected, so keep playing. Once the level meters are moving, you are now ready to record.
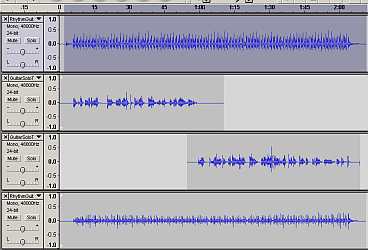
Step4.) When you are ready, simply hit the recording button (red circle) and start tracking. You can record as many tracks as you can once you start recording. If you are a beginner, you might want to record tracks one at a time to make sure it’s been correctly done. Below is an example of a 4 tracks recording session in Audacity:
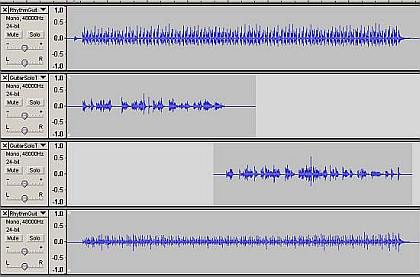
Take note that track#3 did not start at zero time. This is normal because you might want to record at a later section of your tracks (such as overdubbing guitars). After you have finished recording your first track, simply hit the recording button again to start the second track. Also bear in mind that the above tracks are all recorded in 24-bits/48KHz mono as configured earlier.
Exporting files for Audio Mixing
After completing the recording session, you will need to export the recorded files for audio mixing. You can have someone mixes your songs or you can mix it yourself. One of the common problems when exporting files is the loss of synchronized/timing information on the recorded tracks. Although you can export multiple files at once (Audacity has this “Export Multiple” feature) but sometimes this might not work if you have tracks not starting in zero. Below are the steps to correctly export your Audacity recorded files:
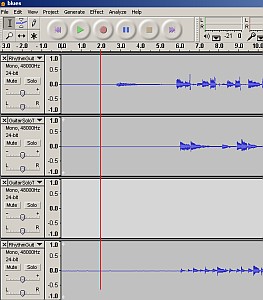
Step1.) Decide on a starting time (in second). All tracks should start BEFORE this starting time. For example, the recordings below are chosen with a starting time of 2 seconds (see the red line below):
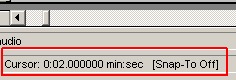
Step2.) Start exporting the first track. Zoom into the 2 second area and make sure the cursor is pointing EXACTLY at 2 seconds. You will confirm this in the cursor selection at the bottom of Audacity. See below for the sample start time at exact 2 seconds.
Then the cursor is at 2 seconds, select/highlight the first track waveform until the very end. This is the screenshot of the highlighting/selection process. Take note only the first track has been highlighted.
Step3.) You will now export track#1 by going to File – “Export Selection as WAV”. Decide where you will be saving the WAV files. It will be exported as 24-bit/48KHz, the same as the recording bit depth/sample rate.
Step4.) After exporting the first track, repeat the above procedure for second to the last track, keeping in mind that the starting time should always be in 2 seconds so that all recordings would be synchronized in multi-track when exported for audio mixing.
#TIP: You should not be applying any effects after recording (like compression, EQ, etc). Leave all effects to the audio mixing process. Also for broken tracks (like tracks that did not start at zero time, such as re-takes); you will need to select both tracks first and sub mix them before exporting. See screenshot below for the two broken tracks that needs to be sub mix first. To sub-mix; go to Project – Quick Mix:

Optional Step: Duplicating Clips and Tracks
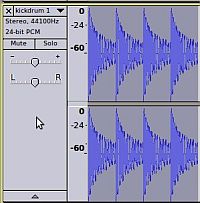
Supposing you will “clip duplicate” a certain track four times before exporting or sub-mixing so that it will have an 8 seconds playing time. The original clip is 2 seconds long so duplicating it 4 times will yield 2 x 4 =8 seconds play time. “Clip duplicate” simply repeats the clip in the same track. For example, this track is a kick drum clip. To do this:
1.) Select a track. To select, simply click the area indicated by the arrow in the screenshot:
After selection, it will turn to darker color.
2.) After it was selected, go to Edit – Copy.
3.) Edit – Move to Cursor – to Track End.
4.) Finally to paste: Edit – Paste. This will create the second duplicated kick drum clip in track 2:
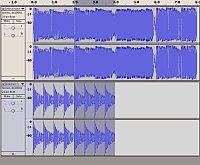
5.) To paste two more clips to reach the 8 seconds mark, Edit – Move to Cursor – to Track End, then Edit – Paste. Repeat this process until it reaches the 8 seconds mark. Below is what it looks like after completion. The kick drums on the second track reaches the 8 seconds (the same with the bass guitar). This is done using clip duplication technique:

You have just completed importing and arranging the tracks in the Audacity multi-track. To save a multi-track project: Go to File – Save Project → when you see the warning, just click OK. You can save the project to your desktop. Name the project as “audacitymixingtutorial.aup” and finally click “Save”. Note: You might see a warning such as “Project depends on other audio files”. Click “Copy All Audio into Project (Safer)”.
Content last updated on July 14, 2012


2 Responses
I’m glad you find it helpful. Thanks.
Nice tutorial, it helped me a lot with audacity