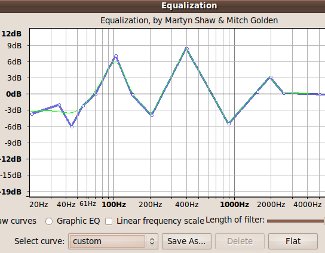
Observation: You will notice that the low shelf filter effectively reduces the amount of signal below 200Hz. This also true for the significant boosting at 300Hz and 1000Hz as well as the reduction at 500Hz using band pass filters.The high shelving filter is also very effective in removing significant of signals above 2000Hz.
Implementing EQ without using LADSPA
The default installation of Audacity in Linux/Ubuntu (or even in Windows), does not come with a built-in fully functional parametric equalizer. You can have it when you are going to install LADSPA (details in the previous section).
A fully functional parametric EQ (at a minimum) allows you to:
a.) Adjust center frequency.
b.) Adjust how wide or narrow the EQ adjustments by using Q.
c.) Adjust how much dB to cut or boost.
If you are not familiar with these terms, it might be worth reading this post on how to use a parametric equalizer. Audacity does come with a “parametric equalizer” like feature such as shown below:
audacity equalizer
However, the main disadvantage is that you cannot implement accurate EQ settings. For example if you like to boost 3dB on 3000Hz at Q= 0.7. Of course, you cannot estimate Q using that EQ feature.
One of the ways to implement parametric equalizer in Audacity without any plug-in is to use the Graphic Equalizer feature: Launch Audacity then go to Effects – Equalization – click “Graphic Equalizer” options. You will see it like this:
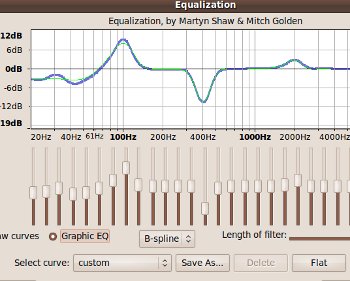
audacity graphic equalizer screenshot
Using graphic equalizer allows you to adjust specific frequencies accurately. The only problem is that, it do not provide a functionality to adjust Q (for how wide or narrow the frequency adjustment).
However using the concepts discussed in this tutorial: “Understanding Parametric Equalizer theory” ; you can get the value of f1 and f2 when Q and center frequency is given. This needs some calculation, so you need to download this Excel spreadsheet to automatically do the calculations:
Open the tool in Excel; you will see it like this:
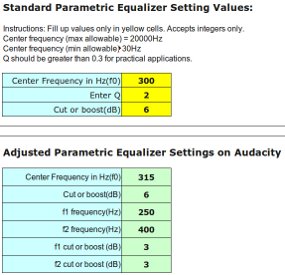
screenshot of the audacity parametric equalizer setting
Supposing you need implement an EQ setting of 6dB boost at 5000Hz with Q=1.4. Try entering the values at the tool (at the yellow cells), Center frequency = 5000, Q = 1.4 and boost = 6, it will return:
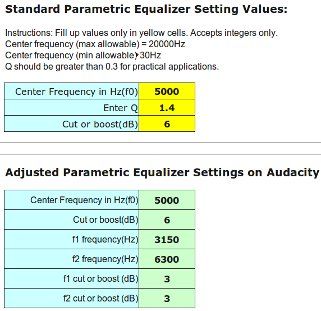
screenshot EQ
Now to implement the EQ settings shown above under “Adjusted Parametric Equalizer Settings on Audacity”: Launch Audacity, then open a sample WAV files. Go to Effects – Equalization – click “Graphic Equalizer”. Then click “Flat”.
Start by boosting the center frequency 5 KHz by 6dB:

boosting by 5 dB Audacity
The next step is to boost the f1, f2 points: Boost 3150Hz with 3dB and 6300 Hz by 3dB according to the Excel tool calculation result. This is the resulting EQ plot after you adjust it:

boosting f1 and f2 in audacity
Finally, smoothen the EQ plots by boosting the nearby frequencies between f1 and f2 range to become a near perfect bell curve (mountain like) such as this:
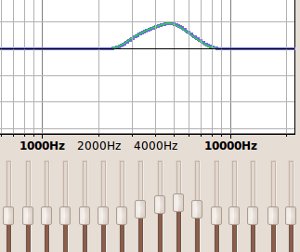
bell like curve eq boosting
The parametric EQ adjustment on Audacity is complete. You can do the same with cutting frequencies. So instead of boosting the nearby frequencies to make a perfect bell (mountain like curve), you will cut nearby frequencies to make it a reverse bell curve such as shown below:
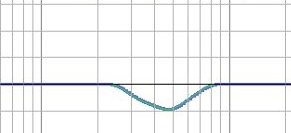
reverse bell curve EQ
Content last updated on July 14, 2012