Tip#3: Never clipped beyond 0dBFS
When you are editing a digital audio waveform; there are times when the result would boost or amplify the original signal. This is when you are using effects such as EQ, amplification, compression, etc. When applying effects; make sure your digital audio waveforms would never clip beyond 0dBFS. This will result to audible distortion. Clipping is easy to spot because this will turn the level meters to red (inside the white box).
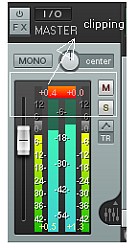
Clipping on Reaper
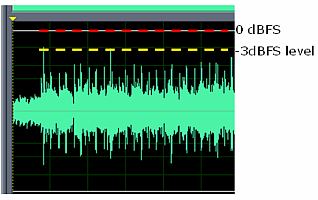
The most recommended approach is to leave at most -3dBFS headroom. See the waveform screenshot below:
Headroom specs
As you can see, the red line is the maximum possible digital audio level and that is 0dBFS. Beyond this level, it is called “clipping”. Make sure that when you are doing audio editing, you should be careful that there are no clipped waveforms. At a start, you can set the maximum peak to -3dBFS to make sure you still have enough headroom/allowance for future editing. Find out more about digital clipping in the following tutorials:
Recording Clipping Prevention Techniques
Tip#4: Always backup your original source audio before editing
Audio editing can be destructive. This means that saving the file would overwrite the original file with and there is no way to bring it back. Beginners often commit this mistake only to realize that they want to undo all the changes which is not possible after saving the file.
As the best practice, backup all audio files before doing the editing process. When you are saving files and you accidentally overwrite the file, you can repeat the editing process by using the backup files.
Tip#5: If possible, always use non-destructive editing method
Non-destructive editing method preserves the original audio file during the editing process. The effects are only remembered and applied on the software and not directly rendered to the original audio file saved in your hard drive.
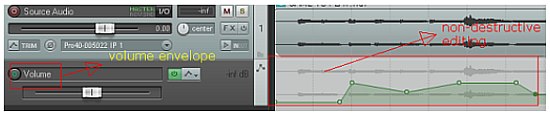
Not all audio editing software offers this feature. If you want a non-destructive audio editing environment, you can use REAPER. Below is an example of controlling the audio file volume in different sections of the edited waveform by using the volume envelope/automation. This feature is also available in other audio editing software:
Reaper volume non destructive editing
Volume automation is used to control the loudness in different sections of the waveform. For example in the above screenshot, the audio is edited such that there is silence at the beginning of the audio file. Envelope is a very flexible and easy audio editing tool.
This type of editing is considered safe because it won’t alter the original source audio. When you are finally implementing the changes, REAPER would ask you for a new file name so that original file won’t be overwritten in the process. For more information on this topic, read this post on editing audio files: non-destructive vs. destructive editing.
Tip#6: If possible, always use minimal effects processing
Effects processing can further add errors and artifacts particularly if the source audio are lossy formats (MP3). You should keep the processing to a minimum if this is the case.
There are instances when you need to do a lot of processing on the digital audio. In this case, make sure you are working with a high resolution WAV file (24-bits) as they are an accurate/complete representation of original audio.
It is why 24-bits audio is an industry standard in professional music production. Engineers working in the studio are often applying a lot of effects to improve digital audio quality. Since the source audio is uncompressed and high resolution; quality would be preserved and digital errors are kept to a minimum during the editing process.
Content last updated on July 23, 2012