Step3.) Formulate EQ adjustment settings
In “Appendix F. EQ examples” sheet; you can find lots of information on doing EQ adjustment examples based on the frequency response plot.
Let’s follow the solution steps:
1.) Identification of problem frequency range.
a.) Weak mid-frequency from 800Hz to 3200Hz
b.) Wide and weak high-audio frequency response from 5000Hz to 13000Hz
2.) Estimating the amount of cut and boost
Since all the issues are weak frequency response, I would only be doing boosting here and no cut. Based on the plot, I would like to implement the following boost settings:
For weak 800Hz- 3200Hz mid frequency range= +2.0 dB boost
For weak 5000Hz to 13000Hz high-audio frequency range= +3.0 boost
I encourage you to read “APPENDIX E. Best EQ practices” sheet, for more details on doing EQ settings.
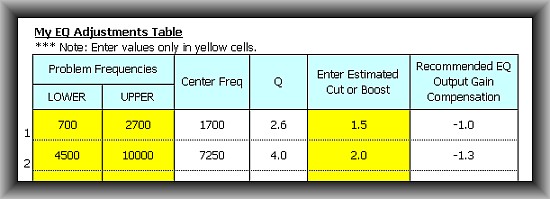
3.) Computing the center frequency, Q, and output compensation gain.
I then proceed to “My_EQ_ADJUSTMENTS” sheet to input the above values. This is how it looks like:

EQ settings
EQ settings#1 (correcting weak mid-frequency response):
Center frequency= 2000Hz
Q= 2.5
Estimated Boost= +2.0dB
EQ output gain compensation= -1.3dB
EQ settings#2 (correcting weak high-audio frequency response):
Center frequency= 9000Hz
Q=3.4
Estimated Boost= +3.0dB
EQ output gain compensation= -2.0dB
Output gain compensation is used to prevent your track from gaining undesirable loudness from EQ boost. This can result to distortion. Most parametric EQ tools are equipped with this feature such as Waves Paragraphic.
For more details, read the “EQ_Output_Compensation” sheet in the tool.
At this end of this step, I finally obtain the EQ settings necessary to balance the frequency response of the track.
Step4.) Implementing the EQ settings
I then open the high resolution WAV mix down (In the demo files: High Resolution WAV Files– > CanIknowYourName-BEFORE EQ.wav) file in my audio mastering software (Adobe Audition 1.5).
I use Waves Q1-Paragraphic to implement each of the EQ settings one by one. These are the Q1 EQ screenshots:
For EQ settings #1:

EQ#1
For EQ settings #2:

EQ#2
There is some small drop in loudness of the adjusted track after EQ settings. This is OK. After implementing the above EQ settings, I immediately save it with a different file name (Refer to High Resolution WAV Files — > CanIknowYourName-AFTER 1st EQ.wav). When saving the file, I use the same bit depth and sample rate as the original mix down.
I played the track a few rounds to examine the changes in the frequency response and I noticed some improvements this time:
a.) The mid-frequency response is now cutting clearly.
b.) The high-audio frequency response is brighter than the original mix down.
But for me, it still lacks that “little” presence on the mid and high to get that perfect sound. This is how it sounds like after EQ adjustment at the same -20dB RMS volume with the original track for clear A-B comparison:
How about doing a confirmation with the AudioSpectro FIRE tool?
Step5.) Measuring the Frequency Balance Improvement after EQ
I repeat the entire raw data generation process using the WAV output (CanIknowYourName-AFTER 1st EQ.wav) of the EQ adjustment process. You view this data in the demo files: Raw data generated — > raw data- AFTER 1ST EQ.txt.
The frequency balance score increases from a low 52% to 78%, an improvement of 26%.
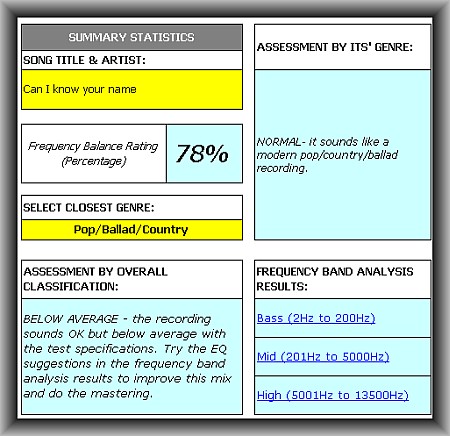
frequency summary
Specifically:
1.) The mid-frequency range improves from 36% to 23% below specifications. The remaining problem frequency range is highlighted in dotted box.

problem range
2.) The high-audio frequency range improves from 67% down to 21% below specifications.
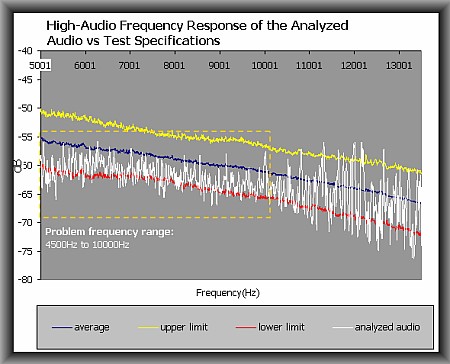
problematic high-freq
Can this be further improved? Yes of course.
Step6.) Implementing Further Improvements on Frequency Balance
Using the “My_EQ_ADJUSTMENTS” sheet on the tool, I inputted the remaining problematic frequency range with the desired gain and the recommended settings are shown below:
recommended values
Then I open again the EQ-adjusted WAV file (CanIknowYourName-AFTER 1st EQ.wav) in my audio mastering software and implement the above EQ settings using Waves Q1 paragraphic.
I give it some time to listen to the track after EQ tweaks and indeed it now sounds great to my ears the first time. I then save the WAV output of this 2nd EQ adjustment with a different file name (refer to High Resolution WAV Files — > CanIknowYourName-AFTER 2nd EQ.wav) but retaining the same bit depth and sample rate.
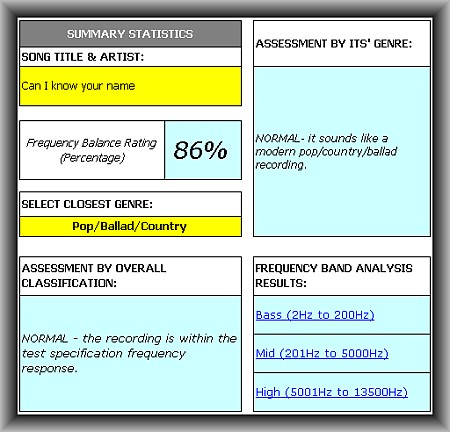
I generate another set of raw data using the adjusted file: CanIknowYourName-AFTER 2nd EQ.wav. You can view this data in the demo files: Raw data generated — > rawdata-AFTER 2nd EQ.txt. And finally, the frequency balance rating increases to 86% and everything else (the bass, the mid and high) appears normal. For details on of this result, please refer to “Analysis on Original MixDown AFTER 2nd EQ.xls” in the demo files.
Final response
This is how the final mastered track would sound like after the 2nd EQ adjustment (with Waves L1 limiter plug-in applied):
This is how it sounds like without the limiter and normalized to -20dB RMS (for A-B comparison with the previous examples).
You can practice with the audio files provided with the demo to see if you come up with the similar results using your own tools.
Once you get to know the process very well, you can then start improving the frequency balance of your own mix down. Using AudioSpectro FIRE removes a lot of guesswork in the frequency balance adjustment process.
DIY Audio Mastering Process with AudioSpectro FIRE
Using this tool, you can easily implement a simple audio mastering process such as:
Raw mix down (e.g. 24-bit/44100Hz WAV) — > EQ (Frequency Balance Adjustment with AudioSpectro FIRE) — > Limiting process
Assuming you have a well-crafted mix, all you need to do is to implement frequency balance first then apply a conservative amount of limiting using your favorite limiter plug-in (e.g. using Waves L1) to attain the final desired loudness and you are done with your mastering.
I recommend targeting DR11 or DR12 dynamic range (after limiting) for best results as discussed in this tutorial on creating radio-friendly mixes. You can of course make your masters even louder (e.g. DR 10 and above) but you risk losing the original dynamics.
With this recommended process; you have implemented minimal digital audio processing in mastering that preserves much of the quality of the original mix. For distributing the final masters based from high-resolution WAV master (e.g. 24-bit/44100Hz), this is my preferred flow:
Distributing as high quality MP3 masters (320kbps)

MP3 masters
The above is the optimal process based on this research.
Distributing as 16-bit/44.1KHz audio CD master:

CD master
Another Frequency Balance Illustration
This is not included in the demo files, but let’s illustrate another example. Listen to the raw mix down below before mastering:
Basically, the frequency balance rating before EQ is already around 85%. The only problem after listening the track seems to be a lacked of mid-frequency presence. This has been confirmed by AudioSpectro FIRE with 37% of mid-frequency response falling below specifications (inside the orange box):
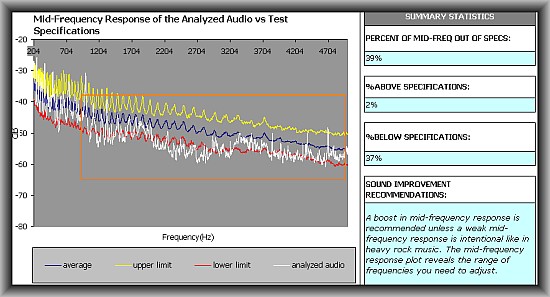
spectrum response before adjustment
The affected frequency range is around 1200Hz to 4600Hz; approximately this needs a boost of around +2.5dB. The following are the final EQ settings formulated with the help of the tool:
Center frequency: 2900Hz
Q= 2.6
EQ Gain: +2.5dB
Output gain compensation: -1.7dB
After implementation, there is a significant improvement in the track frequency balance. The final rating is at 91%. You can listen to the two samples below after the EQ adjustment:
Normalized to -20dB RMS:
With limiter applied:
Benefits and User Feedback
The following summarizes the most important benefits on using AudioSpectro FIRE with your project:
1.) Identify frequency balance issues objectively in your mix.
2.) Accurately identify problematic frequency range in your mix that would be difficult to confirm with listening or in a limited monitoring environment.
3.) Assist in formulating EQ tweaks to get a professionally sounding finished master.
4.) Objectively compare your mix to broadcast quality/reference tracks.
5.) This is a perfect confirmation tool (used along with your ears) in monitoring problematic frequencies during the mix down and mastering.
6.) It provides lots of easy-to-understand information about the frequency response of your mix.
7.) It minimizes the guesswork when doing EQ adjustments during mastering.
8.) This tool uses FFT data analysis techniques that prevent external factors (room acoustic response, external noise, etc.) from affecting the accuracy of EQ adjustments.
9.) It will help in documenting your work progress by saving analysis results in the form of spreadsheet data and text files.
User feedback: Since this tool is new, here’s some of the initial user feedback on using AudioSpectro FIRE:
“I have been using this tool, somewhat different than the outline, but very much inline with the objective. It really is a good starting point on understanding the mastering process. I am seeing a lot of issues with my mixes and the corrections make a huge difference!
Thank you for providing this tool…”
“…Now, all of my cuts are consistent, no more worrying about of the loudness, too much bass, etc. It really is a GREAT tool for all of us beginners to produce clean professional sounds. Now I just have to focus on mixing :).
Thank you very much for this tool!”
Download and Purchase a License
You can download the latest version of AudioSpectro FIRE (right click and save as):

(Latest version: 1.4, November 6, 2012)
Tested/Recommended Compatible Software:
1.) Windows operating system with MS Excel (At least Version 2002 or 2003)
2.) Windows OS with Calc Open Office version 3.4.1
3.) Linux operating system with Libre Office Calc (version 3.5.4.2)
4.) Audacity (Linux and Windows version) version 2.0.2 (as of November 2012)
5.) TT Dynamic range meter – in Windows and Linux. Use Wine to run this software.
6.) Plugins – Waves EQ plugins (fully tested and working).
7.) Other EQ plugins – refer to user notes under “My EQ adjustment sheet” in the tool.
8.) Audio mastering software – compatible any mastering software
The software package for evaluation is complete with all the required documentation (generating raw data, etc.), EULA (End-user license agreement) and helpful-guide/tips. It is a fully working version.
After downloading, unzip the package. You will see four folders inside the main folder. These are as follows:
a.) Documentation– complete reference and manual of the software.
b.) Libre Office Calc for Linux – use this version if you are in Linux.
c.) MS Excel Windows – if you are using MS Excel as your spreadsheet solution.
d.) Open Office Calc – if you are using Open Office as your spreadsheet solution in Windows OS.
Before purchasing a license, I recommend you fully evaluate AudioSpectro FIRE in your projects for 30 days. I also encouraged you to read the EULA for the terms covered by the license. And if you finally decide to use this software for more than 30 days, you should purchase a license.
There is only one type of license offered:
$39.95– Single-user for both personal and commercial use.
You can also purchase license directly from the tool, go to EULA sheet and you can find the PayPal link.
Support for non-profit software: The developer will be donating 5% of sales to Audacity and The Pleasurize Music Foundation. AudioSpectro FIRE uses these tools to generate raw data for the analysis.
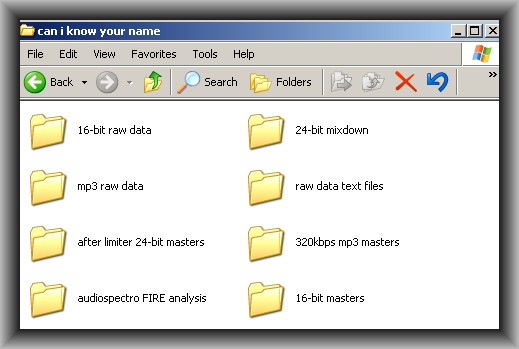
TIP: Organizing your Files
It is essential to organize analysis files and raw data to avoid getting lost in your audio mastering process. I recommend that you create a dedicated folder for each song with analysis folders inside like this:
structure
Where:
a.) 16-bit masters– folder containing the finished product: 16-bit/44.1KHz WAV master.
b.) 16-bit raw data -this is the folder where you will be placing your raw 16-bit files for volume analysis (the one exported by Audacity). To organize file names, I recommend the following:
songtitle_beforeEQ.wav – this is not yet applied with EQ
songtitle_afterEQ.wav – applied with first EQ
songtitle_after2ndEQ.wav – applied with second EQ
c.) 24-bit mixdown -this the folder where you will place your 24-bit files. You can use the above naming conventions also to this folder like:
songtitle_beforeEQ.wav – this is the original 24-bit file not yet implemented with EQ or mastering effects
d.) 320kbps MP3 masters -your high quality MP3 master will be placed on this folder.
e.) after limiter 24-bit masters – once you have completed the EQ adjustment you can implement limiter. The limiter applied 24-bit master will be placed on this folder.
f.) audioSpectro FIRE analysis -folder where you will be placing your analysis Excel files from the tool. For example:
songtitle_after2ndEQ.xls – this is the audiospectro FIRE analysis file after second EQ.
g.) mp3 raw data – folder containing your 128kbps mp3 files for raw data generation.
h.) raw data text files – you will place all generated raw data text files in this folder.
A big advantage of this workflow is that your entire work will be documented. You have all the necessary data and files you have created during the mastering.
Project Credits
Developer/Creator: Emerson R. Maningo
Website: https://www.audiorecording.me/
This project would not be possible without the following important software:
TT Dynamic Range Meter by The Pleasurize Music Foundation
Website: http://www.dynamicrange.de
Audacity by the Audacity Team:
Website: http://audacity.sourceforge.net/
Voxengo R8brain by Aleksey Vaneev
Website: http://www.voxengo.com
LAME MP3 by Lame Developers
Website: http://lame.sourceforge.net/
Changelog
November 6, 2012 – Version 1.4 – This is a major upgrade of the software with the following important changes:
a.) Improve the output gain calculation algorithm by providing two sets of values (max and min) to compensate increase of loudness due to EQ adjustment. You only need to select a value between this range.
b.) Provide a complete documentation of each specific task in PDF files.
c.) Improve compatibility of the software to Open Office and Libre Office spreadsheet solutions.
d.) Improve calculation accuracy of desired EQ settings.
October 16, 2012 – Version 1.3 – Update tool source code for compatibility with Linux operating system. Add user notes on “My EQ adjustment” sheet pertaining to Q setting accuracy. Add some notes on “EQ Output compensation” sheet pertaining to gain adjustment of quiet mixes.
October 9, 2012 – Version 1.2 – Change raw data generation process to use TT Dynamic range meter instead of REAPER. This is an easier and more flexible method.
October 8, 2012 – Version 1.1 – Original version.
Content last updated on November 6, 2012