This is a tutorial how to implement dynamics processing or compression in Adobe Audition without plug-in. In this way, you will be relying on the built-in compressor included in Adobe Audition called as the “dynamics processor”. This tutorial is written using Adobe Audition 1.5 but the concepts illustrated in this tutorial can be applied to modern versions. To get started, follow the steps below:
1.) Launch Adobe Audition.
2.) Go to Edit View. Bear in mind that you can also implement this process in the multi-track view by loading the built-in effects in multi-track racks. But let’s just use the Edit view because it’s simple. However, take note that doing changes in Edit view can destroy the original audio material. Make sure to back up the original audio before saving any changes. In multi-track view, it is non-destructive because the settings are implemented in sessions rather than to the direct audio wave.
3.) Go to File – Open and then load the audio wav file that needs compression.
If you are new to audio compression, you should need to read this introductory tutorial on dynamic range compression. Examine why you should need to compress in the first place. You need to have some objective before you compress. Having a clear objective helps you how to set your compressor to get the desired sound. For example, you are examining the audio material before compression below:
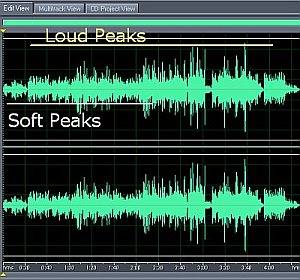
There is a big difference between loud (yellow lines) and soft peaks (white) in the audio material and you may want to even out the volume using compression.
4.) Before you will implement some compression settings, you should need to analyze your audio material to know what are the minimum RMS and maximum RMS power of your audio. This will be basis for your compression settings later on. Go to Analyze – Statistics. The result will be shown as follows:
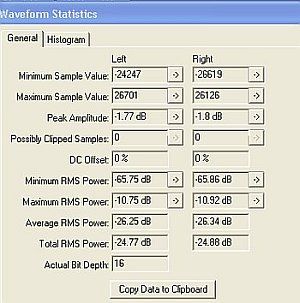
It shows that the minimum RMS power of the audio before compression is around -65dB while the maximum RMS power is -10dB.
5.) To implement compression, go to Effects – Amplitude – Dynamics Processing. Actually this looks like this:
There are actually two ways you can set your compressor using dynamics processing effects. The first one is using “Graphic” and the second one is using “Traditional”. You can see them as tabs in the Dynamics processing effects. Graphic methods are much simpler to do. Traditional methods are for advanced users that needs very fine compression adjustments. But what you set in the graphic methods will also be automatically reflected in the traditional settings tab. Since you need to even out the volume, the ideal compressor behavior is as follows:
a.) When the audio hits its minimum RMS power, the compressor should boost its level to make it loud.
b.) When the audio hits the same level with maximum RMS power, it level will be retained (no gain or no reduction).
c.) When the audio hits above its maximum RMS power, it will be attenuated.
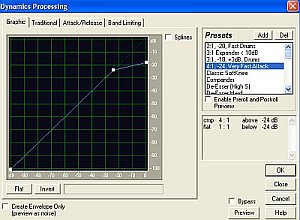
6.) The best compressor presets to start with to accomplish the above behavior is the “classic softknee”. Select the entire wave (Go to Edit then select entire wave). Then go again to Effects – Amplitude – Dynamics processing. Under “Presets” select “Classic SoftKnee”. Let’s use the graphical method to implement the settings.
You can simple click and drag the points in the graph to adjust the default compression behavior. Supposing you would like a -65dB input power to become a -40dB at the compressor output (making it louder when it’s soft). You can click and drag such that it will look like below:

The x-axis is the compressor input while the y-axis is the compressor output. Looking at the graph above; when the input is -65dB, the output is -40dB. You can also notice that even when the input to the compressor is above -10dB, say -5dB or even 0dB (loudest). The output will still remain at -10dB. This is because the overall objective of the compressor (used in this example) is to even out the volume.
7.) Now click at “Band Limiting”. The low cutoff is set to 0Hz and the High cutoff to 24000Hz. This implies that the compression adjustments will implement in this frequency range. If you like to compress bass frequencies, you need to change the high cutoff from 24000Hz to only 150Hz or 200Hz.
8.) To implement the dynamic settings, click OK. This is how the resulting audio waveform should look like after compression:
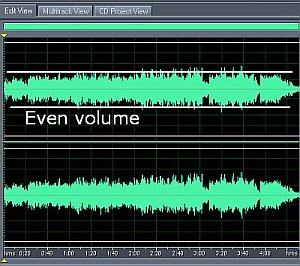
As you can see the volume peaks throughout the waveform is now even. You cannot only use the compressor to even out the volume but you can use them for any dynamics processing task you want.
Content last updated on June 21, 2012


2 Responses
Hi Hebz,
You can send it via email as long as it is in mp3 format (320Kbps) format and less than 10MB in file size. You can refer to the contact page of my blog for the email address. By submitting, you agree to the site terms and conditions and you hold the rights to the song and the recording. Cheers.
Emerson
I have my own song. How can i upload them for you to comment about how they sound?