Creating MIDI Music using Virtual Instrument
If you want to create MIDI music, then you need to use the built-in editor provided by REAPER. Follow the steps below:
1.) Go to File – then create a new project.
2.) Insert your favorite virtual instrument as illustrated in the previous section.
3.) Go to Insert – then click “New MIDI Item”.
4.) Right click over the blank MIDI item added then go to “Open Items in Editor” and finally select “Open MIDI Item in Editor”.
5.) You will then see a MIDI editor with a piano keyboard.
6.) To add musical notes, press your mouse left click button and hold on to shade the notes in the grid. Below is an example of a C Major scale plotted using the editor:
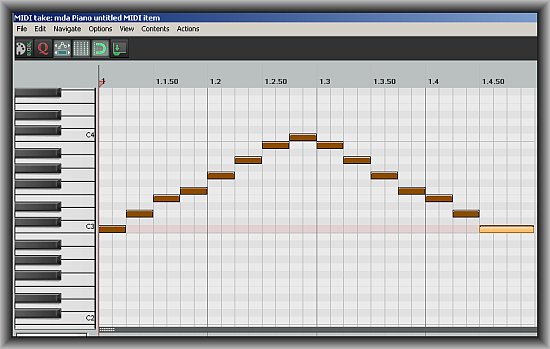
notated in editor
7.) After writing some music, go to File – Close Editor. The MIDI item is not anymore blank but is now containing digital music data. It is not anymore an empty MIDI track since it will be updated with the music you have added in the editor.
8.) Render the MIDI music as WAV or MP3. For example, this is the rendered MIDI project in 320kbps MP3:
Importing Big MIDI projects, Routing and Isolating Tracks
It’s possible to import big MIDI projects consisting of several tracks. It is also important to learn how to route virtual instruments to its respective MIDI track or isolate a certain track in the mix. Below is an example:
1.) Download this sample MIDI project (Right click then save the zip file to your Desktop).
Credits: Piano concerto No. 5 in E flat major by Ludwig van Beethoven
Sequenced and arranged by Jean-François Lucarelli
2.) Unzip the MIDI file.
3.) In REAPER, go to Item — > Insert Media File then select beethoven_piano_concerto.mid
4.) Make sure the following is checked under MIDI file import options:
a.) Expand 20 source tracks to new REAPER tracks.
b.) Merge source tempo map to project tempo map at 1.1.00.
5.) Click OK.
6.) You will then see the entire MIDI tracks of the piano concerto being imported.
7.) Supposing you want to listen and isolate the piano forte track only. Let’s use the piano VST virtual instrument in the previous section to play this track. Add that instrument first then drag it to the top (as the first track). This is how it looks like:
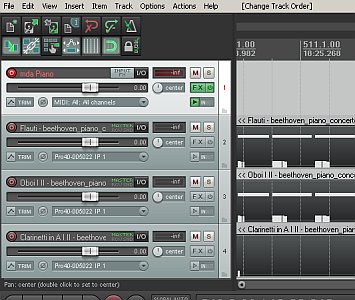
added VST
8.) Find the Pianoforte MIDI track and configure it to be routed to piano virtual instrument. Select it and click “Master I/O” (enclosed in yellow box).

Aux sends
9.) In the “Add New Send” drop down, select “mda Piano”. You should be able to see “Send to Track 1 mda Piano” after doing this:
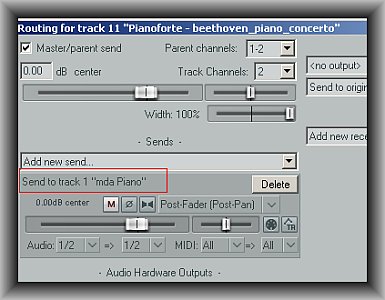
complete sends
You can then close it.
10.) Position the marker near the start of the piano forte MIDI track to prepare playback as soon as possible.

positioning before start
11.) Hit the play button. You should be able to listen only to the piano forte track. This is how it sounds like when rendered to MP3:
The above concept can be applied to any MIDI projects. For example, if you are importing a string quartet, you need at least 3 virtual instruments to play the entire project (viola, violin and cello). Route each of the MIDI track to their respective virtual instruments using the techniques illustrated earlier. You will then be able to listen to the entire string quartet or even render it as an audio file. The quality of the rendered sound depends on the quality of your virtual instruments as well as the settings used.
This tutorial can be applied to other genre using MIDI instruments such as pop, rock, etc.