Audio mastering example
As a start in mastering, it follows the usual steps (my personal preference although other engineers might have other methods):
Step1. EQ using Parametric Equalizer (providing tonal quality and flavors for your mastered track)
Step2. Multiband compression (adjusting dynamics and final shaping of the audio frequencies and level).
Step3. Limiter (making the track as loud as possible without ruining the dynamics or adding distortion).
The first step (EQ) and the last step (limiter) are not discussed in this tutorial. You can read here for some mastering EQ tips. For tips on how to use the limiter, you can read this tutorial on L2 Ultramaximizer and creating radio friendly mix.
The multiband compression is an important step because it provides the final dynamic control to make the track to sound as good as possible. Below are my basic routines using LinMB for mastering. The following steps can be applied to any audio mastering software:
Step1.) Load up the track to be mastered in the Adobe Audition editor view (or in any DAW you are using).
Step2.) Launch the LinMB multiband compressor effect/plugin. You need to go to Effects –> DirectX –> Waves –> LinMB. You can also use the VST version if its installed.
Step3.) Start with using the “Factory Preset”. The most recommended setting is to start with “Multi Opto Mastering” preset.
Step4.) Click “Preview” to play the music.
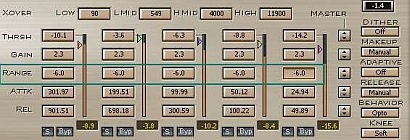
Step5.) Now while the music is playing, adjust the “Range” of all bands (Low, LMid, HMid and High) from -5.1 to -6. This is how it looks like after adjustment (enclosed in green box):
LinMB multiband compressor adjusting range
The purpose of setting this to -6 is that if you compress, you are controlling loud peaks and that the maximum attenuation should not exceed -6dB.
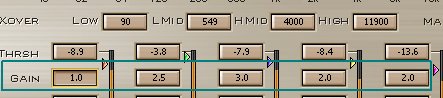
Step6.) It’s now the time to set the thresholds. While the music is playing (by clicking preview); adjust the threshold to match with the maximum recorded peak energy level. For example, see the screenshot below:

Adjusting the threshold in multiband compressor
As what you can see, if the peak energy level of the low band is -8.9dB, the THRSH is also set to -8.9.For LMid, it is -3.8dB as well as the LMid band threshold is set to -3.8dB. The peak energy level can be seen at the bottom, this is a level meter that moves when the music is played. The purpose of setting the threshold to match with the peak energy level of each band is controlling loud peaks that occurs any of those bands. If the compressor sees a signal above the thresholds, it will be compressed.
Step7.) Now under “Makeup”, click it to change from “Manual” to “Auto”. See screenshot below after changing “Makeup” to “Auto”.
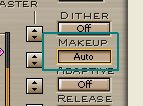
auto make up with Linear Multiband
Step8.) It is now the time to use your “ears”. Adjust the “Gain” of each band in such a way that the overall tonal quality is “balanced” (from low to high frequencies). Bear in mind that if you are doing EQ before multiband, this can only be minor adjustments. Or can be ignored at all if you are satisfied with the tonal quality output as played by the preview.
Be conservative with gain, too much can destroy an otherwise well balanced mix. Personally, I apply at most 3 or -3 in any band. A positive value in gain is boosting while a negative value is reduction. A sample screenshot after gain adjustments:
a sample gain adjustments in Waves LinMB
It is highly important that you have a well balanced room (studio room designed for mastering and audio mixing), so that EQ adjustments will be accurate. Read here for some tips on studio setup acoustic design.
Step9.) Play the entire music again by clicking the “Preview”. Find the loudest passage of the song and then if you find it, click the “Trim” button. This will control the overall global output gain to within its reasonable level. This is the trim button in the multiband compressor.

Trim button in multiband compressor
Step10.) Finally when you are happy with those settings, you can click “OK” to implement all multiband compressor settings to your mastered track. You can then proceed to the limiter stage where you will need to maximize the loudness of your track. You can refer to the related tutorial links provided previously.
As a tip, you can use reference tracks when mastering and this will be very useful if you are aiming for a particular sound based on your favorite recordings.
Content last updated on June 20, 2012