2.) The job of the dithering is to convert a higher bit depth (e.g. 24 bit audio) to lower bit depth such as 16-bit CD audio. Using the quality tools mentioned previously ensures that the dithering system employs some noise shaping features that will retain the original dynamic range and quality. This makes the 16 bit output quality to sound roughly similar to the original 24 bit audio (before dithering).
Some dithering software does not use noise shaping or does employ optimized dithering algorithm, as a result the converted audio is not optimal after dithering. Fortunately, this is not detectable by normal listeners. But it can be audible in a very accurate monitoring environment with an experience sound engineer.
Example illustration on how to implement dithering for commercial music distribution (converting 24-bit audio masters to 16-bit audio):
Step1.) Ensure that the audio is now in 44.1KHz sample rate format. You can use any recording and DAW software to confirm this. If not, then do sample rate conversion first using R8brain before dithering.
Step2.) Say for example you are using Adobe Audition (similar steps are applicable to any DAW). Load the audio in your software and confirm the bit depth. You can do this by going to View — Wave properties. The audio is shown as:
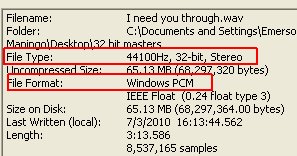
Audio wave properties using Adobe Audition
It shows that the source file is a 44.1 KHz, 32-bit float audio wav file. If you are using Reaper, you can do this by selecting the waveform then clicking “Source Properties”. More details on this Reaper audio mastering tutorial.
Step3.) Close Adobe Audition and re-launched it. This time go to File — Batch processing -Click “Add Files” — navigate to the audio file location in your hard drive and click “Add”
Step4.) Skip “Run script” but click “Resample” tab.
Step5.) Make sure “Conversion settings” has been checked.
Step6.) Click “Change destination format”.
Step7.) Configure the following in the “Convert Sample type” menu.
Sample rate=44100
Channels = stereo
Resolution = 16
Pre/post filter = checked
Step8.) Check “Enable Dithering”.
Step9.) Recommended dithering settings:
Dither depth = 0.5
p.d.f = Triangular
Noise shaping = 44.1 KHz
Screenshot:
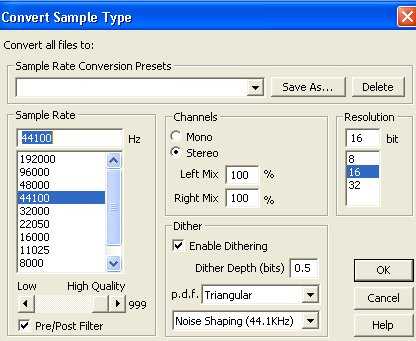
Dithering settings in Adobe Audition
Click OK.
Step11.) Under “Output format” select WAV file and 16 bit (44.1Khz).
Step12.) Select where you would like to save your converted audio file.
If you are using other DAW such as Reaper, then you can follow the similar steps above as they all DAW have batch conversion feature. In the steps, do not forget to enable or check dithering. Not all software do have noise shaping features such as illustrated in Step9 above. But it is still doable.
If you prefer to use Voxengo R8brain in doing the dithering, then simply set the output bit depth to 16-bits and the processed output will be dithered.
Why it is important to use dithering and sample rate conversion in your mastering work? The audio format during the mastering process is around 24-bits/48KHz or even use a higher sample rate such as 96KHz, so you need to employ dithering and sample rate conversion to convert that resolution to 16 bit/44.1Khz which is the standard audio format used in CD and MP3 players. But if you are recording and mixing at 24-bits/44.1KHz resolution. The sample rate is now 44.1KHz, so you do not need to do a SRC only dithering.
Content last updated on July 21, 2012