Configuration Steps on using Saffire Pro 40
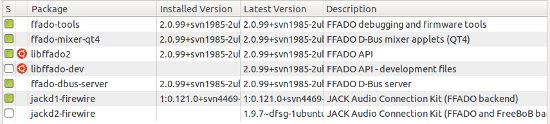
Now that all important packages/software are installed; let’s test the installation. Follow the step by step procedures below carefully:
1.) Switch on Saffire Pro 40 as well as the studio monitors. When the audio interface is now powered; restart Ubuntu. After the restart, you need to make sure that the system recognizes your audio interface and you have the permission to use it. Follow steps 14, 15 and 16 in this tutorial to install FFADO & JACK from Source using Subversion in Ubuntu 11.10.
Do not proceed with Step2 below if the above steps are not perfectly complied.
2.) Launch terminal (Control-Alt-t), run FFADO DBUS server. Command below:
$ ffado-dbus-server
When it’s running; do not close the terminal window. You should be able to see “DBUS service running”. If you take a look at the executed lines, you should see the inputs and outputs of Saffire Pro 40 get recognized.
3.) Launch another terminal and run the FFADO mixer. Command:
$ ffado-mixer
If all is well, you should be able to see your Saffire Pro 40 mixer control panel that is similar to the one in Windows operating system. Feel free to submit the usage report to FFADO. This is how it looks like:

You do not need to touch or edit any of the Saffire Pro 40 mixer configurations. Leave it with default settings for this test.
4.) Launch another terminal again and run JACK using qjackctl:
$ qjackctl
Configure JACK for Saffire Pro 40 by clicking “Setup”. Configure as shown below (make sure the driver is set to Firewire and set other parameters with the values shown below):
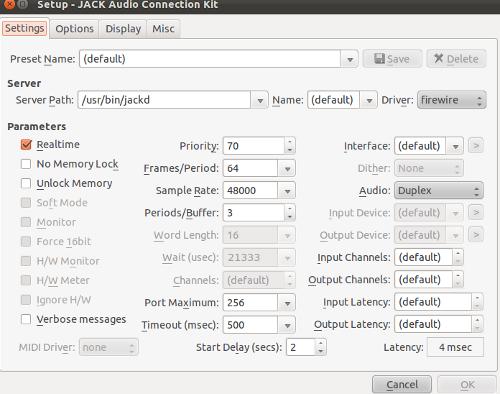
As you can see the latency provided is 4ms which is OK. Press OK to save the changes.
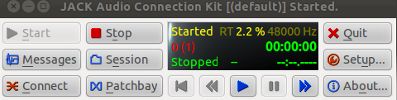
5.) Hit “Start” on JACK. There should be no errors. For the first time, the “FW active” LED on your Saffire Pro 40 hardware would emit a green light; indicating a successful Firewire communication between the hardware and your computer. This is the JACK screenshot showing it is started:
6.) Let’s do a test recording. Plug a musical instrument (acoustic guitar for example) to Input 1 of your Saffire Pro 40 and set the gain knob to around 30% to 50% of the maximum. Click the “Inst” button also on Input 1. Play the guitar and you should see the Input 1 level meters moving in response to the received audio signal from your instrument.
7.) Launch Ardour and let’s do a test recording. In New Session, assign a name e.g. “test”. Then click “New”. There might be some warning errors like ALSA driver not found, just ignore and close them.
8.) Go to Track – Add Track/Bus – select “1”, “Tracks” and “Mono” as well as “Normal” for “Track Mode” then click “Add”. This track would be named “Audio1” by default.
9.) Hit both the record button of the added track as well as master record button. See below (enclosed in yellow):
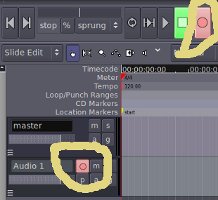
The master record button would then blink.
10.) To start recording, hit the play button. Play your guitar and the waveforms would then start to appear on Ardour. See below:
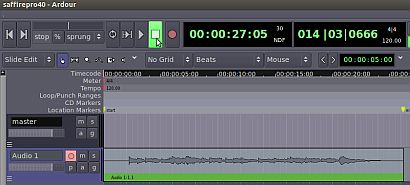
Below is a sample recording made with Saffire Pro 40 in Ardour using Ubuntu 11.10:
If you encounter some installation and configuration issues , leave a comment below.
Content last updated on June 29, 2012


11 Responses
Same question! ) Is it possible to playback OS sounds?
Hi, good tutorial. But now I have to stream audio channels separately on web, especially using php scripts! Anyone knows how?
I followed the instructions on Linux Mint 14 Nadia and everything is working perfectly including recording instruments and getting playback into my monitors! 🙂
However, the only thing I seem to be getting playback from is Ardour and nothing else on the operating system… is this intended? If so, would there be a way for me to use my interface for all sounds coming out of my OS including browser, mp3 and video files? If not it’s no biggie since I still get to produce music on Linux with my interface! 🙂 Thanks for this wonderful guide and please reply if you have any suggestions for me. 😀
What is your Ubuntu version? I am using the latest version of Ubuntu as of the time I write this comment as well as the latest version of Ardour.
everything works out like expected until I launch ardour. It launches fine and everything seems fine but when I try to add the track it just freezes. I am still able to move the track window around but the button is still frozen in the selection color and after a while a force quit window appears. I tried to record in audacity but it either doesn’t load at all or if it does it says there are something wrong in the input settings. What’s wrong?
Yeah, I see since Ubuntu recently released a new upgraded to 12.04. Thanks for the update.
In Ubuntu 12.04 I’ve needed to add my user to “audio” group and renamed the file /etc/security/limits.d/audio.conf.disabled to audio.conf. Rebooted and done!
You’re welcome..Glad to know it works.
Thank you very much!
I have installed Ubuntu 10.04 and followed your steps for configuration, and now it works!
I think its different. It is because Saffire 6 is using USB connection while Saffire Pro 40 is using Firewire. The tutorial is using FFADO which is basically a Linux audio driver for Firewire. I think its a bit tough getting this audio interface to work with Linux. You can read some related posts here: http://ubuntuforums.org/showthread.php?t=1486482
Hi
I don’t need a big interface like the Focusrite Saffire Pro 40.
Focusrite Saffire 6 USB would be enough for me.
is it possible / is it the same way to get it to work?