Kick drum:
Low shelf -9dB at 75Hz
Boost +3dB at 100Hz, Q=1.4
Cut -9dB at 400Hz, Q=1.4
Chorus bass:
Cut -9dB at 100Hz, Q=1.4
Boost +3dB at 400Hz, Q=1.4
The objective of that setting is to establish clarity between the kick drum and bass drum. The EQ settings also depends on the nature of the material. For more details, read this tutorial for more EQ settings used during mixing.
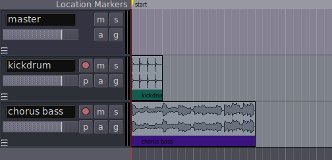
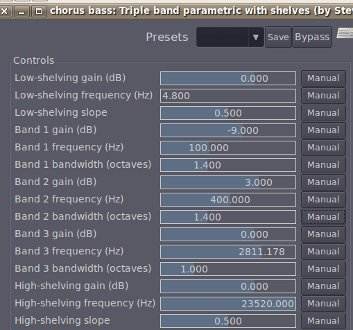
To implement the above settings. Go to “Window” – “Show Mixer”. Double click “Triple band parametric” under “kickdrum” track. Move the sliders of the “Controls” to assign a particular setting in terms of dB, frequency and Q (bandwidth) or double click on the values to type the setting. This is the EQ setting applied on kickdrum based on the above settings:

Now do the same for chorus bass and implement the above settings, this is how the triple band parametric settings would look like:
You can find more details here about using Tri-band parametric w/ shelves in Ardour.
2.) Try to play the session. Using your accurate studio monitoring system, listen properly if it’s the right EQ settings. Feel free to tweaked further until you obtained maximum clarity. Make sure that both the channel and master fader level does not clip after EQ adjustment. If it does clip, either lower the +dB settings in EQ or the specific channel fader itself.
Adding and Configuring Compressors in the Mix
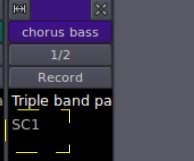
1.) Supposing you would like to add a compressor to the bass guitar. Go to Window – Show Mixer. Right click on the empty region below “Triple band parametric” under “chorus bass” track. Go to “New Plugin” – “Plugin Manager”. Find “SC1” which is a compressor, click “Add” and finally click “Insert Plugin”. You should then see SC1 added next to Triple band parametric, screenshot:
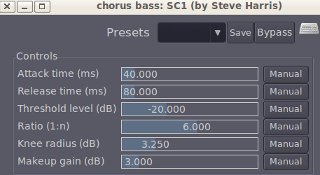
2.) To configure the SC1 compressor, double click “SC1” under “chorus bass”. Supposing you would implement the following compressor settings for the bass:
Threshold= -20dB
Ratio: 6 is to 1
Attack time: 40ms
Release time: 80ms
This is how it looks after implementing it on the SC1:
Aside from compressors, you can as well apply a lot of effects supported by Ardour. For example reverb, delay, echo, panning, etc.
Finally Mix Down your Track in Ardour…
If your mix sounds good, you can render a mix down into a single file ready for mastering. To do this:
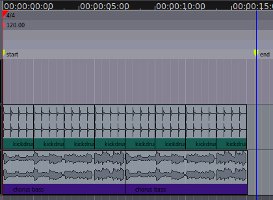
1.) Move the “End” markers near to the last section of the track. If you do not move this, you will have very LONG silence at the end of the track. This end marker is a blue line with yellow pin on the top. After moving this to the last part of the track, it would look like this:
2.) Go to Session – Export – Export Session to Audiofile, configure it as follows:
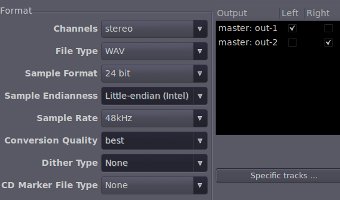
The format of the mixdown will be 24-bit/48KHz.
3.) Finally click Export. You will see the message “Congratulations on your session export”. You can decide to donate to Ardour as a one time donation or select “Ask about this the next time I export” if you are not yet ready. Click OK.
4.) The mixdown audio file will be placed in the path:
“/home/yourusername/Desktop/ardourmixingtutorial/export”
Note: If you have your Ardour project saved in your Linux desktop.
5.) If you want to see how your mixdown waveform looks like, right click and open it in Audacity (close Ardour first). This is how it looks like:
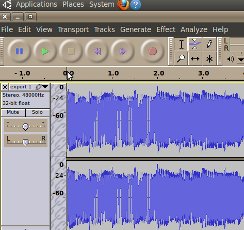
You can then provide this audio file to a mastering engineer for your track to be professionally mastered. Ardour can be very difficult to use for a beginner, but this tutorial illustrates all the basic concepts of audio mixing in a simple manner.
Content last updated on June 27, 2012


No responses yet