3.) Save the edited drum sound clip as 44100Hz, 16-bit mono.
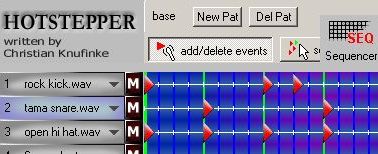
4.) Launch HotStepper and then go to View – Sound Library.
5.) Click “Add Sound” then click “Load Wave”. You can only load one drum sound clip at a time. Select the audio file and then click “Open”. For example, I select the edited “toom.wav” and I would like to add it to the library. This is how it looks like after clicking “Open”:
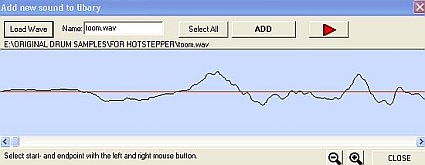
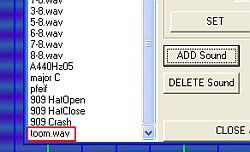
You can click the play button to preview. If everything is OK, click “Add” then “Close”. You will then see the sound clip listed in the sound library:
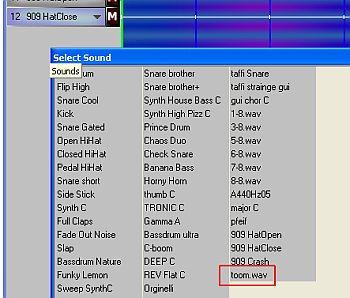
To update the list; click “Close and Save” button in Sound Library; then go to File – Quit. If it asks “Do you want to save before continuing?” click “No”. Re-launch Hotstepper and then you will now see toom.wav listed as one of the Hotstepper drum library sound. If you do not see it, right click on the gray area, then you see the “Select Sound”. See screenshot:
Adding samples to your Drums in multitrack
Supposing you will use a beat box/cajon/drum box percussion instrument to re-generate the fat bass sound in the kick that you need; follow the steps below:
1.) Insert the drum loops (the original one) to the any multi-tracking software for example Reaper DAW.
2.) These drum loops would serve as your click track (timing or reference).
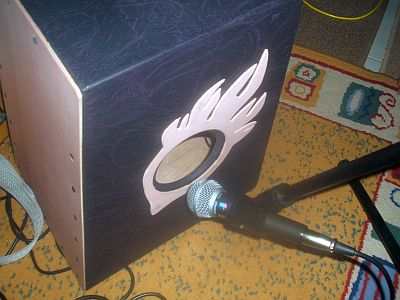
3.) Put a microphone on the percussion instrument. For example, you put the microphone on the drum box as follows:
4.) Plug the microphone to the audio interface preamp input.
5.) Adjust for desirable gain to make sure there is no clipping and noise.
6.) In your DAW (multi-tracking software), insert a new track, for example you named it as “bassdrumrecord”, see below:
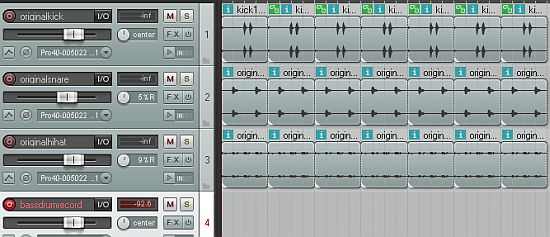
The first three tracks are your original drum loops that you want to improve. The fourth track is the bass drum sample sound to be added. It is red because it is aimed for recording. Finally hit the record button and record your sample. When you record the bass drum, record only the bass drum sound not anything else. The recorded peaks of the bass drum should at least synchronize with the original kick spike; see the first 4 yellow arrows below:
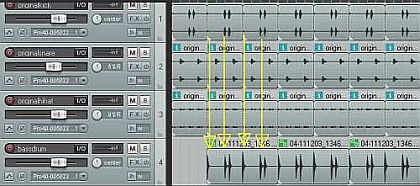
It should follow to the rest of the kick drum spikes. Do not purposely align them perfectly. By recording; you add some natural delay captured on it. Some minor “off-beats” can add “feeling” to your beat sound and prevent it to sound too mechanical.
7.) Now duplicate the snare track. Do not yet add any EQ or other effects.
Adding Effects – EQ and Reverb
Now the following effects have been added (feel free to experiment for a better sound, the above settings are for quick guidelines only):
Original Kick drum:
A.)Parametric EQ:
1.) Low shelf 150Hz, -3dB
2.) 2000Hz, +3dB, Q=1.0
3.) 400Hz, -6dB, Q=7 (removing cardboard sound)
Recorded Sample Bass Drum:
A.) Parametric EQ
1.) 75Hz, +3dB, Q=1.0
2.) 2000Hz, -3dB, Q=1.4
Original Snare:
A.) Parametric EQ
1.) 200Hz, -6dB low shelf
2.) 2000Hz, +3dB, Q=1.0
3.) 8000Hz, -3dB, Q=1.4
B.) Reverb
1.) Focusrite Reverb, preset to Small Bright room with mix set to 60% dry.
Duplicated Sample Snare drum:
A.) Parametric EQ
1.) 100Hz +3dB, Q=1.0
2.) 8000Hz, +3dB, Q=1.0
3.) 2000Hz, -3dB, Q=1.4
B.)Focusrite Reverb, small bright room, 60% dry
C.) Delay (10ms)
Hi-hat
A.) Parametric EQ
a.) 12500Hz, +3dB, Q=1.0
b.) 3000Hz, -1.5dB, Q=1.4
B.) Reverb (same as the snare)
This is the result:
Content last updated on October 10, 2012


No responses yet