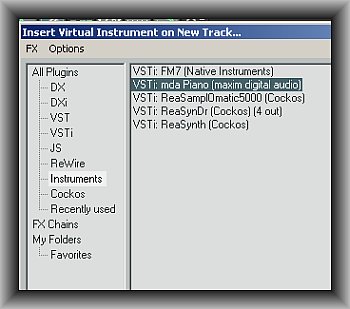
Multi-track Recording Tutorial in Reaper & Importing of Tracks

by: EMERSON MANINGO on April 24, 2012 in Reaper DAW Tutorials

This is a quick and illustrative tutorial for beginners on doing multi-track recording in Reaper. It also illustrates the best way of importing tracks in preparation for mixing. This tutorial assumes you already have a fully working audio interface with REAPER installed in your system. If you still have not installed Reaper or configured your audio interface, refer to the following tutorials to get started:

1.) How to install Reaper in Windows operating system?
2.) Reaper DAW tutorial and getting started quick guide

Or if you want to find out if Reaper is appropriate for your production projects, you can read my Reaper DAW review.

Recording New Tracks

First, let’s illustrate on how to perform multi-track recording in Reaper. Below are the steps:

1.) Go to Insert — > Multiple Tracks. This will let you add several empty tracks for recording at once.

Reaper multiple tracks insert

The number of tracks to be inserted depends on how many instruments you wish to record at the same time. If you are only recording one instrument, then add only one track. Otherwise if you are tracking or recording more than one instrument (such as a live band) then insert a suitable number of tracks for recording. Read the rest of this entry »

Reaper DAW Review -Digital Audio Workstation (2012 Edition)

by: EMERSON MANINGO on April 21, 2012 in  Reaper DAW Tutorials

This is a full review of REAPER Digital audio workstation software by Cockos Incorporated. This software is used in creating multitrack recording projects using your own PC or Mac. REAPER is an acronym for “Rapid Environment for Audio Production, Engineering, and Recording”.

This review would be covering REAPER version (v4.22, 2012 release) and tested using the following hardware and software:

a.) Windows XP operating system (SP3) 32-bit
b.) Focusrite Saffire Pro 40 audio interface (Firewire)
c.) CPU: Intel i3-2100 3.1GHz
d.) RAM: 4GB (2.99GB detected by Windows)
e.) Recording Hard drive: 1TB
f.) Operating system hard drive: 500GB

The review would be focusing on the following important aspects:

a.) Licensing and Price
b.) Supported operating systems
c.) Installation and upgrading process
d.) Configuring your selected audio interface to work with REAPER
e.) VST/Direct-X/ReWire plug-in support
f.) Resolution of the internal mixing engine
g.) Support for audio editing
h.) MIDI Support
i.) CPU and memory resource usage running a full session
j.) Usability
k.) Video editing support

You can read the final verdict here.

Licensing and Price

You can install and run REAPER without any form of user registration during the trial period. The software still operates with its full features. The developers do recommend that you should be testing the software within the span of 30 days.

If you are happy using REAPER within this period; you can purchase a discounted license of $60. REAPER however would still work with its full features even after 30 days and you will be presented with a nag screen.

The license includes two major version upgrades. For example with the current version 4.22, purchasing a license today includes free upgrades up to REAPER version 5.99. The license allows you to install in one computer at a time. And multiple installation of the software by the same person (the licensee/owner) is allowed.

Discount licenses works great for both personal/business use of the software. There is also a full commercial license of $225 for any individual or business establishments with gross revenue of more than $20,000 per year. Cockos Inc. also offers classroom licenses if you wish to use REAPER in schools.
Read the rest of this entry »

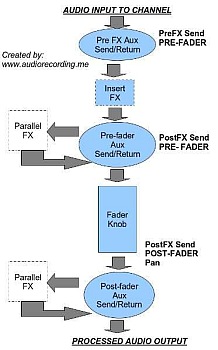
Reaper Aux Send: Setting Reverb & Parallel Compression

by: EMERSON MANINGO on March 30, 2012 in  Reaper DAW Tutorials

In this tutorial, you will learn how to use aux send in Reaper. However this is not only limited in Reaper DAW but could also be implemented in any DAW software. Common audio mixing application of this technique includes parallel compression and implementing effects on parallel/aux such as reverb.

Schematic Signal Flow of Aux Send and Return

If you are using aux send and return in your DAW software such as Reaper, it is important to know the basics of how the audio signal flows. The best way of understanding this concept is to present a classic audio mixing console channel strip (that is also used by most digital audio workstation software). This is one channel in a mixing console. If you have an audio mixer in your home, take a minute to look at them and examine each channels. The simplified signal would look like this:

Signal path in a mixing console

It shows that an aux send can either be applied before Insert FX (that is Pre-FX) or after FX (Post-FX). Aside from these options, you can also decide whether to send the signal after fader (that is Post-Fader) or before the fader (Pre-fader). For details on this topic, you can read this tutorial on pre-fader vs. post-fader that also includes important information pertaining to pre and post-FX processing.

Parallel FX is created using aux send and the processed signal (which is also called “wet”) is being returned back to the signal path back via return. Therefore:

After Parallel FX = Dry Signal + Wet Signal = Mixed (blend)

The wet signal is the processed (output) signal of the parallel FX and it is mixed/blended together with the dry signal.

Application #1: Adding Reverb on Aux Sends using Reaper

Now you know the little basics, let’s illustrate a sample application. The common practice is to use reverb unit with your mixing using aux sends and return.

With this method; you can easily apply the same reverb settings for a number of tracks in your mix. For example, you have two tracks in Reaper, a snare drum and a kick drum that you want to add some reverb via aux. Below are the steps on how to do this:
Read the rest of this entry »