This is an important tutorial on how you can easily “speed up” and optimize your Windows computer without doing extremely complicated tweaks. The objective is to work perfectly when using the computer as a digital audio workstation. Doing complicated tweaks in Windows system can be very risky as it can render your system useless if you commit a serious mistake or your system is not compatible with the changes. This is written primarily to a beginner/novice or expert in digital audio workstation and these tips can be applied to any DAW software you are using. These tweaks help me to speed up my Windows XP computer a multiple times as compared before the tweaks. So whenever I do some multi-track recording session, I did not get drop-outs, pauses, hang-ups like what I have experienced before the tweaks. This tutorial is both applicable to Windows XP users and some tips can be applied to Windows 7 provided the features are still supported.
First Tweak: Turn on the “Best performance” mode.
You need to go to Control Panel – Right click on “System” – click “Advanced” tab – Under Performance click “Settings”. Under “Visual Effects”, make sure you have clicked “Adjust for best performance”. And then click OK to apply.
Second Tweak: Make sure DMA is turned on.
In Control Panel, right click on “System” and then click open. Click “Hardware” tab. Click “Device Manager”. Expand “IDE ATA/ATAPI Controllers”. Right click on Primary IDE Channel and click “Properties”. Click “Advanced Settings”. Make sure the “Current Transfer Mode” is set to DMA mode. For example, in the screenshot below, the current mode is “Ultra DMA Mode 5”. This is true for Device 0 and Device 1.
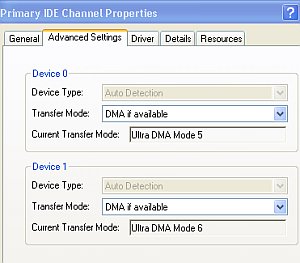
What is not good is to have PIO mode as the current transfer mode as this will drastically affect the audio performance of your computer.
Third Tweak: Optimize your Page File
Go to Control Panel; right click again on System to open. Go to “Advanced” Under “Performance” click “Settings” and then click “Advanced” under “Performance Options”. Make sure these two are set:
a.) Adjust for best performance of “Programs” (select this one)
b.) Memory usage: “Programs”
Under Virtual Memory click “Change”. If your Windows is installed in Drive C, by default; the page file will be located also in Drive C. But I find it to be optimal if the page file will be located on the other drives only (example Drive E). It’s because when Windows programs such as your digital audio workstation software which are installed in Drive C are heavily accessing your hard drives. This heavy access can slow down the accessing of your page file as well. By assigning the page file to a different hard drive, you can get much less interference and your page file accessing will improve. So set the following:
Drive C: No paging file
Drive E (or other drive letters depending on what you are using): System Managed Size
If you have two or more drives and partitions, it’s important to assigned only one partition for the paging file. See screenshot below:
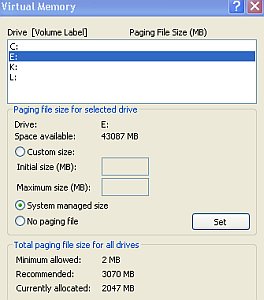
In the above example, Drive C is set to no paging file. Other Drives such as K and L does not have paging file. Only Drive E has a page file set to “System Managed size”. Make sure there is a lot of spaces on Drive E and there are no programs installed on that drive.
Fourth Tweak: Turn off Windows default audio
Go to Control Panel and then click “Sounds and Audio Devices”. Click “Sounds” tab. And change the “Sound scheme” to “No Sounds”. Click Apply to implement.
Fifth Tweak: Delete all temporary files
Temporary files in your Windows computer can clog up and will slow down your system. Make sure you delete all temporary files on a daily basis. The easiest way is to use CCleaner.
Sixth Tweak: Optimize the operations in your Windows Services
Not all Windows services are important to turn on. Turning on a lot of Windows services can significantly slow down your system particularly if you are using your computer for audio recording. These are the Windows services that I have set to “Automatic”, “Manual” or “Disabled”. It works for me very well. My system is running at 2GB RAM and 2.4GHz processor. So if you have much better specs, then it’s expected your computer should run a bit faster and efficient to be used for DAW (Digital Audio Workstation).
Seventh Tweak: Defragment all your Windows hard drive partitions once a month.
Go to “My Computer” and right click on the Drive and click “Properties”. Go to “Tools” and then click “Defragment Now”. Proceed with the analysis and start the defragmentation.
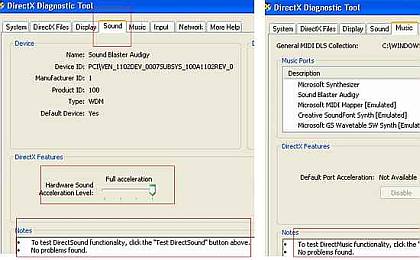
Eight Tweak: Make sure all your audio devices are set to “full hardware acceleration”.
Go to Start and click “Run”. Type dxdiag and then press enter.
a.) Go to “Sound” tab and make sure the “Hardware Sound Acceleration level” is set to “Full acceleration”. And under notes, it should say “No problems found”.
b.)Go to “Music” tab and make sure under notes, you will see “No problems found”. See screenshot below:
Ninth Tweak: Correct bad sectors in your drive file system
If your hard drive contains a lot of bad sectors, it can slow down the read and write operation especially if you are recording/bouncing your audio tracks to the hard drives. You can fix the problem by doing a disk check. Go to My Computer, right click on the each drive and click “Properties”. Go to “Tools” tab. Under “Error checking”, click “Check Now” button. Check “Automatically Fix File System Errors” and “Scan for and attempt recovery of bad sectors”. Then click Start, in some cases, it requires you to reboot your Windows PC.
Tenth Tweak: Do not exceed more than 60% of the Main System Drive (Drive C) usage space.
Based on my experience, if your main C drive where most of the programs are installed exceeds 60%, it will drastically slow down your DAW operations. Make sure it has adequate disk space left. For example in the screenshot below, the total capacity is 78.1 GB while only 28.6GB are used. Therefore the total disk space usage is around 28.6/78.1 = 36.6%.
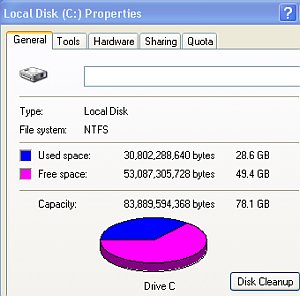
For optimal result, never save your WAV Files in the C drive. Instead save it somewhere else. You can also do “Disk cleanup” that further removes all files unneeded by your computer (see screenshot above). Also go to Control Panel and double click on “Add or Remove Programs”. Make sure you have entirely removed all useless programs to further save disk space. Other important things to do: If you are about to start recording. Turn off your antivirus and all running applications or switch them to “Game Mode”.
Eleventh Tweak: Optimize your RAM
Even you have sufficient RAM (e.g. 2GB); things are still not optimal because your RAM will encounter a problem called “memory leaking”. To solve this problem one of the best tools is to use a memory optimization tool. The most recommended is CleanMem which is free.
The installation is straightforward and easy. There are two versions: the paid and the free version. You only need the free version.
I am personally using this tool and it helps a lot in speeding up my DAW system because of the absence of memory leaking. If after all these tweaks, your computer is still running slow. The primary cause is the hardware. You should have at least:
a.) Pentium 4 computer – 2.4 GHz and above
b.) Physical RAM – 2GB and above
c.) Hard drive- 160GB and above
This will ensure that tweaks implemented will be effective.
Case Study: No Sound using SoundBlaster Audigy Sound on Windows XP
This is a troubleshooting guide of Creative Audigy SoundBlaster soundcard for those users experiencing a “no sound” problem in Windows XP. This can as well extend to recently released operating system such as Windows 7. “No sound” problem troubleshooting assumes you have already done the following:
1.) You have completely installed the soundcard on its PCI slot.
2.) You have completely installed the soundcard drivers using creative audigy CD installer.
3.) You have a fully working PC and no other hardware related problems.
It is recommended you will follow through the check items in a step by step procedure, if a certain step appears OK then go to the next step:
Step1.) Did you disable the onboard soundcard in the BIOS?
If you have not disabled it before you have installed the soundcard, try uninstalling all the drivers and remove the soundcard from your PC, then reboot to BIOS. Once you are in the BIOS, disable the onboard soundcard. Having two sound cards enabled in your PC can cause conflict to Creative soundcards.
Step2.) Did you connect your studio monitoring speakers correctly to your PC?
Your problem might not be soundcard related, you need to check if your PC speakers are correctly setup and working. In this case, the easiest way to test is to uninstall Creative soundcards and drivers, then enable the onboard soundcard; after that; try to play some audio.
If you were able to play it, then your studio monitoring system is not the problem.
Step3.) Did you have other PCI cards enabled and working correctly?
For example, you have other PCI card installed like a network card and it is working; then the problem is NOT PCI related. If it is PCI related, then PCI might be disabled in your BIOS so you need to enable that.
Step4.) Are you sure the soundcard or driver package is NOT damaged/corrupt?
The only way to check this is to install the soundcard in different Windows XP PC and see if its working or not. If it is not playing, most likely the soundcard is damaged, you need to bring it back to the computer store and ask for replacement.
Step5.) Have you enabled the soundcard in Control panel?
It might be disabled, so go to Start == Run then type devmgmt.msc, expand “Sound, video and game controllers”. You should see “Soundblaster Audigy” as one of the entry there. Right click on properties and you should the same entry as shown below:
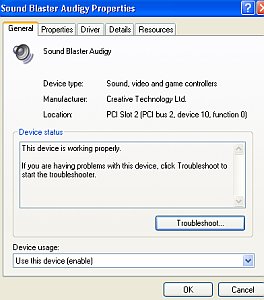
The important is that you should see “This device is working properly” and “Use this device (enable)”.
Step6.) Did you see a “New hardware found” wizard during Windows XP/7 boot?
You might see this warning despite that you have previously installed the soundcard correctly and plays on your computer. So when you see this warning and your soundcard won’t play anymore. Then you need to open your PC, remove all connectors/cables to the soundcard and then remove the soundcard from its PCI slot. Finally, put it back tightly and correctly as well as return all the cables/connectors; then reboot to see if the soundcard will play. Sometimes this is a trial and error process; you might need to repeat this one twice.
Step7.) Did you have “digital playback enabled”?
Some incompatibility in the system prevents the OS and sound card to render digital playback. Refer to this tutorial for the resolution.
Step8.) If all the above procedure does not solve the “No sound” problem and you are sure that the soundcard is not damaged and the drivers are correct then…
Uninstall all the soundcard drivers in your PC, remove the soundcard from its PCI slot; then do a complete fresh reinstall of the soundcard as stated in the soundcard manual. You need to follow those installation procedures as accurate as possible.
Content last updated on August 23, 2012


No responses yet