The Solution: Upsampling == > “Effects processing” == > Down sampling == > Dithering
Now you have seen the artifacts generated if you are applying effects directly over a 16-bit/44.1Khz. Let’s illustrate how you can avoid this. These are the steps:
1.) Generate the 10 KHz sine wave tone at the original sample rate and bit depth of 16-bit/44.1Khz, mono. Refer to the previous section for the procedure.
2.) Before you will apply any effects, “up-sample” first the digital audio. In Adobe Audition 1.5 (which I am using), you can simply go to “Edit – Convert Sample Type – Select “96000” under Sample rate – Select “32” bit under resolution. Select “mono” for channel. Make sure pre/post filter is checked and set to 999 for high quality. Finally click OK. This is the screenshot of the convert sample type settings. If you are using the more recent versions of Adobe Audition, you can refer to the manual and the process should still be similar.
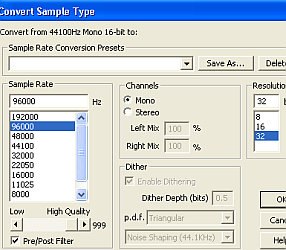
convert sample type settings
The resulting wave still sounds and looks the same, except that it is now in high resolution 32-bit/96Khz.
3.) After up-sampling, apply the same “classic compressor” preset from Waves C1, and then click OK. Save the processed audio file as testing.wav. The saved audio wave file should retain its sample rate and bit-depth at 32-bit/96Khz. Close the file in Adobe Audition.
4.) Using Voxengo sample rate converter; down sample first the audio from 96 KHz to 44.1 KHz, just leave the bit depth at 32-bit float (do not changed it). This is my Voxengo R8brain settings:
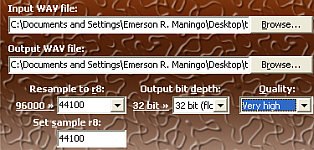
Voxengo sample rate converter settings
5.) Open the converted file from Voxengo in Adobe Audition (e.g. testing_r8b.wav). Now dither it from 32-bit float to 16-bit. I use Waves IDR as the dithering plug-in. After applying dithering, you have successfully converted back the audio to 16-bit/44.1Khz.
6.) Now let’s see if there are any artifacts generated. To confirm; re-perform the FFT analysis; this is the result:
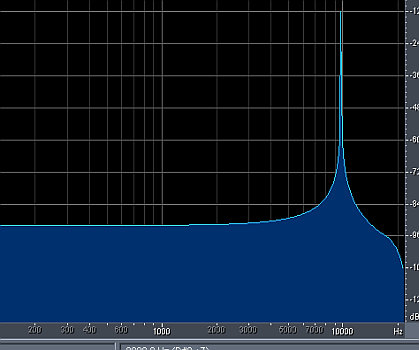
no artifacts generated
Thus you have noticed that there are no more artifacts/significant distortion on the compressed wave unlike when you apply effects directly on a 16-bit/44.1Khz wave. It looks smooth and clean. This is because the original audio of 16-bit/44.Khz has been up-sampled first to a higher bit-depth/sample rate before applying effects. Then it is down sampled to its original bit-depth/sample rate. The result is zero distortion, digital artifacts or aliasing. You can implement this technique whether you are working with digital audio in mixing and mastering.
Content last updated on August 15, 2012