

There is a lot of ways to increase volume in audio recording, take note the following before you increase volume :
a. Maximizing volume is important to make the music as loud as it can be without distortion.
b. Loudness is a subject in mastering although anyone would have the necessary tools to make the music as loud as possible.
The Importance of Headroom in the quest for “Loudness”
OK. You need to make it loud? Remember that in music production, it is not all about loudness but keeping the music dynamics as balanced as possible is an important objective.
As a rule, it is best to have the maximum amplitude of around -6 dB to -3dB during your mix down. This means that after mixing, there should be no peak louder than -3dB. The basic reason is to give some headroom during the mastering process.
If you are a serious music production professional (either as an engineer in recording, mixing and audio mastering); it is recommended you read the following tutorials regarding the importance of headroom:
a.) Introductory guide on appropriate gain staging -implement the proper recording levels during the tracking session.
b.) Assigning the right headroom for your mix – this will prepare your mix for mastering.
Quickest Tip to Maximize the Volume
This is for non-music production professionals and beginner in audio editing. OK supposing you are having some MP3 and WAV files which you find very soft (lacking in loudness). Below are the quickest steps you can implement loudness without ruining the original audio:
Step1.) Download audio recording software. For example you might to use Audacity which is a free recording software. Or if you are technical savvy you might want to install Reaper.
You can read this tutorial on installing Reaper in Windows. You need to install that first to your computer.
Step2.) Altering the volume of an existing audio file (whether it is an mp3 or a wav file) is a dest¬ructive form of editing. You need to make sure that you have done a backup of these audio files before editing.
Step3.) You can check this procedure on how to normalize audio using Audacity software.
Or if you are using Reaper, you refer to this quick tip on normalizing audio using REAPER.
Step4.)When maximizing volume (through amplification/normalization), allow some small headroom such as -0.2dB and not 0dB (maximum possible digital audio volume).
Maximizing audio in mastering (Limiting vs. Normalization)
The mastering process involves the following important processes :
a. Track Trimming and Noise Reduction
b. Equalization
c. Limiting
Those 3 major processes affecting the quality of your overall tracks particularly equalization and compression process.
Honestly it is the limiting process the sets the volume really loud. This can be accomplished with a plugin called “limiter”. One of my personal favorite is using Waves L1 and L2. These are not free plug-ins but widely used among music production professionals. You can refer to this tutorial for some tips in using limiter.
You can also read this article on audio mastering software and plugins if you want free stuff/plug-ins.
Too much abuse of limiting to maximize loudness can squash or destroy the original dynamics of the recorded audio as illustrated here.
Normalization is a fairly easy process and less damaging to audio quality than limiting. The overall goal of normalization is to attain maximum peak volume (which is specified) without clipping. This preserves sound quality compared while making the music loud using limiter. Bear in mind that the final result of normalization is having a lesser average SPL volume than limiting.
Normalization is a classic technique to make sounds loud and was commonly applied during 60′s and 70′s. Have you noticed that when you compare Led Zeppelin tracks and Green Day tracks? The Led Zeppelin tracks tend to sound less loud than the Green Day tracks, but sound cleaner and clearer. It is because Led Zeppelin mastering engineers uses less compression/limiting and relies more on normalization.
The rest of the techniques illustrated below apply best to mastering process.
To do normalization in Adobe Audition 1.5 (similar steps to other audio editing software):
1. Using Edit view, highlight the parts of the audio wave you want to normalize.
2. Go to Effects—->Amplitude
3. Then in constant amplification tab, Find “calculate normalization value” then click “calculate now. This will give the amount of boost in dB needed to reach maximum amplitude of -0.2dB (0dB is not recommended, always give some headroom for best results)
4. Then click OK. It will then normalize the tracks to -0.2dB.
See screen shot before normalization :
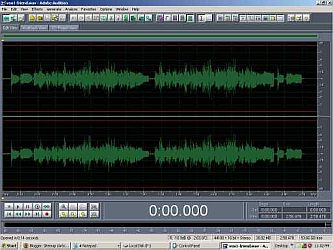
Before normalization
See screen shot after normalization:
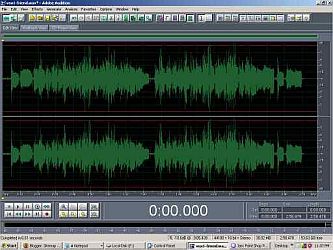
After normalization
See the difference??? Normalization amplifies the whole waveform in such a way no peak will be louder than the specified target (e.g. 0dB). In other words it will not sound as loud as using compression but it sounds absolutely clean.
Below is a screen shot of the same wave using limiter:
Tools/Settings: Waves L2 Plug in, -8dB threshold, Out of ceiling= -0.2dB

Limiter output
Comparing the limiter output to the normalized output, you can observe that the limiter output has lesser dynamics (difference between loud and soft peaks in the audio waveform) although it would sound very loud compared to the normalized output. The normalized output preserves the dynamics of the original recording however it does not sound very loud.
Read this very useful guide on true measurement of “quality” loudness in audio mastering.
As bonus for you, you can read this tutorial on the 54 ways you can improve the quality of your recording projects.
Content last updated on October 22, 2012