However when a 10 KHz analog signal is sampled at DVD audio quality (24-bit/192KHz in brown color), the resulting audio wave is now a near perfect replica of the analog signal.
Therefore you should be using an audio interface that supports recording at 24-bit/192KHz to get the highest possible quality out of your original analog masters.
Not all audio interfaces natively supports recording (or analog to digital conversion) at 24-bit/192KHz, some can only support 24-bit/96KHz or even low-end audio interface at 24-bit/48KHz.
This external audio interface would then be connected to your computer either via Firewire or USB. Before moving to the next step, make sure your audio interface drivers are fully installed and configured to work with your computer.
Setup for Digital Recording Transfers
Now you have the highest possible resolution for digital audio conversion (24-bit/192KHz). The next thing you would do is to wire up your hardware in preparation for the digital recording transfers. This will do the actual job of converting analog to digital audio format. Follow the steps below:
1.) Connect the stereo line output of your analog player (whether cassette, vinyl, etc.) to the line-input of the audio interface. Make sure it is a stereo line output so that it could playback your analog masters in stereo format.
2.) Turn on both analog player (with your analog masters on it), your audio interface and finally your computer.
3.) Launch your recording software and configure to record in 24-bit/192KHz stereo. For example in Adobe Audition 1.5, this can be done by going to Edit view – File – New then select 24-bit (or 32-bit float, this is still using a 24-bit resolution), 192KHz.
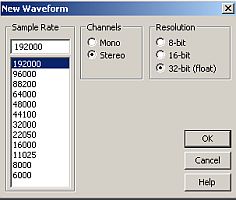
Adobe Audition 24-bit 192KHz
4.) Test the recording signal by playing the analog recordings then making sure that the peaks should hit no more than -6dBFS in your audio interface level meters. For example see the level meter of the audio interface below, the green led at -6dB indicates the maximum possible peak of recorded signal.
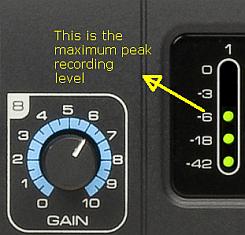
Saffire Pro 40 levels
If there are certain instances in the song that it hits above -6dB (particularly the loudest section of the song), try to lower the volume of the source (analog player). If the output from the analog player is very weak despite having stereo line outs, then try adjusting the gain of the audio interface to some reasonable level.
5.) Finally when all checks are done hit the record button in your recording software then play the analog source. As the analog source is playing, your audio interface is converting analog audio to digital audio in real time at 24-bit/192KHz which you can then see in your recording software as waveforms. Make sure the recorded digital audio is in stereo format.
You are now ready to perform digital remastering process
What you have right now as an output of the previous section is the mix down of the song in 24-bit/192KHz digital audio format. As a mastering engineer, you can now start working on remastering the track using digital plug-ins. Common processes is shown in the chart below:
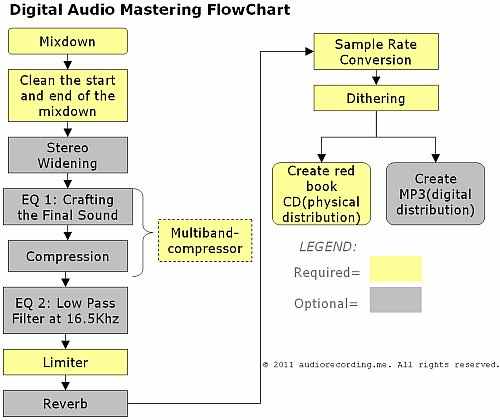
Audio Mastering flowchart
Good luck in your remastering process.
Content last updated on August 24, 2012