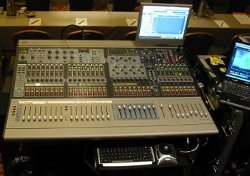
Compressors, Reverb and EQ are the most important effects in audio mixing. When used properly, they significantly improve the quality of your audio mix. This beginner tutorial will talk about how to connect them to your mixing console. This is referring to hardware mixing consoles (the one you commonly see in big studios, see picture below) and digital audio mixer inside your software (as they often mimic real world mixing console).
The principle of operation is basically the same except that its more flexible in software. This post assumes you have basic knowledge about pre-faders, post-faders, aux sends/return and Insert FX.
Step1: Connecting EQ and Compressor to your Mixer
EQ works by altering the frequency response of the signal. In most audio mixing practices, these two effects are used together (in tandem with one another). Some applications need you to EQ before you compress. There are also instances where you need to compress before you apply EQ. It depends on the sound you are working on.
In most cases, you should be using the “Insert FX” feature in your mixer when connecting a compressor and EQ . In DAW software, this is usually the FX you see in the mixing session.Connecting as inserts makes them in series with the signal paths. There are also instances where you will be connecting compressors in parallel, this means using aux sends and return.
A typical application is to accomplish a bit of loudness and punch to a mixed track. For example you would want to produce a powerful snare drum sound. So you might want to connect the compressor in parallel and then send the “wet” or “compressed” signal to mixed with the dry signal. The result is a big sound. This is not only used in snare drum tracks but to any audio tracks in the mix.
If you are using Reaper DAW, you can read this tutorial on Reaper aux send to learn how to set up parallel compression in your mix.
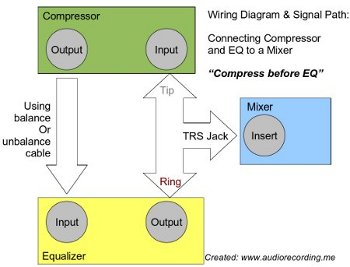
In hardware mixing consoles; supposing you would want to compress first then EQ. You will need to use one Insert cable which basically consist of one TRS jack (see below) and two jacks (ring and tip). You also need one unbalanced or balanced cable(recommended if your compressor/EQ has balanced connectors) for connecting compressors and EQ together. An insert cable looks like this:

A balance cable looks like this:

Unbalanced cables are common causes of noise in recordings. So it’s recommended if possible always use balance cable when making connections with your hardware. To do this; simply plug the TRS jack of the insert cable to your mixer insert.
Then the tip jack of the TRS cable to the compressor input. Since you connect them in series, connect the compressor output to EQ input using a balance cable.Then connect the insert cable ring jack (the red colored jack) to the EQ output. So basically the resulting signal path goes like this: (Compression before EQ example)
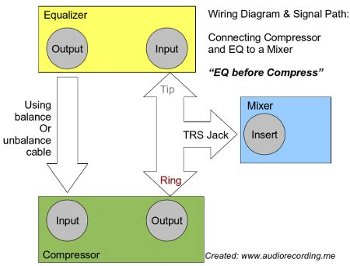
Or if you like to EQ before you compress, you can do it like this:
Take note that in an insert cable, the red jack is the ring and the white/gray is the tip.
Step2: How to connect a reverb unit to your Mixer
Reverb unit is commonly connected in Aux sends/return in your mixer. The main question is whether to add it post fader or pre-fader.
For most reverb mixing applications, you should do it post-fader since you can maintain the same dry/wet ratio even if you adjust the fader. Why?
Consider the signal path as follows in post-fader applications:
Fader — > Reverb (parallel to signal path) — > output
For example you set the reverb to 40% wet, 60% dry ratio. If you increase the fader level, this will increase dry input signal to the reverb unit but the amount of wet signal would also increase to maintain the ratio.
However you can also do it pre-fader for some creative reverb applications, try to experiment.Now for the connection diagram in a mixing console hardware; see the screenshot below:
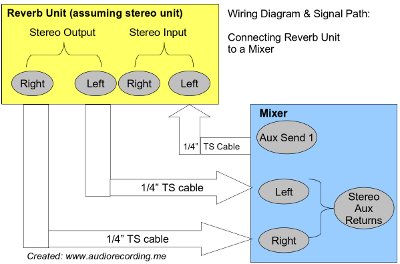
If your mixer has aux send 1 and aux send 2, you will be needing only one. For example you use aux send 1 only. Connect ¼ TS cable from aux send output of the mixer to either of the reverb unit stereo inputs (for example the left channel). Now use two ¼ TS cables to connect the reverb stereo outputs to your mixer stereo aux returns.
For audio mixing software, the concept is similar. If you are using Reaper, you can read this tutorial on Reaper aux send to add a reverb plugin to your mix.
Adding reverb on aux sends and return is adding effects on parallel. Adding EQ and compressors in series with the signal path is inserting FX on your mix. Always remember this rule.
Beginner basics in using the audio mixer unit
1.) When connecting microphones, always connect them to the balanced input of the mixer. This will give the best signal as possible because of the absence of noise. If you have a microphone make sure it does have a balanced XLR male output and connect it to the mixer XLR female input. See diagram:

Do not connect your instruments or microphones using unbalanced connections because of noise. Read more about that here.
2.) Look for “Main output”, sometimes in other mixers this is called “Main out”. Connect a TRS cable (this is balanced connection) to your studio monitors. You need two connectors for the Left and Right monitors.
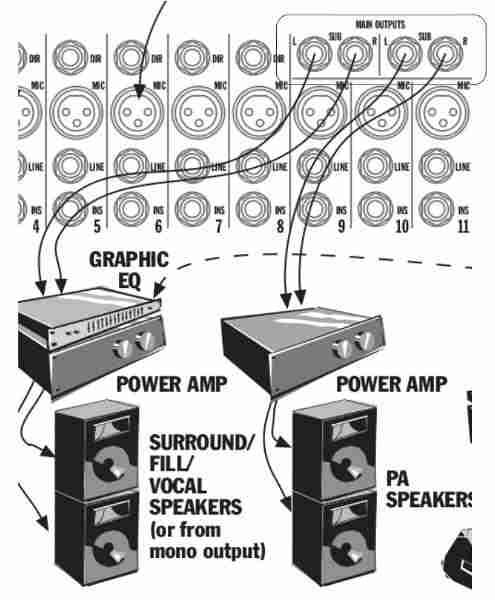
Photo credits: Soundcraft mixing guide
In the screenshot above the output of the mixer is connected to power amplifiers of the studio monitor (if you are using power amplifiers). In home studio, you will simply connect the mixer output to the input of your near field studio monitor. Depending on the complexity of your mixer, you are allowed to send outputs to different monitors such as shown in the screenshot above. For live sound monitoring such as used in concert venues, the mixer output is feed to a power amplifer then to the power amplifier speakers.What you will hear in the output of the mixer depends on your adjustment of settings done in the mixer.
3.) If you are using the microphone preamps of your mixer, you will be amplifying the instruments levels. Do not anymore pass the signal to another preamp (such as in your audio interface) because it can distort the signal affecting the quality of your recordings.
Most audio interface has some button to bypass the preamp during digital tracking. See signal flow path below if you are recording using your mixer preamp and audio interface to your PC:
Instruments — > Mixer Preamp — > Audio interface (bypass preamp) — > Computer
Example tips on using a mixer: Illustration using Behringer Xenyx 502
I use this mixer in my recordings for more than 3 years I think. This is one of the smallest mixer available for home studio recordings yet even as powerful and sounds good as a professional mixing console. A mixer like Xenyx 502 are very handy for all type of home studio applications. It’s use goes beyond the normal home recording implementation.
Official documentation/manuals can be found in official Behringer Xenyx 502 website.This is a personal collection of my tips in using this mixer for your home studio.For more general use of a mixer, you can read this guide on how to use an audio mixer.
Tip #1: Pre-amplification of weak instrument level signals
Back in my old days; I do not use Behringer Xenyx 502 for analog mixing but use this for recording. The signal flow diagram is shown below:
Musical Instruments –> Behringer Xenyx 502 mixer –> Sound card
I’m using PCI soundcard before wayback 2005. It works great and if you see the signal flow diagram. Musical instruments output which are very weak are then inputted to the Behringer Xenyx 502 preamp.
It is then amplified and the output is a line level signal suitable for analog to digital conversion (read: “pulse code modulation tutorial“. Before, I’m using a PCI soundcard (which is bad) and it cannot handle full amplification of analog instruments. Xenyx 502 is there to get the job done. All you have to do is to connect your analog instruments to its microphone preamp XLR input (not the line inputs!). See screenshot below inside the yellow box:

By doing this, the signal input will be feed to a microphone preamplifier. If you connect your instruments directly to a line input in the mixer, it will bypass the pre-amplification stage and your signal does not sound good.
Do not disturb the EQ (set it flat) and adjust the main mix volume, enough to get a good recording level in your digital recording software.
In most cases, analog instrument input signal to the mixer is very weak; these are common in passive instruments such as bass guitar (not the active bass guitar type). This type of signals are known as “instrument or microphone level signals”. Learn the difference between line, instrument and microphone level signals.
However you can always boost/adjust the signal in Xenyx 502 mixer using #1 Gain level knob (provided you connect the instrument to the Xenyx XLR microphone preamp input). Adjust it until you get a good recording level. The weak signal would be amplified to line-levels.
This is particularly useful if you ran out of preamps in your audio interface.
Tip #2: Use balanced connectors and cables when connecting to preamp
Xenyx 502 can accept XLR microphone inputs. Whenever as possible, use balanced connectors. This will result to low noise when using the mixer.For example when connecting microphones to a mixer, below is the configuration flow:
Microphone or other instruments === > XLR output === > balanced cables === > XLR connector === XLR input of Xenxy 502
For more details on this topic, read this tutorial on balanced and unbalanced audio guide.
Tip #3: Unplugged the power supply immediately after use
Since these are made of solid state devices, unfortunately these are subject to various stresses that affect the reliability of the electronic components in the mixer. One of these frequent stresses is electricity.
If you will not unplug the mixer from the AC source, then you are allowing some electrical energy to be stored or consumed by the mixer, which speeds up the degradation of the components. This will worsen if in any even the AC line gets shorted or there are spikes, and then you have no surge protector.
It is better if you can take away the dust on the Xenyx 502 surface if you are not using it for a long time.
Tip #4: Always set the volume to minimum when plugging the mixer
This will avoid damaging your speakers, in case a transient loud sound will be accidentally transmitted due to faulty wiring settings or maximum volume settings. This extends to plugging analog instruments to the mixer.
Content last updated on October 12, 2012


No responses yet