For VST plug-in, you can read some tip mentioned in this post: How to Install Focusrite VST Plug-in in Reaper
The illustrated VST plug-in is Focusrite VST and same procedure applies to all other types of VST plug-in. The VST plug-in would also appear on the Reaper list of plug-in after successful installation.
Second Skill: Knowing the Master Fader & Individual Level meters
In mixing, the goal is to mix all mono recorded tracks (which are mostly the case) to a master stereo output. The summing volume of all individually recorded tracks can be seen at the master fader. The individual volume of each mono track in your mix can also be monitored. It is shown below (using the default skin configuration of Reaper):

Master and individual faders in Reaper DAW
It is important that the master fader level meters should not clip (which results to red) at all. If it clips, you have two options:
a.) Lower the master fader volume until it is not clipping (-not recommended because clipping might be caused by a clipped mono channel also)
b.) Lower the volume in each individual track in the mix by lowering their fader until the master fader do not clip (-recommended, more safe)
Allow some -3dB maximum headroom on the master fader at all times. This means that the maximum peak of the mix should not exceed -3dB at anytime. For example in the screenshot below, the master level meter hits at -5.4dB, -5.3dB (there are two values since the master output is in stereo, left and right channel) which is OK since it’s below -3dB maximum.

Headroom in Reaper mixing
The individual level meters can also be monitored and it is also very important to avoid clipping anytime. For example, in the screenshot below; there is no clipping on all mono recorded tracks level meters (enclosed in yellow box):
Individual level meters no clipping
In the above screenshot, there are 9 mono tracks and each has its own level meters. During the entire mixing session, make sure there is no clipping on each of these channels. Lower down the volume on the affected channel if it clips to red.
Third Skill: Panning mono tracks in the stereo field
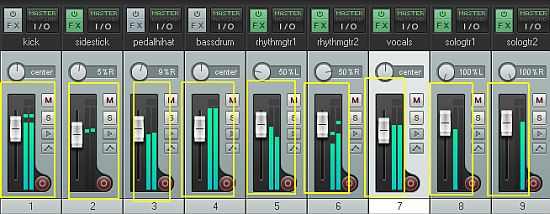
Panning is a technique to place different mono recorded tracks in different locations in the stereo field. For example, vocals, bass guitar and kick drums are commonly placed in the center. Guitars on the hard left (100% L) and hard right (100% R).
You can assign panning settings to mono tracks by using the panning knob, see below:

Reaper panning knob
It defaults to “center” as the location. Feel free to change from hard left to hard right or even in the mid left (50%L) or mid right (50% R) in the stereo field.
Panning is important so that the listener can visualize the artist and the band performing in the live stage. Do not pan all instruments in one location because it will not sound good.
Below are the panning settings of all tracks in the mix (enclosed in yellow box):
panning of all tracks in the mix
Fourth Skill: Applying Volume Envelopes, etc
Say for example, you want to silence all the recorded sections before the guitar starts because it contains a lot of background noise. To do this, you will use volume envelopes. Aside from minimizing or adding silence, it can be used to add fade out or even boost specific sections in volume.
This is done by adding automation controls in the mix, for example see screenshot below:

Volume envelope controls in Reaper
To do this, please read the volume automation and envelope tutorial in Reaper.
Fifth Skill: Adding Effects to your Tracks using Plug-in
In the mix, the most important effects are EQ, compression and reverb. If used properly, these very sufficient enough to create a great mix. Assuming you already added this plug-in in Reaper, its time to use them:
Supposing you want to add effects to your vocal tracks
1.) Click FX button of vocals.
2.) Select any effects you want to add to vocals. Select and click OK.
3.) You can add as many effects you want on a single track (e.g. vocals). For example, you would like to add these following effects in series: Parametric EQ – Compressor – DeEsser:
This is how it looks like in the vocal effects rack in Reaper:

Effects rack for vocals
For details about how to use the plug-in in the mix; refer to the plug-in manual for details. For example, Waves plug-in releases manuals on how to use their plug-in. And it contains a lot of tips and techniques regard its use. You should understand it thoroughly before using the plug-in in the mix.
Using MP3 with Reaper
You can use Reaper to convert any audio file to mp3:
1.) Download lame dll file here.
Make sure you correctly downloaded a DLL file that corresponds to your operating system.
2.) Put the DLL file in your Reaper directory (where you can find Reaper exe), see screenshot below:
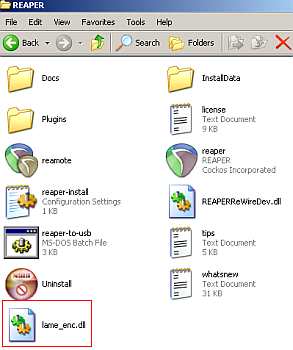
MP3 Lame dll
3.) Launch Reaper.
4.) Go to File – Batch File/item converter.
5.) Click “Add” to files to convert to MP3. You can add more than one audio file.
6.) Assign a filename; configure the output directory of the resulting MP3 files.
7.) Set the output format to Mp3 Lame, and have the rest at default, see screenshot:
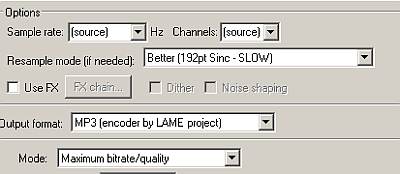
MP3 output settings
8.) Click “Convert all”.
Content last updated on October 8, 2012