This is a beginner and complete tutorial on how to digitize your analog music collection (converting analog music to digital). Analog storage media (cassette tape, etc.) will degrade over time because they are mechanical in nature. So it is best to digitize them before they become worn-out that can affect the quality of the recorded music. This tutorial has so many applications like converting your favourite artist cassette tape albums to high quality digital master that preserves the original quality. Before you can start, make sure you have the following:
a.) Personal computer (preferably Windows XP or 7 operating system)
b.) Your analog music collection in cassette tape.
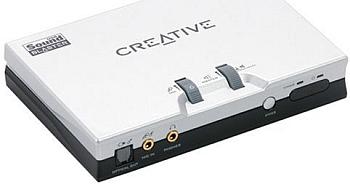
c.) External USB audio interface that can handle 24-bit/96KHz recording such as the Creative Soundblaster Live 24-bit External Soundcard.See photo below:
d.) Analog playback system (such as a cassette tape deck) with output (for example at ¼ inch jack output for the speakers).
c.) Recording software. This tutorial will be using Audacity which is free.
Digitizing your recordings: Some technical basics
To digitize your recordings is a process of analog to digital conversion. The quality of conversion depends on the quality of your analog to digital converter (which is the soundcard). The setting parameters used by your analog to digital converter is also important, these are the following:
a.) Bit depth – the higher the bit depth, the more accurate will be the digital representation of the original analog source.
b.) Sampling rate
It is why you should have a decent soundcard or audio interface if you are planning to have an accurate conversion of your analog music collections to digital. The most recommended bit depth and sampling rate will be 24-bit and 96KHz. However in Audacity, it has a 32-bit float bit depth which is 24-bit accurate. At this bit depth and sampling rate, the analog music sample will be accurately reproduced by the converter and get stored as a digital data in your hard disk drive. If the conversion is accurate, the digital representation is an replica of the analog music sample. Audio interface such as Creative Soundblaster Live 24-bit External Soundcard or any quality soundcards will be capable of 24-bit/96KHz conversion. It is not recommended to use onboard soundcard because they can easily be subjected to noise, distortion, etc which introduce some issues in your digitization process.
How to Set-up your System to digitize recordings
This is how to connect all the requirements in the previous section. But first, you should have your sound card fully installed and integrated with your computer. If not, refer to the soundcard manual for installation instructions. Also make sure that your recording software (e.g. Audacity) is ready and installed.
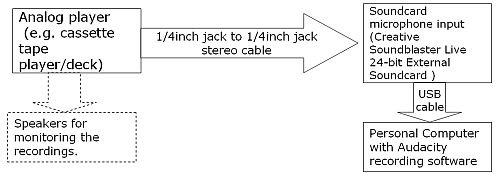
1.) Connect your analog player (cassette tape player, etc.) output to the soundcard microphone input. This cassette tape output is usually used to send signals to the tape speaker or headphone. But in this tutorial, you will be connecting this to the soundcard microphone input instead to your headphone or cassette tape player speakers. As illustration, if you are using a USB external soundcard, below is the connection diagram:
2.) Launch Audacity in your PC.
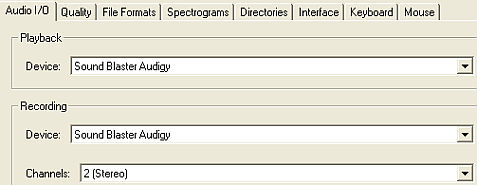
3.) a.) You need to configure Audacity to receive inputs from your correct recording device (audio interface). Go to Edit – Preferences. In “Audio I/O” tab Playback and Recording; make sure that the device is set to the correct soundcard then set Channels to 2 (Stereo).
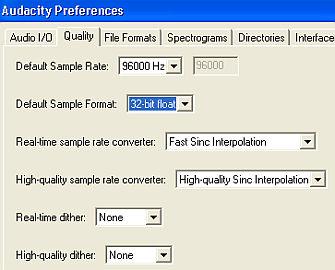
b.) In Edit – Preferences go to “Quality” tab. Set “Default Sample rate” to “96000Hz” and the “Default Sample Format” to “32-bit float”. Set “Real time” and “High Quality Dither” to none (you will be using 3rd party tools for this later on). Set the other parameters to Default. Click OK and close Audacity. It will look like this:
c.) In Edit – Preferences. Go to “File Format” tab. Set “Uncompressed Export Format” to “WAV (Microsoft 32 bit float)”. Finally click OK and close Audacity.
5.) Re-launch Audacity and then try to insert a cassette tape with music. Hit the play button of the analog player.
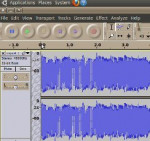
In Audacity, click “Monitor Input” to monitor the playback signal sent by the cassette tape. See screenshot below:
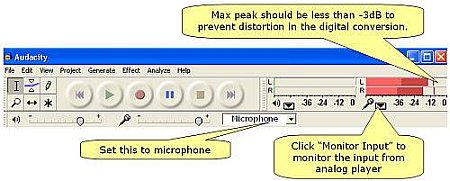
In the above screenshot, it shows that Audacity is receiving the inputs from the analog player and that it is stereo in format (Left and Right channels contain signals). Also make sure that the peak will not exceed -3dB to prevent distortion and clipping in the music digital versions. You can control this using either the soundcard or the cassette tape player volume.
6.) Your computer should not be doing any other task. Close all programs running except Audacity. If everything is ready, hit the record button in Audacity. Audacity will then capture the sound waveform.
7.) After recording; to maximize the volume of your digital recordings without distortion. Press Control A in the recorded waveform to select all then go to Effects – Amplify. In the “New Peak Amplitude”, enter -0.2. It will automatically determine how much dB boost is needed to maximize the peak volume to -0.2dB. Press OK. This process is called normalization.
8.) You have basically completed creating a “digital master” of your analog music or recordings in a high-fidelity format (32-bit float/96KHz). When everything is OK, go to File – Export as WAV. Save your digital master to a secure location such as your external hard drive backup for long term storage. However this digital master is still not meant or ready to play in MP3 players or CD audio players. You need to one more processing for this to be ready.
Sampling rate conversion and dithering of your digital master
1.) Download this free and high quality sample rate converter.
2.) In the input WAV file, browse to the location of your digital master WAV file which is using 32-bit float/96KHz resolution. Set resample to “44100Hz” and output bit depth to “16-bit”. Set quality to “very high”.
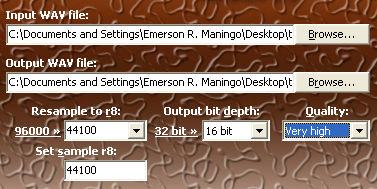
3.) After clicking “Perform R8brain” it will create a 16-bit/44.1KHz WAV digital audio of your high resolution 32-bit float/96KHz digital master. You can then convert this 16-bit/44.1KHz audio wav file to MP3 format or even burn into a CD.
Content last updated on July 22, 2012


No responses yet