-30.4dB threshold
4:1 Compression ratio
Scan mode: RMS
Smooth saturation: Yes
Attack time: 5ms
Release time: 100ms
Output gain: 7.6dB
The second setting has very fast attack time but slow release time. It also uses moderate compression ratio of 4:1. This is how the snare drum sounds like:
This is one of the common snare sounds in the 80’s new wave. A highly compressed snare emphasizing its metallic sounds more than the body. With some reverb technique, you can actually produce a gated snare sound which is popular in that period. This is how the waveform looks like:
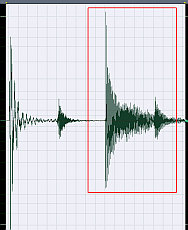
Compression settings 2
The peak section looks very compressed (as evident by very thin peaks showing less energy). It is because the attack time is set to short and the release time sets to slow. The compression ratio of 4:1 is strong enough to compress those peaks effectively. Let’s try this third setting:
-30.4dB threshold
4:1 Compression ratio
Scan mode: RMS
Smooth saturation: Yes
Attack time: 100ms
Release time: 100ms
Output gain: 4.5dB
This is moderate compression with attack and release time set to a same value. This is how it sounds like:
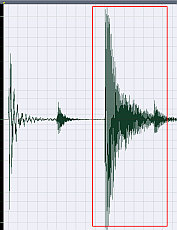
The snare drum hits are prominent and strong with little sustain. This is one of the snare drum type sound used in alternative music. As a result if the attack time is set to slow with slow release time, the snare drum sounds powerful. Here is the waveform of this setting:

Compression settings 3
You will notice that there are more energies concentrated in the peak section of the snare. This is why it sounds stronger than the other compressed examples. Comparing with the uncompressed sound, the third setting has a better “snare body” sound. Now let’s try this fourth setting:
-30.4dB threshold
7.5:1 Compression ratio
Scan mode: RMS
Smooth saturation: Yes
Attack time: 100ms
Release time: 10ms
Output gain: 6dB
In this setting, the attack time is set to slow and the release time is very fast. The compression ratio is also deep at 7.5:1; this is how the snare drum sounds like at this setting:
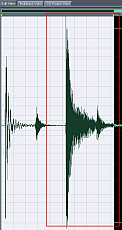
Actually this sounds similar to the third sound, it has great snare body sound and hits. It is also as powerful as the third setting. One slight difference I have noticed that it’s more sustained than the third setting. This is how the waveform looks like:
Compression settings 4
As you have observed some energies are spread are towards the end of the waveform, it is why it sound a bit sustain. Finally this is the fifth setting:
-30.4dB threshold
5:1 compression ratio
Scan mode: RMS
Smooth saturation: yes
Attack time: 20ms
Release time: 40ms
The compression ratio is set to medium with slower attack and faster release time. This gives the snare some scratchy yet powerful sound:
Personally, I will use this setting for compressing snare in punk drum tracks. This is how the waveform looks like:
Compression settings 5
The peak has a lot of energy yet you can also see some of the energy being distributed throughout the waveform contributing to some sustain.
Final recommendation: The settings above are not meant to be the final solution, I recommend to highly rely on your ear to tweak the settings further to create a great snare sound in your mix starting with the settings provided above.
Add more punch by using parallel compression
Parallel compression as the name implies is running a compressor parallel to the original signal. To understand this very easily; look at the schematic below:
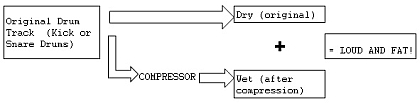
Parallel Compression for Drums
As you can see, your original drum tracks signal and compressed drum signal are mixed together to produce a loud and fat drum sound. Why compress in parallel?
1.) First, if you compress the original signal directly (not in parallel) – you are taking away precious dynamics from the recording. These are the “loud” and “soft” parts of the drum recording that makes the music very exciting to listen. Compression reduces the dynamic range of the recording.
If you want to learn why, you can read this tutorial on dynamic range compression.
2.) By compressing in parallel, you retain the original drum recording dynamics while taking advantage of “compressed” and “loud” drum sound. Compressed sounds are loud because the soft parts in the drum recording are made to be loud while the loud parts stays loud. If you mix the compressed and original drum recording, the resulting sound is loud while retaining the important dynamics.
To do parallel compression, you can follow the steps below:
1.) Create a new track in your DAW mix.
2.) Route the input of your original drum recording to this new track. You can do this by making an auxiliary connection. This feature is usually available in most DAW.
3.) Now in the aux track, add a compressor.
4.) Set the compressor threshold, ratio, attack and release time as follows:
a.) Set the compression ratio starting at 4:1
b.) Attack time at 0.5ms
c.) Release time at 30ms
Listen to the parallel compressed track, now slowly lower the threshold from 0dB to -6dB , then to -15dB ,etc until you reach the optimal loudness while not squashing the result.
You can even experiment with slower attack time and faster release or with a very high compression ratio to make the output really compressed and loud. Listen to the mix and see how the settings are affecting the resulting drum sound. If you are using REAPER, you can read this parallel compression tutorial.
If you have other great tips in mixing snare drums, feel free to share. Thanks.
Content last updated on October 13, 2012