
This is a full review of REAPER Digital audio workstation software by Cockos Incorporated. This software is used in creating multitrack recording projects using your own PC or Mac. REAPER is an acronym for “Rapid Environment for Audio Production, Engineering, and Recording”.
This review would be covering REAPER version (v4.22, 2012 release) and tested using the following hardware and software:
a.) Windows XP operating system (SP3) 32-bit
b.) Focusrite Saffire Pro 40 audio interface (Firewire)
c.) CPU: Intel i3-2100 3.1GHz
d.) RAM: 4GB (2.99GB detected by Windows)
e.) Recording Hard drive: 1TB
f.) Operating system hard drive: 500GB
The review would be focusing on the following important aspects:
a.) Licensing and Price
b.) Supported operating systems
c.) Installation and upgrading process
d.) Configuring your selected audio interface to work with REAPER
e.) VST/Direct-X/ReWire plug-in support
f.) Resolution of the internal mixing engine
g.) Support for audio editing
h.) MIDI Support
i.) CPU and memory resource usage running a full session
j.) Usability
k.) Video editing support
You can read the final verdict here.
Licensing and Price
You can install and run REAPER without any form of user registration during the trial period. The software still operates with its full features. The developers do recommend that you should be testing the software within the span of 30 days.
If you are happy using REAPER within this period; you can purchase a discounted license of $60. REAPER however would still work with its full features even after 30 days and you will be presented with a nag screen.
The license includes two major version upgrades. For example with the current version 4.22, purchasing a license today includes free upgrades up to REAPER version 5.99. The license allows you to install in one computer at a time. And multiple installation of the software by the same person (the licensee/owner) is allowed.
Discount licenses works great for both personal/business use of the software. There is also a full commercial license of $225 for any individual or business establishments with gross revenue of more than $20,000 per year. Cockos Inc. also offers classroom licenses if you wish to use REAPER in schools.
You can say that REAPER licensing cost is way lower than most commercially available DAW software. This makes it very affordable for a common home studio owner/producer. For more details about Reaper licensing procedure you can read this tutorial on how to install Reaper.
Score: 5/5
Back to top
Supported operating systems
REAPER has two native versions available to Windows operating system and Mac OSx. The good thing is that it supports both 32-bit and 64-bit versions of these operating systems.
In the REAPER download page, there is no native version available for Linux. While most digital recording studios are using Windows and OS X; there is also an increasing trend of Linux users. For advanced users, there are experimental releases of REAPER in Linux; although it is not as complete as the Windows and OS X version.
REAPER would also run using Wine platform in Linux.
Score: 4/5
Back to top
Installation and upgrading process
The installation process is very simple and self-explanatory. To install, the user needs to download the latest REAPER version here. The installation file is very light (around 6MB) which makes the downloading easy.
Then after that, double clicking the executable file would launch the installation screen. The user would need to select all components for installation and everything would then be straightforward. For running the software for the first time, REAPER would ask for a license. As mentioned before, any user can try the software with all its features by simply selecting “Still Evaluating” option. If you want know exactly the detailed installation procedures, you can this tutorial on how to install Reaper.
When doing an upgrade, you can simply download the latest version from the REAPER download page. You will then need to install that to your computer like doing a first installation. This will automatically overwrite the old version while preserving your settings and projects. The upgrading process is quick and easy.
Score: 5/5
Back to top
Configuring your selected audio interface to work with REAPER
In this review, Focusrite Saffire Pro 40 audio interface is configured to work with REAPER. The configuration is easy as long as the audio interface ASIO drivers are fully installed and working in your computer before installing REAPER.
For professional music production projects, ASIO is the preferred audio driver when working with low latency implementations. All the user needs to do is to go to Preferences – Audio – Device; then select ASIO as well your audio system and select your audio interface driver.
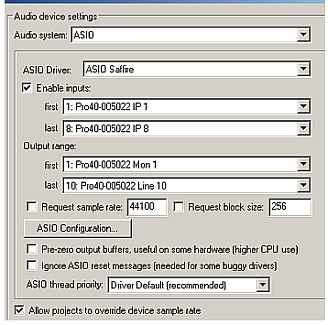
configuring your audio interface to work with Reaper
For multi-channel audio interface, you can take a look at the recognized inputs and outputs of your hardware. These are automatically detected by REAPER upon installation.
Restarting your system and you are now ready to use REAPER in your recording projects. For most of the time, this will work without any issues as long as your audio interface is perfectly supported by your operating system and you are using correct/updated drivers. More details on configuration and setting up in this Reaper DAW tutorial.
Score: 5/5
Back to top
VST/Direct-X/ReWire Plug-in support
REAPER does support both VST and Direct X audio plug-in as well as ReWire. In addition to using third party VST or Direct X plug-in such as from Waves. Adding VST and Direct-X is very easy because all you need is to add the VST path or scan for newly installed plug-ins.
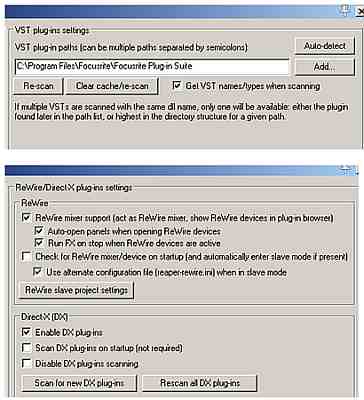
Installing plug-ins in Reaper
You can also install its open source/free plug-ins known as the ReaPlugs VST FX Suite. You can also read this tutorial for sample procedure on how to install VST plugin in Reaper.
You can then experiment a lot of important audio mixing/editing effects such as EQ, compression, reverb, etc.
Score: 5/5
Back to top
Resolution of the internal mixing engine
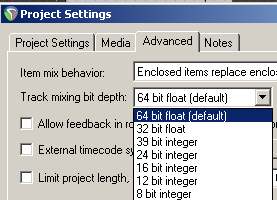
The resolution of the internal mixing engine is important to retain the accuracy and audio quality of your mix. Any processing that goes inside your DAW software are done mathematically using algorithms. There is a lot of calculations involved particularly if you are using a lot of effects in the mix.
The default track mixing depth of REAPER is 64-bit floating point mix. This is similar to the one used by industry standard DAW software like Pro tools. Other older DAW software only supports up to 32-bit floating mixing. There are clear advantages of 64-bit DAW over 32-bit float Digital audio workstation.
REAPER allows you to select different mixing depth in the project settings:
Reaper mixing bit depth
Score: 5/5
Back to top
Support for audio editing
REAPER offers non-destructive form of audio editing. This is very important for digital music production since it will preserve the original recordings on your hard drive during the editing. For example if you like to re-edit the audio, you can simply repeat the editing process using the original recordings.
This is different from destructive form of editing where you cannot anymore undo the changes. Non-destructive editing tools in REAPER are envelopes which are applied directly to the multi-track session waveforms. See an example below:
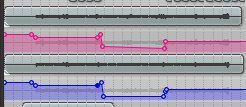
Non-destructive editing Reaper
If the above example are volume automation where you can control the amount of track volume in different time section of the tracks non-destructively.
There is no dedicated/built-in audio editor window in REAPER as you would see in other DAW like Cubase. Dedicated audio editor is great for zooming detailed audio waveforms and performing sophisticated audio editing like removing noise. This is not easy to be performed directly on the multitrack session window. Nevertheless, REAPER audio editing features are sufficient enough for most basic tasks.
There is also an option in adding an external audio editor in Reaper.
Score: 4/5
Back to top
MIDI Support
REAPER does support basic MIDI functionality such as editing, recording and playback. Below is a screenshot of the MIDI editor:
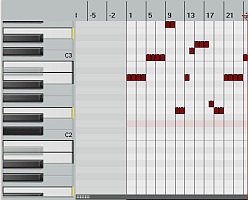
Reaper MIDI editor
In addition, REAPER allows you to insert a virtual instrument on a new track. This is very handy if you want to add a virtual instrument to your projects such as Superior Drummer.
Score: 3/5
Back to top
CPU and memory resource usage running a full session
To test the CPU and memory usage; a multi-track project with 67 recorded tracks (with effects) has been tried with REAPER. Below is the comparison of CPU and memory usage with or without REAPER (only this software is running):
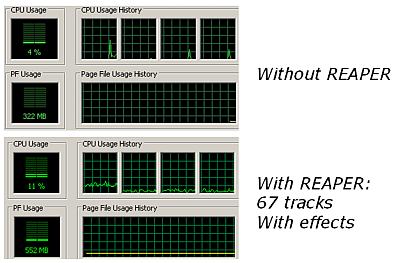
CPU and memory usage of REAPER
As you can see, REAPER is very light on system resources during multi-track playback. It utilizes around 552MB and 11% CPU usage for the playback of 67 tracks with effects.
Score: 5/5
Back to top
Usability
Based on my experience; REAPER is actually easy to use. After launching the program, you can easily insert tracks for recording by going to Tracks – Insert New Tracks. After inserting several new tracks, you can easily assign their corresponding audio interface inputs. These are particularly important for multichannel/simultaneous recording such as drum tracking or live band recording session.
The tracks in the REAPER mixing session have layouts similar to real-world mixing consoles. In the screenshot below, you can easily see the tracks added like channel strip on a mixing console. These are the faders, pan knob, FX and IO. These functionalities are the heart of the REAPER multitrack project.
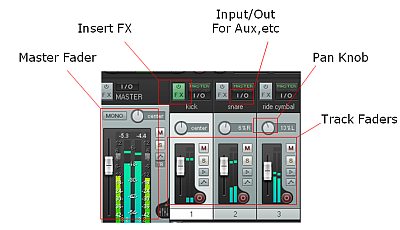
Usability in Reaper
REAPER developers do a great job in providing a simplistic DAW layout design that makes it easy for beginners to use. Reaper DAW file management also allows more efficient and user friendly workflow for saving files.
Score: 5/5
Back to top
Video Editing Support
Reaper video editing as well as other rendering options are very basic . It utilizes FFMPEG open source libraries. You can do the following:
1.) Import and play video files in REAPER. Tested video file extensions: MPG, MOV, WMV, AVI
2.) Cutting and selecting sections of the video and rendering the edited video as a new video file.
3.) Mixing audio tracks for a video project.
There are still a lot of video editing features that are not available. For example, you cannot work with subtitles, adding detailed video effects, in-depth video editing like you see in other video editors such as Windows Movie Maker and Sony Vegas.
It would be great if REAPER developers would focus on improving this feature in the future.
Score: 3/5
Back to top
Final Verdict
REAPER is basically complete as digital audio workstation software for professional music production projects. The 64-bit floating summing engine and compatible to industry standard VST/DX plug-ins allows you craft the best sounding mix for your projects.
This is highly recommended for beginners that are looking for a great DAW for their home digital recording studio and for those that are budget-conscious; considering that it cost only $60 to license.
REAPER though is not perfectly suited for serious video/film professionals and for those sound editors that are looking for a more detailed sound editing environment.
Overall score: 90%
Back to top
Content last updated on June 4, 2012