Reverb is a wonderful effect that creates illusion of space and depth in your stereo mix. However, this effect is often abused particularly by beginners in audio mixing. As a result, the mix lacks punch and clarity because everything has been drowned in reverb. On the opposite; without any reverb can result to a dry, unnatural and less interesting mix due to the lack of space and ambiance.
This tutorial will illustrate some very basic principles on how to apply reverb to a mix correctly. By following these techniques, you will arrive at a punchy sounding mix while maintaining a sense of depth and space using reverb.
First principle: Relationship of Panning to the amount of Reverb
The first thing you should know is that the amount of reverb depends on the location of the track in the stereo field. The location of the track in stereo is set by panning. When mixing, you decide where to put your mono tracks in the stereo field. To do this, you will need to pan them. All DAW software includes some panning features. For example vocal is panned at the center while the guitars in the middle left/right and finally strings or wind instruments to the hard left or right.
The relationship of panning to the amount of reverb can visualize below:
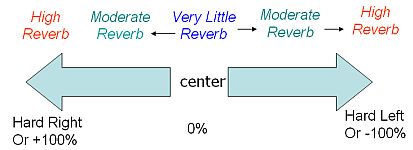
Relationship of panning and reverb
The above screenshot shows that the amount of reverb will increase as it gets farther from the center of the mix. So for tracks at the center, you should apply very little reverb or even no reverb at all. Tracks that are commonly panned in the center include vocals, snare, bass guitar and kick drum. As you have noticed, most professional/commercial recordings today have less reverb applied on these instruments in the mix.
Halfway from the center to both hard left and right, you can apply moderate reverb to it. Common instruments that are panned at 50% include rhythm guitars and keyboards. Then for those instruments that are panned somewhere very near to the hard left and right (85% settings and beyond), you can apply full reverb to these instruments. Example of these instruments include the violin, wind instruments, lead or solo guitars, etc.
If you follow this guide, your mix sounds dynamic and full because the vocals, snare, bass and kick drum drives the punch for the mix while the solo guitars, violins, strings add a sense of depth and space through reverb. You will then have a naturally sounding mix.
Second principle: Relationship of Frequency to Reverb
The second principle is that the higher the frequencies, the higher you can safely apply reverb that can add value to your mix. For example, very low frequency instruments such as bass guitar, kick drums, double bass, etc. may not need to be applied with reverb. If you need to apply reverb, a very small amount is enough. More than that, bass frequencies can easily dominate your mix and it will not sound good.
On the other hand, solo instruments such as violin and lead guitar (playing high notes) can be safely added with reverb to add value to your mix. Vocal frequencies somewhere fall in the middle frequencies but the trend today is having “enough” reverb to make the vocals sit properly in the mix. Too much vocal reverb can destroy clarity and dominance of vocals in the mix which are important in pop and country genre.