
Mastering is the last music production process. It is the next process after audio mixing. In the mastering stage, the engineer does not concern with the mixing elements or different tracks used in the song. The primary reason is that the engineer would only be working on a single waveform (which is called the “mix down” such as the screenshot below:

Unmastered audio waveform
Bear in mind that as a mastering engineer, you should be requiring your clients a “proper mixdown” of the song. This should ensure that you are working with the best quality audio as possible for mastering. One aspect of quality mixdown is observing correct audio mixing levels and headroom in preparation for mastering.
EQ issues in mastering are often caused by problems in the mix. If you are self-mastering your work, you would be surprised that most EQ problems in the mastering can be fixed by remixing. During this remixing process, you would be re-adjusting the EQ of different tracks in the mix until the desired clarity and balance are attained. To minimize issues, you would want to try implementing the complete EQ settings to start when doing audio mixing.
EQ Issues that can be solved in Mastering
Mastering is necessary to further enhance the mix down particularly to address these following audio quality issues:
1.) Lack of presence – presence is an element that makes the music as well as the vocals clearly audible in sound reproduction equipment (like hi-fi audio equipment, your CD player, etc). If this is not addressed, other strong/dominating elements like the bass and the drums will drown the important musical element like the vocals.
Luckily, the mastering engineer can sort this issue using EQ.
2.) Lack of punchy bass elements – if you are producing songs in rock and pop genre, the bass elements is very important to push the song. Unluckily during the mixing process, the job is to simply avoid mud in such as way all instruments can be heard at their specified frequencies.
However, heavy boosting of bass elements is not recommended in the mixing stage and should be comfortably in the mastering stage. The important musical instruments that are affected are the bass and kick drums.
3.) Lack of bright hi frequency elements – one of the common errors in independent music production is the lack of brightness with respect to high frequency elements. This makes the music so bassy and not been able to capture hi frequency elements properly. So if your music includes drum hi hats and cymbals, then you need to tweak these elements during the mastering stage using an EQ.
OK, once you understood the objectives in your mastering stage which is to address the above said problems. It is now the time to formulate the EQ settings for mastering.
EQ Recommendations for Mastering (Quick Guide)
The following are the settings I used (that is a good setting to start but it may depend on your mix down so you need to do minor tweaks):
Low shelf cut: 30Hz (Not recommended for rock, pop and country music as you would need to have a strong sub-bass for additional punch)
Important: Also, if the raw audio mix contains too much sub-bass, you might want to cut this a little bit using the above setting.
70 Hz Q=0.8, +0.5dB to +1.5dB boost (This will boost the bass guitar frequencies or kick fundamental bass drum sound)
100Hz Q=2.0, +0.5dB to +1.5dB boost (This will strengthen the upper bass, for improving the clarity of bass guitar notes and kick drum spikes)
200Hz Q=1.4, -0.5dB to -1.5dB cut (This will remove the muddiness of the bass and guitar frequencies as well as the vocals)
1500Hz Q=0.7, +0.5dB to -1.5 dB boost (This will add overall presence of important mid-range instruments like the vocals and the guitars)
13500Hz Q=1.0, +0.5dB to +1.5 dB boost (This will boost the high frequencies to support hi hats, cymbals and vocals)
You might notice that the mastering EQ does not cut or boost more than +1.5dB or -1.5dB. This is recommended because a slight EQ adjustment in mastering can have a big impact on the resulting audio. You need to use your ears very carefully when making an adjustment. Highly trained ears of professional mastering engineers can distinguish differences of very small EQ boost/cut adjustments even as little as 0.2dB difference. You can assess it here: Ear training development exercises for mastering engineer.
In some cases, you might want to adjust more than 1.5dB which is seems fine as long as you not be overdoing it. For example, the bass region of the mix really deserved a -3dB cut, by all means do that. But if you are doing a -3dB cut in different sections of the frequency spectrum, this is now considered a heavy EQ alteration. You might want to talk to your client first by raising this issue and whether re-mixing can be a better alternative than pushing through drastic EQ adjustments.
There are some advanced EQ parametric such as Waves LinEQ and L2 Ultramaximizer that you can use to make your masters sound loud and big by making big EQ adjustments without compromising the audio quality. Always remember to use your ear and compare your mastering to the standard produced records of the same genre (if you are mastering rock music, you can listen to rock records and compare whether it is comparable sonic quality or not).
For more information about implementing EQ in mastering, I suggest you will check out the following tutorials:
1.) 54 New Year Resolutions to Improve Recording Quality of your Projects– go directly to the mastering section for the tips.
2.) Using Parametric EQ to Find the “Sweet Spot” of any Musical Instruments – in mastering, using parametric EQ is indispensable. Make sure you know how to detect EQ issues by knowing the “sweet spot” of the problem.
3.) Finding Instrument frequencies using Notch filtering in Audio Mastering – this is another detect of finding out serious EQ issues in mastering – using notch filtering.
Differences between EQ and Compression in Mixing and Mastering
A reader asked me about the differences between EQ and Compression in mixing and audio mastering process. Here it is:
Hi Emerson. Thanks for all your tips. They are all very useful. I have a confusion.In some tutorials you give advises on compression and parametric EQ settings for a variety of instruments, however, in the tutorial called, “Mastering with Cool Edit Pro / Adobe Audition” it says the following:
“No EQ and Compression is still applied. It should be completely fresh, the single waveform is still NOT being adjusted with any mastering EQ and compression settings.”
So, the final waveform shouldn’t be compressed in the initial steps of the mastering stage, however each of the instruments should be Equalized and Compressed with their particular settings during the mixing stage and you equalize and compress the final waveform? Am I getting it right?
Another question I have is, how to reduce the peak amplitude of a waveform in cool edit. I am using Normalize with -1db setting. Is that OK?
Well that’s it. Thanks for all your tutorials. You are great!
————————-
Hi ,
Thanks for writing to www.audiorecording.me! I think you are mistaken. Compression and EQ are applied to each instruments/tracks while mixing. And its different in mastering (explained later). But after mixdown, the resulting wave (also called “mixdown”) is NOT anymore compressed or EQ by the mixing engineer. Some mixing engineers attempt to compress this or apply limiter to impress their clients that their mix is very loud but this is not a correct practice.
It is because the compression and EQ are delicate adjustments which can strongly alter the final results of the master. In this case it should be handled by a professional mastering engineer to make this right. In mastering process, the engineer will apply another rounds of compression and EQ to the mixdown wave.This compression can either be in the form of multi-band compression and the EQ will be using either parametric equalization or shelving filters. This time the mastering engineer will only be dealing with a single audio waveform which is the mixdown. EQ and compression are applied in mastering to finally shaped the audio to its desired tonal qualities and to make it sound broadcast ready. In most cases, this is applied in the initial/early steps of mastering process.
To resolve this confusion take a look at the process flow below illustrating the compression and EQ application differences between mastering and mixing (take note that the mixing process is simplified for illustration purposes only, in reality there are other effects applied aside from compression and EQ):
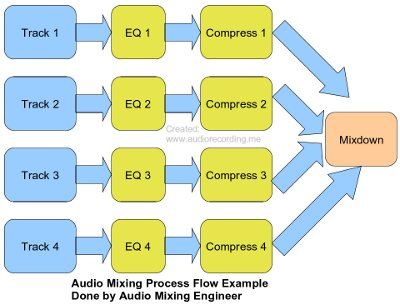
Audio mixing differences

mastering flow simplified
As you have observed, EQ and compression are both used in mixing and mastering. The only difference is that EQ and compression in mixing are applied to each individual tracks/instruments in the mix as opposed to mastering where the mastering engineer will be applying EQ and compression to a single final waveform. So this waveform will still be compressed and EQ’d only by the mastering engineer.
Regarding your second question:
Another question I have is, how to reduce the peak amplitude of a waveform in cool edit. I am using Normalize with -1db setting. Is that ok?
No you should not be using normalization in this case. It is because your aim is only to reduce the peak amplitude, “amplify” or “amplification” feature is enough. Normalization and amplification are actually different although they operate similarly. Normalization aims to “normalize” the wave to a specified dB and adjust DC bias/offset. Amplification does not do any DC bias offset but it can only be boosting or reduction in gain. I will be writing a separate tutorial to properly illustrate the differences between these two.
Anyway, you can always use the amplify feature with negative gain for attenuation(reduction of peak amplitude). In this case, the volume of the wave will be reduced by this fixed amount. In Audacity, amplification feature will even provide a new peak amplitude such as in this case:
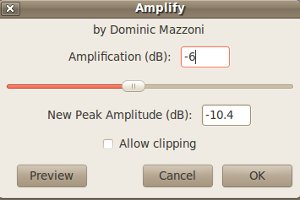
normalized settings
The same concept can be applied to Cool Edit, apply a negative gain on amplification in dB and then a new peak amplitude will be provided(of course it is reduced from its original amount).
Content last updated on October 14, 2012