
Mastering is the last step in the music production process which will take place after audio mixing. Actually mastering is what makes your music radio friendly, broadcast ready or commercial polished sound. Without mastering, your music can hardly compete in the world of music business where sound recording “quality” is important. Mastering can improve your raw mix sound quality several times if the mastering process is done right. This tutorial is primary written to first time learners in audio mastering; those that prefer to learn on their own. This is my own technique acquired over years of experience. Other mastering engineers may have a similar or entirely different approach when mastering. This process works for me very well, so I am going to share this to you. To get started; examine the digital audio mastering process flowchart below:
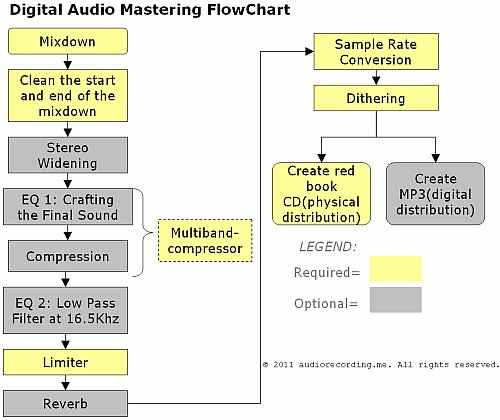
Audio mastering flowchart
The yellow boxes in the flow chart are important and required. The gray boxes are optional and only used when necessary. It is called “digital audio mastering” because everything is done inside a computer using mastering software. This tutorial will be using Adobe Audition, although the process is well applicable to other software as well with similar plug-in and effects. Everything will start on the mix down material. This is the product of the audio mixing process where the entire tracks are summed up into a single waveform known as the “mix down”. Technical format for mix down should be as high resolution as possible such as 24 bit/96Khz. I have written some guide on the detailed technical requirements of your audio mix down for mastering.
You will then launch your audio mastering software. The first thing that you will need to do is to clean the start and end of your mix down audio wave. Audio mix down introduces long silence/gaps at both start and end of the audio. You need to trim this within reasonable lengths. Screenshot:
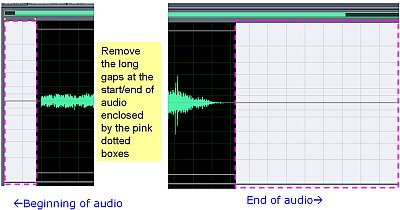
Big gaps in mixdown that needs to be removed
After removing this gap, you can then optionally widen the stereo. This is only useful if you think the center of the stereo is too dominant in the mix. And the guitars which are panned hard on both left and right sound weak. By widening the stereo, those instruments panned in both left and right of the stereo field will become louder thus balancing with the dominant center. In Adobe Audition, you can implement this technique by going to Effects – Amplitude – Pan/Expand – Mastering Width preset. You will then use multi-band compressor to shape both the sound and dynamics of the audio. If you do not have a multi-band compressor, you can start with EQ to craft the final sound then compress after. Multi-band compressor allows you to compress and apply EQ at the same time, so it’s very useful to solve the following common audio mastering problems:
a.) The bass needs compression to accomplish the desired tightness/punch. If you apply only a specific compression setting affecting only the bass frequencies using a MB compressor, it won’t affect the dynamics of other bands (e.g. the mid and high frequencies).
b.) Maintain a good tonal balance overall while doing compression. It is because you can also adjust the gain of each band.
The following are the tutorials I have written pertaining to the use of MB compressor when mastering (using Waves plug-in):
Introduction to LinMB compressor
How to use reference tracks when mastering using LinMB compressor
Once you finally decided and completed on applying dynamics and EQ adjustments, you can optionally apply a low pass filter at 16.5 KHz. Most commercial CD seems to implement this approach. Try opening a commercial/professional mastered audio track. Then plot the frequency analysis of the entire audio; you will notice that above 16 KHz are substantially filtered. Screenshot (inside the white box):
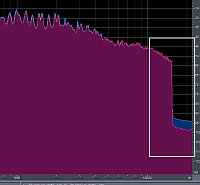
Frequency analysis of mastered audio
In Adobe Audition, you can accomplish this using: Effects – Filters – Scientific Filters. I use the following setting: Butterworth Low pass filter, Cut-off at 16500Hz, order: 66 see screenshot:

Butterworth filter
This is the time to use a limiter to maximize the volume of the audio material. Personally I use Waves L1 Ultramaximizer plug-in in Adobe Audition, with the following settings:
Threshold= Target RMS power of the audio after mastering – Average RMS power of the audio before mastering
Out of Ceiling: 0
Release: 1.00
In Adobe Audition, you can get the average RMS power of the audio by going to Analyze – Statistics. Get the data before mastering. I personally aimed for -14dB RMS power as the target average. This is safe without squashing the resulting dynamics. You can decide whether you like to be lower or even higher, it depends on the material. Supposing the current average RMS power is -19dB, the threshold that I will be going to apply: Threshold = -14dB – (-19dB) = 5dB. This is the final L1 settings:
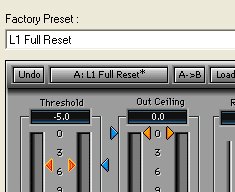
L1 ultramaximizer mastering settings
After limiting, optionally you can apply just a small reverb to sparkle if the audio is very dry. Applying reverb depends also on the material. Sample rate conversion can now be implemented to convert the sampling rate to 44.1 KHz. Dithering is implemented after SRC. Its job is to convert the bit depth down to 16 bits. Essentially, the purpose of SRC and dithering is to convert 24 bit/96Khz to 16 bit/44.1Khz audio which is the format for audio CD. You can read this tutorial on how to use dithering and sample rate conversion during mastering. After converting the mastered audio to a distribution format (16 bit/44.1Khz); it can be distributed in two ways:
a.) Physical album distribution using audio CD – you need to create a CD master that conforms to red book standard. You should as well use the best CD burner for creating Redbook CD in preparation to replication.
b.) Digital album distribution using MP3– you can use quality MP3 encoders such as LAME to create your MP3 tracks. You can read this tutorial on how to add lame mp3 encoder to Adobe Audition.
Content last updated on July 5, 2012