Relevance of Disc burning mode
DON’T burn your CD using “track at once mode” if you are submitting your master for CD replication or distribution.
DO burn your audio CD always in “disc-at-once-mode (DAO)”.
You can easily set this in your CD writing software. This mode ensures compatibility with the CD replication process.
CD-R vs CD-RW
DON’T use CD-rewritable disc when burning music for distribution and album release/CD master.
DO use only high quality CD-R
Music for distribution is meant to be permanent, so you should not be using CD-RW or rewritable discs. If you are submitting CD-RW for duplication or replication; it will be rejected by the replicating plant. It is recommended that you should only be using the highest quality CD-R for your CD project.
Red book CD specifications
DON’T create a CD master if you don’t know about Red book specifications.
DO make sure that your CD master (that contains your music for distribution) is following the Red book specifications.
Audio CD used in commercial releases does follow a certain specification/standard known as the “Red Book”. The purpose of this standard is to create CD that will be compatible with all CD players.
One of the simplest solutions in creating a red book audio CD is to use a CD writing software such as Sony CD Architect. This software fully supports red book specifications. Check out this tutorial on how to make a CD master that complies with Red Book standard.
Importance of CD verification
DON’T burn CD without verification after the writing process.
DO ensure that your CD is verified after the CD burning process.
It’s always the best practice to verify your CD after the burning process. This will ensure that your CD is clean and free of errors.
CD capacity
DON’T exceed the audio CD capacity.
DO gives some allowance in your CD and ensure that the total playing time of the CD is less than 79 minutes.
This is in relation to the red book audio CD specifications. This one of the requirement that CD playing time should not exceed around 79 minutes. Also don’t burn a CD that exceeds the full capacity; you will know this very easily using your CD writing software.
Tips: Burning an Audio Mixing Session to a CD
Question from a reader:
I’m taking a class and I’ve received a session to mix. Every time I burn the wav files using windows media player turns it to regular audio. The problem with that; it loads as audio so it’s a stereo file, can’t get around that. A single kick would load on track 1 and 2. Explain to me when I burn wav files to disc it stays as a wav file. I’m using windows vista.
Potential Issues
a.) Your CD burning software (Windows media player) creates an audio CD. This would automatically mean that even if the audio is mono (as what most tracks for mixing are) it would automatically be converted to stereo.
b.) If you burn the recorded tracks to audio CD, it would lose its original recording resolution since audio CD always has a 16-bit/44.1KHz. Most recording are done at a higher resolution such as 24-bit/48KHz.
Potential Solution
a.) Some CD burning software (like Nero) does include a data disc feature. In this case, you can burn the recorded tracks in its original form and they are not converted to audio CD format (16-bit/44.1KHz).
b.) If you want an open source solution, you can use Infra-recorder.
Then create a data disc. Since most mixing session file are rather big in file sizes, I would recommend creating a DVD Data Disc using Infra Recorder; see screenshot below:
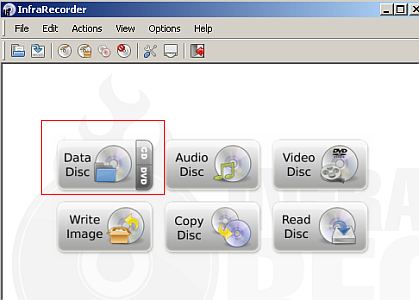
Creating a Data CD
Simply click the DVD button in the data disc options.
c.) Bear in mind that since this is now a data disc, it cannot be played in CD players, etc. To get the data from the disc, put it in your computer DVD drive and simply copy the files to your DAW hard drive; that’s it. The sampling rate, bit depth, etc would be preserved and the same as the recorded files (they are not altered during the CD burning process.)
Content last updated on October 8, 2012