You need to follow the steps below:
Step1.) Launch Audacity.
Step2.) Open your Audio project that you need to change pitch. (File – Open). The source audio can be an MP3 file. But take note that if you want better quality, you might want to convert from the highest resolution format available. So if the music to be transposed has the following available formats:
a.) 24-bit/48KHz
b.) 16-bit/44.1KHz CD audio
c.) 320kbps MP3
d.) 128kbps MP3
Then use the 24-bit/48KHz format because its available and it has the highest resolution. Make sure you make some backup to this file because pitch transposition is a destructive form of audio editing. Put the backup in a different place, e.g. in a external hard drive.
Also bear in mind that converting from low to high resolution does not improve the quality of your audio to be transposed. So if you only have 128Kbps MP3 format and you convert it to 16-bit/44.1KHz or even 24-bit/48KHz, then you will get no benefit in terms of sound quality. It is because the source audio is already in low resolution.
Step3.) Now go to Effect – Change Pitch. The Change pitch tool automatically detects the current Key signature of the music, for example in the screenshot below:
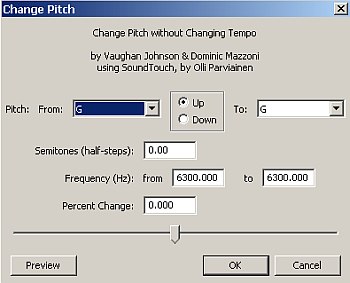
Change Pitch effect tool in Audacity
The current pitch of the music is G. Supposing the singer wants to bring down the pitch by a half step. So the new pitch would be F#/Gb.
To change this, simply select the radio button “down”, and set “To:” F#/Gb. This setting would transpose the entire pitch of the music by a half step. This is the new setting as shown below:
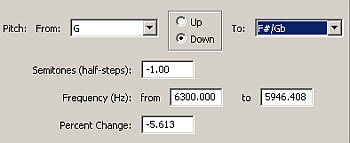
Audacity pitch
Otherwise if you want a higher pitch setting. Supposing from G key to A. Then select “up” and then select A pitch.
Note: You do not need to change or edit the following fields:
a.) Semitones
b.) Frequency from and to.
c.) Percent change.
Leave all the above mentioned fields by default.
Step4.) You can even listen to the sample preview by clicking the preview button. This is highly recommended so that you will not be repeating the pitch process over again that can be time consuming. Let the singer practice the preview pitch to make sure it is already final. If all are set, click OK.
Step5.) You can save the file. The most recommended format for saving the edited file is in 24-bits/44.1KHz WAV. First, you need to save the project. Go to File — > Save Project As then type any desired name of the project and click save.
Then go to File — > Export, type the name of the edited file (do not overwrite the original audio source or your backup!). Then in the “Save as type”, select “Other uncompressed files”. Click “Options” and then under “Header” select WAV (Microsoft). Then under “Encoding”, select “Signed 24-bit PCM”. Click OK and save. You can optionally enter metadata. You can skip this by clicking OK. Close the file and exit Audacity.
Creating a copy of transposed audio or distribution
By following steps in the previous section, you now have a high resolution 24-bit copy of the transposed music. Your objective is to create copies that you can distribute to other medium such as CD or MP3. To do this, follow the steps below:
Step1.) In Audacity, go to File — > Open. You need to load the edited file (24-bit audio).
Step2.) Check first if the audio volume has been maximized. Go to Effect — > Normalize. Check all available options and then set the maximum amplitude to -0.2dB.
Step3.) Click OK. The transposed music is now louder than before.
Step4.) Export the audio again as 24-bits following step 5 in the previous section.
Step5.) Download this tool.
Step6.) Using Voxengo R8brain, you need to implement dithering and sample rate conversion (SRC). This will convert the 24-bit audio to 16-bits/44.1KHz. SRC is only needed when the original audio sample rate is not equal to 44.1KHz.
Step7.) What you have after R8brain conversion is a 16-bit/44.1KHz WAV. If you like to convert it to MP3, to export it as MP3. If it looks for a LAME encoder. Download it here.
The rest will be self-explanatory.
Recommendations for Best Results
1.) Always use the highest resolution audio format as possible when dong audio editing.
2.) Don’t use MP3 or lower WAV resolution such as 16-bit.
3.) If you can re-record the out-of tune performance, then much better. Re-recording is always preferred than serious digital editing. Why? Do you know that heavy digital editing such as pitch correction can introduce some unwanted side effects? These side effects would be audible to your listeners.
4.) The quality of the edited result strongly depends on the quality or algorithm of the pitch correction software.
5.) If you don’t have Adobe Audition, there are lots of free software that allows you to edit the pitch of the waveform. For example, you can use Audacity and its free plugins.
For more information, read the additional/related articles of this post below.
Content last updated on October 13, 2012