
One of the key elements in rock mix is thick and heavy guitar sound. One of the effective ways to accomplish this sound in the mixing process is through a technique called as “Double Tracking”. In this post I will illustrate how to double track guitars in the mix with the objective of making it heavy and thick. Also in the last section of this article, you will also know the general guidelines on mixing guitar tracks in your home studio that utilizes different techniques depending on how the guitar is recorded.
Recording the guitar properly for Double Tracking

Electric guitar photos
Photo credits:
http://www.penmachine.com/musicpages/cheapguitar2005.html
The simplest method is recording the guitar performance with two microphones aimed at the guitar amplifier cabinet. In this type of setup, you will automatically get “double tracked” guitars which makes easier for you to mix later. See signal flow diagram below:
Double tracking signal flow path
Also with this type of recording technique, you do not need to record the guitar twice. Record with the best distortion tone you need. Do not record it yet if you are not yet convinced of the distortion tone; much better to experiment with a live band before starting to record the guitar. The overall purpose is to have a clean and final recording ready for mixing. Remember it is not advisable to fix the distortion tone in the mix; it makes the mixing process to be complicated.
c.) If you only have one microphone, you can still follow the above steps except that you will only be creating one track in your DAW. It will be double tracked in the mix (to be illustrated later) by manual duplication of tracks.
d.) If you do not have a microphone, you can implement this technique on recording the clean guitar using DI method(direct to your audio interface) as one track. It will be duplicated in the mix later.
2.) Double check the tuning of the guitars. Very easy to do but often overlooked.
The proper “double tracking” mixing steps
If you are only recording one guitar track (using one microphone or DI), start with Step1 until the end. If you are recording guitars using two microphones (thus you have two recorded tracks in your DAW) start with Step3.
Step1.) Start with placing the 1st track in Track1 of the mixing session. This is the original guitar recording.
Step2.) Create Track2 of in your DAW mixing session. Simply copy and paste the wav file in Track1 to Track2.
Step3.) Pan the Track1 to -75 units (left). Depending on your DAW/mixing software, this could be in %, for example if the maximum left pan setting is 100% so it will be 75/100 or 75%.
Step4.) Pan the Track2 to 75 units (right)
You can read this detailed article on panning guitars in mix.
Step5.) Now to get that wide thick sound, you can apply 5ms delay to one of the guitar (either left or right) (mix 100%). This delay may not be necessary if you are recording guitars using two microphones because there is a natural delay captured between these microphones. However feel free to experiment with the sound.
Step6.) To even make it heavier, do not anymore apply reverb on any of the tracks (it is highly important that the reverb is from the room and amp based reverb that will be realized during the recording process). It is because if you start applying reverb on the guitar, it will tend to sound weak and far. Since you are mixing for rock, it is important to get the “in your face” guitar sound.
USEFUL REFERENCE: If you are looking for more information relating to Step1 to Step6, you can read the following tutorials:
Adding ambiance sound to your guitar recording
Properly adding reverb to your guitar
Step7.) EQ it properly, do not cut too much bass in the distorted guitar, it will help add the heaviness sound. As an example:
a.) Cut 1000Hz and 800 Hz at Q=1.4(start with -3dB then gradually increase until you get the desired sound) on any guitar to make sound so clean and avoid the cracking sound. For more EQ tips, you can read the next section of this tutorial.
b.) Cut 3000Hz with around -6dB and Q of 1.0 for both guitar tracks. This will improve the vocal clarity in the mix. Optionally for heavy rock and alternative music, you can start with -3dB to still get that strong mid-range guitar overdrive tone.
Step8.) Adjust track1 and track2 volume and stop when it is loud enough for the guitar tracks to be heard, not dominating the vocals. It is highly important to rely on your ears to decide whether the settings are working or not.
DEMO: Listen to a sample mix below applying the principles above:
More samples and illustration are available at my music licensing page.
General guidelines on mixing guitar in your home studio
The method or approach on mixing guitar tracks strongly depends on the way how the guitars are recorded. For example if the guitars are recorded clean or does not have any effects.
Bear in mind that having a well recorded guitar is as important as mixing the guitar. So make sure that the recording quality of the guitar that you are going to mix is superb. There is no way you can fix a poorly recorded guitar in your mix. Refer to the following tutorials above for details on how to record your guitar properly for a variety of applications. In the following situations, you can implement double tracking methods the way it has been described in the previous section. But more details are provided below.
Situation#1: Mixing approach when the guitars are recorded dry
There are two ways on doing this. First, it is assumed that the producer would want the guitars clean in the mix. There are instances where the guitar needs to sound dry as possible (no guitar overdrive effects for example) in the mix. If this is the case, the following are mixing suggestions:
a.) Panning– rhythm guitars are panned usually in the left and right. Typically between 50% to 100% (in both LEFT and RIGHT). The more bass content in the rhythm guitars (such as a power chord riff), the closer it will be to 50%.
Higher notes such as an arpeggio guitar would be comfortable sitting between 75% to 100% for both left and right channel in your mix.
b.) Compression – you can read the following compression guidelines on guitar here.
c.) EQ -clean guitar needs some equalization to give the best sound in the mix. Assuming you are mixing a track with bass guitars and vocals.
-6dB low shelf =increase bass guitar clarity
-6dB 1000Hz Q=2.0 = increase vocals clarity
+3dB 5000Hz Q=3.0 =increase the brilliance of the guitar strings
In some cases, such as recording a cheap steel string guitars; the high ends are so harsh and contains too much treble. You might want to filter that with a high shelf:
-3dB high shelf at 3000Hz
You will be using a parametric equalizer in implementing these settings.
The other reasons why the record producer are recording clean guitars is to use them in re-amping. This is a brilliant way of getting effects on your guitars directly in the mix. For details on this technique, you can read this tutorial on recording distorted guitar.
When mixing guitars done with re-amping, there are only two effects that can be applied in the mix. These are panning and EQ. Panning guitars done with re-amp are the same with clean guitars. Feel free to experiment as to what sounds great for your mix. EQ can be done in similar settings as well.
Situation#2: Mixing overdubbed guitars
In the mix, the objective is to create layers of guitar sound. This can be accomplished by panning them cleverly in the mix. Supposing you are mixing with two rhythm guitars. Since this is an overdub take. There are a total of 4 guitar recordings that you are going to mix, see below:
Rhythm guitar 1:
1.) Overdub guitar 1 take 1 —- > mono 24-bits/44.1KHz
2.) Overdub guitar 1 take 2 —- > mono
Rhythm guitar 2:
3.) Overdub guitar 2 take 1 —- > mono 24-bits/44.1KHz
4.) Overdub guitar 2 take 2 —- > mono
a.) Panning, you can put them in different location in the stereo field to bring in some nice blending effect, some suggestions below:
1.) Overdub guitar 1 take 1 —- > 50% LEFT
2.) Guitar 1 take 2 —- > 50% RIGHT
3.) Guitar 2 take 1 —- > 85% LEFT
4.) Guitar 2 take 2 —- > 85% RIGHT
Experiment with different panning settings and decide which sound best for your mix. If you have additional guitar tracks, you can pan them to unoccupied location in the stereo field, for example:
5.) Overdub guitar 3 take 1 — > 100% LEFT (hard left)
6.) Overdub guitar 3 take 2 — > 100% RIGHT (hard right)
b.) Compression -if the guitar is recorded with even volume and dynamics. It can benefit very little from audio compression. If dynamics is a very important factor in the overall guitar mix, you might need to skip compression or only apply a small amount of compression. Refer to the compression settings for clean guitar for details.
c.) EQ -as usual guitars done with overdubs will have similar EQ as the clean guitars. But blending with other instruments in the mix are crucial (for example, with bass guitar, vocals, etc.). Since overdub guitar mixing consists of different layers of guitars, clarity is very important or else your mix will not sound great. Refer to this beginner guide on complete EQ settings to start when doing audio mixing to know the EQ settings for other important instruments in the mix.
d.) Reverb– now that you are dealing with different layers of guitars in the mix. It is easy to be tempted and apply the same amount of reverb to each track. You will be surprised that won’t translate to a great sounding mix. The best approach would be to apply different amounts of reverb to different guitar tracks.
For those guitars that are panned closer to the center, it should have less reverb than those guitars that panned very far from the center. See the diagram below:
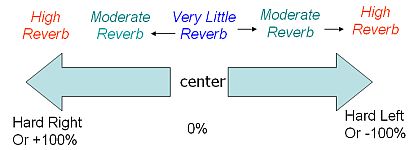
Panning and reverb
Situation#3: Mixing Solo or Classical Guitar
Classical guitar is intended to sound original and pure. If you are recording a solo guitar in a big live-sounding room. You won’t need to apply any effects on the mix. It is because the guitar sound is meant to be pure. Proper microphone placement could capture the natural reverberations of the environment so won’t need to apply reverb.
If you are recording the classical guitar using DI (not recommended), then you need to apply EQ and reverb (refer to the above tips) to make the sound captivating and lively. The primary reason is that when you are recording a classical guitar performance using DI method, the recorded sound is very dry.
Content last updated on June 21, 2012